This excellent content from the Hackaday writing crew highlights recurring topics and popular series like Linux-Fu, 3D-Printering, Hackaday Links, This Week in Security, Inputs of Interest, Profiles in Science, Retrotechtacular, Ask Hackaday, Teardowns, Reviews, and many more.
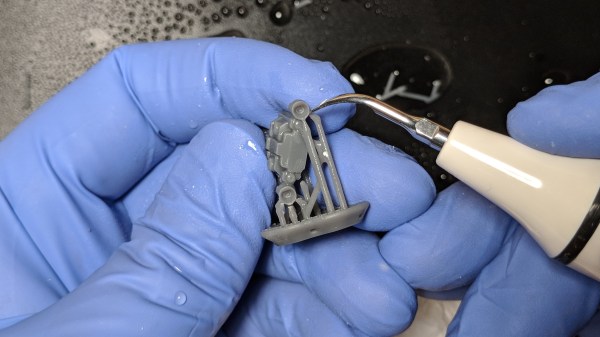
An ultrasonic knife is a blade that vibrates a tiny amount at a high frequency, giving the knife edge minor superpowers. It gets used much like any other blade, but it becomes far easier to cut through troublesome materials like rubber or hard plastics. I was always curious about them, and recently made my own by modifying another tool. It turns out that an ultrasonic scaling tool intended for dental use can fairly easily be turned into a nimble little ultrasonic cutter for fine detail work.
Cheap ultrasonic scaler. The blue disk is for adjusting power. Foot switch not shown.
I originally started thinking about an ultrasonic knife to make removing supports from SLA 3D prints easier. SLA resin prints are made from a smooth, hard plastic and can sometimes require a veritable forest of supports. These supports are normally removed with flush cutters, or torn off if one doesn’t care about appearances, but sometimes the density of supports makes this process awkward, especially on small objects.
I imagined that an ultrasonic blade would make short work of these pesky supports, and for the most part, I was right! It won’t effortlessly cut through a forest of support bases like a hot knife through butter, but it certainly makes it easier to remove tricky supports from the model itself. Specifically, it excels at slicing through fine areas while preserving delicate features. Continue reading “Making An Ultrasonic Cutter For Post-processing Tiny 3D Prints”→
Drop what you’re doing and get thee to thy workshop. This is the last weekend of the Hackaday Circuit Sculpture Contest, the perfect chance for you to exercise the creative hacker within by building something artistic using stuff you already have on hand.
The concept is simple: build a sculpture where the electronic circuit is the sculpture. Wire the components up in a way that shows off that wiring, and uses it as the structure of the art piece. Seven top finishers will win prizes, but really we want to see everyone give this a try because the results are so cool! Need proof? Check out all the entries, then ooh and ah over a few we’ve picked out below. You have until this Tuesday at noon Pacific time to get in the game.
wirez80 by Matseng
555 Spider by Sunny
Freeform RGB Atari Punk Console by Emily Valesco
These are just three awesome examples of the different styles we’ve seen so far in the contest. Who needs a circuit board for a retro computer? Most people… but apparently not [Matseng] as this Z80 computer is freformed yet still interactive.
Really there can’t be many things more horrifying than the thought of spider robots, but somehow [Sunny] has taken away all of our fears. The 555 spider project takes “dead bug” to a whole new level. We love the angles in the legs, and the four SMD LEDs as spider eyes really finish the look of the tiny beast.
Finally, the 3D design of [Emily Valesco’s] RGB Atari Punk Console is spectacular. It’s a build that sounds great, and looks as though it will hold up to regular use. But visually, this earns a place on your desk long after the punky appeal wears off. We also like it that she added a color-coded photograph to match up the structure to the schematic, very cool!
If you’re like me, chances are pretty good that you’ve been taught that all the elements of the modern computer user interface — programs running in windows, menus, icons, WYSIWYG editing of text documents, and of course, the venerable computer mouse — descended from the hallowed halls of the Xerox Corporation’s Palo Alto Research Center in the early 1970s. And it’s certainly true that PARC developed these technologies and more, including the laser printer and object-oriented programming, all of which would grace first the workplaces of the world and later the homes of everyday people.
But none of these technologies would have existed without first having been conceived of by a man with a singular vision of computing. Douglas Engelbart pictured a future in which computers were tools to sharpen the human intellectual edge needed to solve the world’s problem, and he set out to invent systems to allow that. Reading a Twitter feed or scanning YouTube comments, one can argue with how well Engelbart’s vision worked out, but there’s no arguing with the fact that he invented almost all the trappings of modern human-computer interaction, and bestowed it upon the world in one massive demonstration that became known as “The Mother of All Demos.”
It all started when I bought a late-1990s synthesizer that needed a firmware upgrade. One could simply pull the ROM chip, ship it off to Yamaha for a free replacement, and swap in the new one — in 2003. Lacking a time machine, a sensible option is to buy a pre-programmed aftermarket EPROM on eBay for $10, and if you just want a single pre-flashed EPROM that’s probably the right way to go. But I wanted an adventure.
Spoiler alert: I did manage to flash a few EPROMs and the RM1X is happily running OS 1.13 and pumping out the jams. That’s not the adventure. The adventure is trying to erase UV-erasable EPROMS.
And that’s how I ended up with a small cardboard fire and a scorched tanning lamp, and why I bought a $5 LED, and why I left EPROMs out in the sun for four days. And why, in the end, I gave up and ordered a $15 EPROM eraser from China. Along the way, I learned a ton about old-school UV-erasable EPROMs, and now I have a stack of obsolete silicon that’s looking for a new project like a hammer looks for a nail — just as soon as that UV eraser arrives in the mail.
Motors are not overly complex, but this one is downright simple. Carl Bujega has been working on a motor design that heavily relies on the capabilities of the printed circuit board (PCB) fabrication processes. His talk at the 2018 Hackaday Superconference covers how he built a brushless DC motor and speed controller into a PCB. You can watch the newly published video after the break.
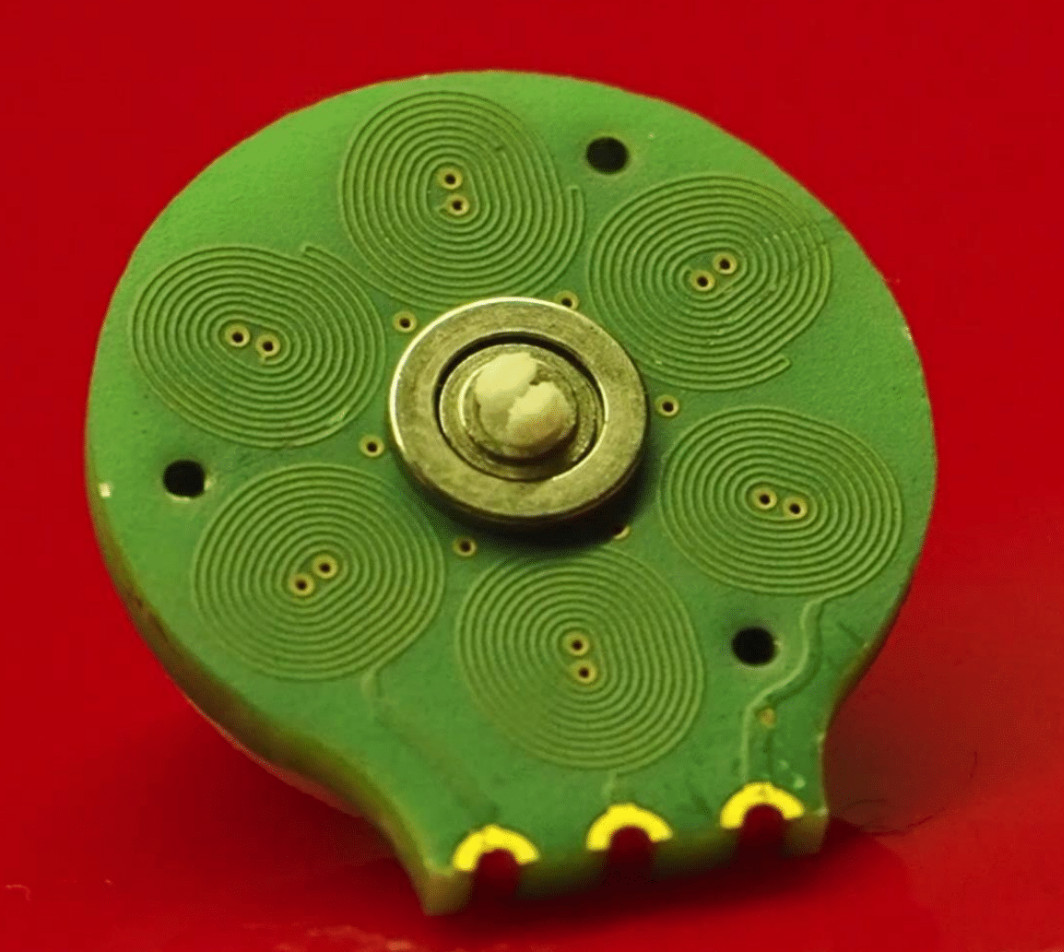
There are two main parts of an electric motor; the stator is stationary while the rotor spins on bearings. Electromagnetic forces are used to cause that spinning action. In this case, Carl has built the electromagnets as coils on a 4-layer circuit board (six coils on each layer). When electrified, a magnetic field is generated that pushes against the rare-earth magnets housed in the rotor.
A couple of things are really interesting here. First, those coils are usually made of “magnet wire” (enamel covered wire that is very thin) wrapped around an iron core. Using the circuit board instead saves both physical space, and the time and expense of wrapping coils of wire in the traditional way. Second, Carl has been designing with manufacture in mind; you can see in the image show that his motor design is dead-simple to assemble by inserting a 3mm bearing in the PCB, inserting magnets into the plastic rotor and snapping it into place. The end goal is to make robot actuators that are part of the circuit board itself.
The genesis of this idea came from Carl’s interest in drone design, in fact, he jumped right into a drone startup immediately after finishing his EE. The company didn’t last, but his thirst for interesting designs is ongoing. When looking at reducing the total parts necessary to build a quadcopter he happened on the idea of PCB-based coils and he’s followed it to this motor design, and beyond to some very interesting flexible-PCB robot design work which you can check out on his Hackaday.io page, YouTube, and Twitter.
There are of course some trade-offs to this. The motor is low torque since it uses an air core and not an iron core. And he’s had trouble implementing a sensor-less Electronic Speed Controller (ESC) as the back-EMF from the coils appears to be too weak. Not to fret, he added a hall sensor and has succeeded in designing an ESC that measures just 14mm by 8mm. In fact, he’s holding up the ESC and motor in the image at the top of this article!
The last few days have seen drone stories in the news, as London’s Gatwick airport remained closed for a couple of days amid a spate of drone reports. The police remained baffled, arrested a couple who turned out to be blameless, and finally admitted that there was a possibility the drone could not have existed at all. It emerged that a problem with the investigation lay in there being no means to detect a drone beyond the eyesight of people on the ground, and as we have explored in these pages already, eyewitness reports are not always trustworthy.
Not much use against a small and mostly plastic multirotor. Sixflashphoto [CC BY-SA 4.0]
Radar Can’t See Them
It seems odd at first sight, that a 21st century airport lacks the ability to spot a drone in the air above it, but a few calls to friends of Hackaday in the business made it clear that drones are extremely difficult to spot using the radar systems on a typical airport. A system designed to track huge metal airliners at significant altitude is not suitable for watching tiny mostly-plastic machines viewed side-on at the low altitudes. We’re told at best an intermittent trace appears, but for the majority of drones there is simply no trace on a radar screen.
We’re sure that some large players in the world of defence radar are queueing up to offer multi-million-dollar systems to airports worldwide, panicked into big spending by the Gatwick story, but idle hackerspace chat on the matter makes us ask the question: Just how difficult would it be to detect a drone in flight over an airport? A quick Google search reveals multiple products purporting to be drone detectors, but wouldn’t airports such as Gatwick already be using them if they were any good? The Hackaday readership never fail to impress us with their ingenuity, so how would you do it?
Can You Hear What You Can’t See?
It’s easy to pose that question as a Hackaday scribe, so to get the ball rolling here’s my first thought on how I’d do it. I always hear a multirotor and look up to see it, so I’d take the approach of listening for the distinctive sound of multirotor propellers. Could the auditory signature of high-RPM brushless motors be detected amidst the roar of sound near airports?
I’m imagining a network of Rasberry Pi boards each with a microphone attached, doing some real-time audio spectrum analysis to spot the likely frequency signature of the drone. Of course it’s easy to just say that as a hardware person with a background in the publishing business, so would a software specialist take that tack too? Or would you go for a radar approach, or perhaps even an infra-red one? Could you sense the heat signature of a multirotor, as their parts become quite hot in flight?
Whatever you think might work as a drone detection system, give it a spin in the comments. We’d suggest that people have the confidence to build something, and maybe even enter it in the Hackaday Prize when the time comes around. Come on, what have you got to lose!
Vacuum tubes fueled a technological revolution. They made the amplification of signals a reality for transatlantic telephone cables (and transcontinental ones too), they performed logic for early computers, and they delivered that warm fuzzy sound for high fidelity audio. But they were labor intensive to produce, and fragile, so semiconductors came along and replaced tubes in almost every application. But of course tubes are still with us and some tube applications are still critical — you’ll find them used in high-power RF and there are even satellites that depend on klystrons. So there are still experts in tube fabrication around, and Charles Alexanian is one of them. His newly-published talk at the 2018 Hackaday Supercon (found below) is a whirlwind tour of what goes into building a vacuum tube.
The process of building your own vacuum tube isn’t hard, but it’s not a walk in the park. The difficulty comes in the sheer number of processes, and the tricks of the trade found at every step. Charles’ methaphor is that if you build one tube at a time each step is like learning to ride a bicycle again, but if you build many you get into the swing of it and things go a lot better. His talk is a brief overview of everything, but if you want to drill down he also wrote an excellent article that goes further in depth.
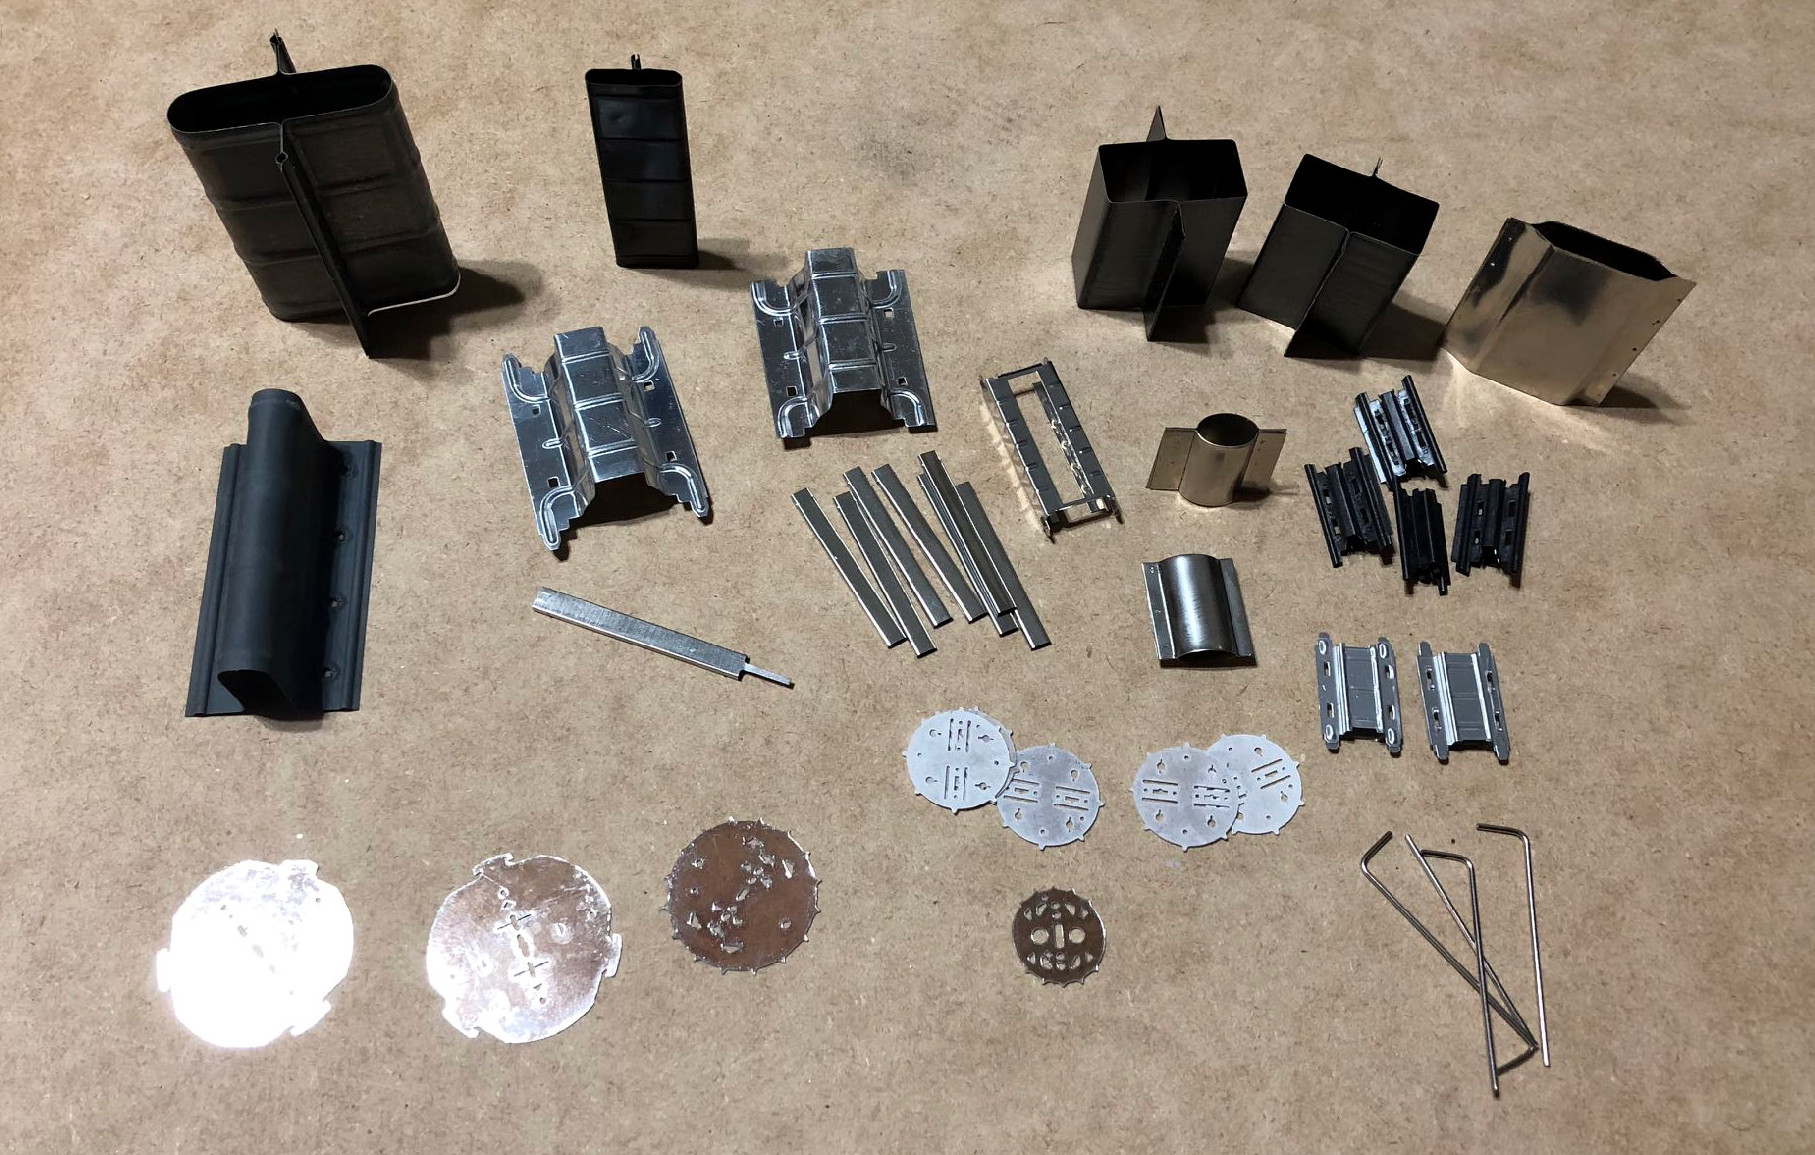
In the working components of each tube are the precision parts: the grid (or grids). For the tube to function well these must be accurately produced which can be done with photolithography, but Charles usually uses a winding process involving a lathe. After winding, the grid is stretched to straighten the nickel wire, then cut to length. Other components such as the plate are stamped using an arbor press and simple forms he fabricates for the purpose.
Tube sealing machine common in factories
Lathe setup used for 1-off tube sealing
Tube being tested for leaks
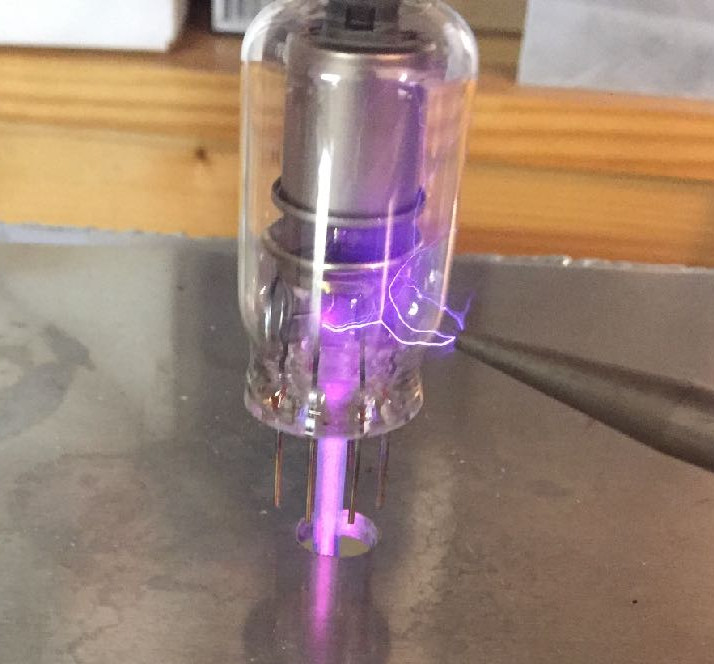
Two glass components are used, the dome itself, and feedthrough stems that have a wire for each lead passing through a glass disc. The components are spot welded to the inside portion of the feedthrough stem, then the glass is fused together, again using a lathe. It heads over to a pumping station to evacuate the air from the tube, and is finally tested for leaks using a handheld Tesla coil (see, we knew those weren’t just toys).
Charles proposed his Supercon appearance as a chance to fabricate tubes on-site. We loved the idea, but the amount of gear needed is somewhat prohibitive (annealing ovens, vacuum cabinets, torches for sealing, and the need for 220v, plus space for it all). That’s too bad since we were really hoping to see the Jolly Wrencher in Nixie-tube form — incidentally, Charles says Nixes are simple to make compared to amplifiers and switches. He also mentions that the majority of your time is spent “washing” parts to remove impurities. Fair enough, that part sounds boring, but we hope to endure it at some point in the future because vacuum tube fabrication demos feel very much like a Hackaday event!









![Not much use against a small and mostly plastic multirotor. Sixflashphoto [CC BY-SA 4.0]](https://hackaday.com/wp-content/uploads/2018/12/788px-KCMH_Radar.jpg)