Fail Of The Week: When The Epoxy-Coated Chip Is Conductive

Every once in a while, you’ll find some weirdness that will send your head spinning. Most of the time you’ll chalk it up to a bad solder joint, some bad code, or just your own failings. This time it’s different. This is a story of weirdness that’s due entirely to a pin that shouldn’t be there. This is a package for an integrated circuit that has a pin zero.

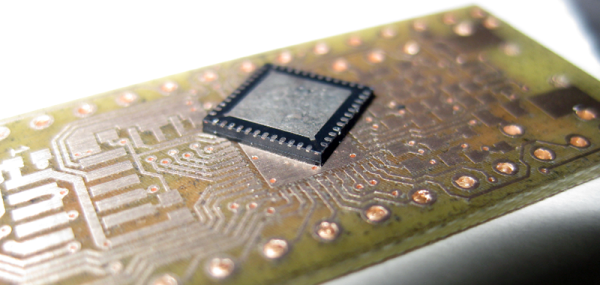
The story begins with [Erich] building a few development boards for the Freescale Kinetis K20 FPGA. This is a USB-enabled microcontroller, and by all accounts, a worthwhile effort. So far, so good. The problem with the prototype boards was soon apparent. On some of the boards, the external 32 kHz oscillator was not starting. Resoldering the oscillator or microcontroller sometimes solved the problem, but not always. This is troubling, because that means the issue isn’t code, and it’s not the PCB. This is going to take a deep dive and a good inspection microscope.
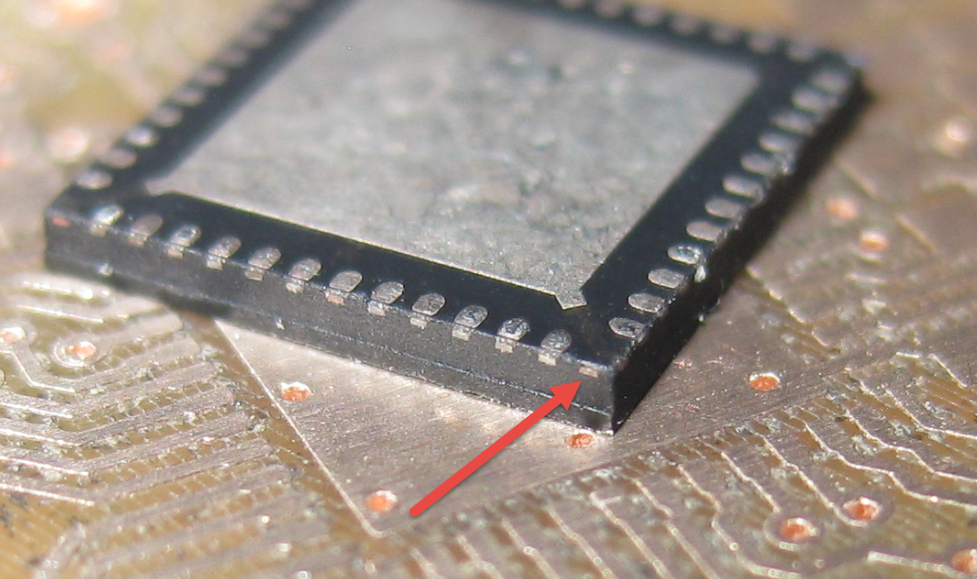
One of [Erich]’s friends, [Christian B] somehow found the problem. When the Freescale K40 is manufactured, the die is carefully laid in a chip carrier and coated with epoxy, putting it in a small QFN package. The problem is, there’s an extra connection sticking out of one corner of this chip. This is just an artifact of the chip carrier, but if you leave exposed metal connected to ground, something is eventually going to go wrong.

The best guess [Erich] has is that this additional connection is from the manufacturing and packaging process, with the exposed metal pad in this application being bridged to an adjacent pad. Now, if there’s one failure to [Erich]’s design, it’s that the trace comes out of the pin on the adjacent pad at 90 degrees; this isn’t a best practice, but most of the time you can get away with it. This time, though, somebody got burned.

We don’t know how [Christian] ever found this issue. When you look at a tiny QFN package, you don’t expect there to be an extra pin attached to ground that can be easily bridged with a bit of solder paste. It’s either a lot of luck or skill to find this problem, but it’s a great example of the weird things you have to look out for.


Hackaday Links Column Banner

Hackaday Links: November 18, 2018

The greatest bit of consumer electronics is shipping and the reviews are out: Amazon’s Alexa-enabled microwave is a capable microwave, but befuddling to the voice-controlled-everything neophyte. Voice controlled everything is the last hope we have for technological innovation; it’s the last gasp of the consumer electronics industry. This is Amazon’s first thing with a built-in voice assistant, and while this is a marginally capable microwave at only 700 Watts — fine for a college dorm, but it’s generally worth shelling out a bit more cash for a 1000 Watt unit — the controls are befuddling. The first iteration is always hard, and we’re looking forward to the Amazon Alexa-enabled toaster, toothbrush, vacuum cleaner, and Bezos shrine.

Need a laser cutter, like crowdfunding campaigns, and know literally nothing about laser cutters? Have we got something for you. The Etcher Laser crowdfunding campaign has been pinging my email non-stop, and they’ve got something remarkable: a diode laser cutter engraver for $500. It comes in a neat-looking enclosure, so it’s sure to raise a lot of money.

A while back [Paulusjacobus] released an Arduino-based CNC controller for K40 laser cutters. There were a few suggestions to upgrade this to the STM32, so now this CNC controller is running on a Blue Pill. Yes, it’s great and there’s more floating points and such and such, so now this project is a Kickstarter project. Need a CNC controller based on the STM32? Boom, you’re done. It’s also named the ‘Super Gerbil’, which is an awesome name for something that is effectively a GRBL controller. Naming things is the hardest problem in computer science, after all.

The Gigatron computer is a ‘home computer’ without a microprocessor or microcontroller. How does it do this? A metric butt-load of ROM and look-up tables. This is cool and all, but now the Gigatron logo is huge. we’re talking 18 μm by 24 μm. This was done by etching a silicon test wafer with electron beam lithography.

FPGA Testbenches Made Easier

You finally finish writing the Verilog for that amazing new DSP function that will revolutionize human society and make you rich. Does it work? Your first instinct, of course, is to blow it into your FPGA of choice and see if it works. If it does, that was a great idea. If it doesn’t, it was a terrible idea because — typically — it is hard to look inside the FPGA. That’s why you’ll typical simulate your logic on a desktop computer before you commit it to the FPGA. But that means you have to delay gratification long enough to write a testbench — a piece of hardware description language (HDL) code that exercises the function you wrote. In this post I’ll show you a small piece of software that can read your Verilog module and automatically create most of a testbench for you. The code originally came from GitHub, but I wanted to make some changes to it, so I forked it and I’ll tell you about the changes I made. This isn’t specific to a particular FPGA. Any Verilog project can use the tool to generate a simple starter testbench.

Writing a testbench isn’t that hard. You usually use the same language you wrote the original code in but since it won’t reside in silicon, you can do things in the simulator that you can’t get away with in code that you’ll synthesize. However, it is a bit painful to have to always write more or less the same code, especially if you have a lot of modules you want to test. But it is a good idea to test small modules before linking them together and then test them linked together, too. With this little Python script, it is very easy to generate a simple testbench and then further elaborate it. It isn’t life-changing, but it does save some time. If you want to try this out, you’ll need something to run the Python script on, of course. You also need a Verilog simulator or you can use EDA Playground to try all this out in your browser.

Continue reading “FPGA Testbenches Made Easier” →

An In-Depth Look At Dexter, The Robotic Arm

Dexter, a really great robot arm project, just won top honors in the 2018 Hackaday Prize, and walked away with $50,000 toward continuing their project. As a hat tip to Hackaday and the community, Haddington Dynamics, the company behind Dexter, agreed to open-source their newest version of Dexter as well. As James Newton said when accepting the trophy during the award ceremony, “because of your faith in us, because of this award, we have been moved to open-source the next generation of Dexter.” Some very clever work went into producing Dexter, and we can’t wait to see what further refinements have been made!

Dexter isn’t the only robotic arm in town, by any means. But in terms of hobbyist-level robotics, it’s by far the most complete robot arm that we’ve seen, and it includes a couple of design features that make both its positional accuracy and overall usability stand out above the rest. This is a robot arm with many of the bells and whistles of a hundred-thousand dollar robot, but on a couple-thousand dollar budget. Continue reading “An In-Depth Look At Dexter, The Robotic Arm” →

3D Printering: Blender Tips For Printable Objects

3D models drawn in Blender work great in a computer animated virtual world but don’t always when brought into a slicer for 3D printing. Slicers require something which makes sense in the real world. And the real world is far less forgiving, as I’ve found out with my own projects which use 3D printed parts.

Our [Brian Benchoff] already talked about making parts in Blender with his two-part series (here and here) so consider this the next step. These are the techniques I’ve come up with for preparing parts for 3D printing before handing them off to a slicer program. Note that the same may apply to other mesh-type modeling programs too, but as Blender is the only one I’ve used, please share your experiences with other programs in the comments below.

I’ll be using the latest version of Blender at this time, version 2.79b. My printer is the Crealty CR-10 and my slicer is Cura 3.1.0. Some of these steps may vary depending on your slicer or if you’re using a printing service. For example, Shapeways has instructions for people creating STLs from Blender for uploading to them.

Continue reading “3D Printering: Blender Tips For Printable Objects” →

Friday Hack Chat: All About Crypto

What is crypto? Crypto means ‘hidden’, and it’s meant ‘hidden’ since before the Greek alphabet was written, but don’t let that stop you from arguing. For this week’s Hack Chat, we’re going to be talking all about cryptography, a medium of exchange for secrets. If you need confidentiality, integrity, or authenticity, you need cryptography.

Our guest for this week’s Hack Chat will be none other than Nick Sayer. Nick is a frequent attendee of the Hackaday meetups and he’s been building gadgets and gizmos and selling them on Tindie for years now. He’s given talks on design for manufacturing. This year, he designed and developed the Orthrus, an appliance that creates a cryptographically secured USB volume from two microSD cards. Basically, it’s like the Captain Planet team, only instead of rings, you need all the SD cards, and instead of Captain Planet, you summon your data.

For this week’s Hack Chat, we’re going to sit down with and talk about all things cryptography, including understanding what you need, what you don’t, and picking the correct tools. Items of interest will include:

  • When cryptography is needed
  • Cryptography tools
  • The best practices for cryptography

You are, of course, encouraged to add your own questions to the discussion. You can do that by leaving a comment on the Cryptography Hack Chat and we’ll put that in the queue for the Hack Chat discussion.

join-hack-chat

Our Hack Chats are live community events on the Hackaday.io Hack Chat group messaging. This week we’ll be sitting down on Friday, November 16th, at noon, Pacific time. If time zones got you down, we have a handy time zone converter.

Click that speech bubble to the right, and you’ll be taken directly to the Hack Chat group on Hackaday.io.

You don’t have to wait until Friday; join whenever you want and you can see what the community is talking about.

Hack My House: Opening Raspberry Pi To The Internet, But Not The Whole World

If you’ve followed along with our series so far, you know we’ve set up a network of Raspberry Pis that PXE boot off a central server, and then used Zoneminder to run a network of IP cameras. Now that some useful services are running in our smart house, how do we access those services when away from home, and how do we keep the rest of the world from spying on our cameras?

Before we get to VPNs and port forwarding, there is a more fundamental issue: Do you trust your devices? What exactly is the firmware on those cheap cameras really doing? You could use Wireshark and a smart switch with port mirroring to audit the camera’s traffic. How much traffic would you need to inspect to feel confident the camera never sends your data off somewhere else?

Thankfully, there’s a better way. One of the major features of surveillance software like Zoneminder is that it aggregates the feeds from the cameras. This process also has the effect of proxying the video feeds: We don’t connect directly to the cameras in order to view them, we connect to the surveillance software. If you don’t completely trust those cameras, then don’t give them internet access. You can make the cameras a physically separate network, only connected to the surveillance machine, or just set their IP addresses manually, and don’t fill in the default route or DNS. Whichever way you set it up, the goal is the same: let your surveillance software talk to the cameras, but don’t let the cameras talk to the outside world.

Edit: As has been pointed out in the comments, leaving off a default route is significantly less effective than separate networks. A truly malicious peice of hardware could easily probe for the gateway.

This idea applies to more than cameras. Any device that doesn’t need internet access to function, can be isolated in this way. While this could be considered paranoia, I consider it simple good practice. Join me after the break to discuss port forwarding vs. VPNs.

Continue reading “Hack My House: Opening Raspberry Pi To The Internet, But Not The Whole World” →