This excellent content from the Hackaday writing crew highlights recurring topics and popular series like Linux-Fu, 3D-Printering, Hackaday Links, This Week in Security, Inputs of Interest, Profiles in Science, Retrotechtacular, Ask Hackaday, Teardowns, Reviews, and many more.
This is a solution to global warming. This solution will also produce electricity, produce rain in desertified areas, and transform the Sahara into arable land capable of capturing CO2. How is this possible? It’s simple: all we need to do is build a five-kilometer tall, twenty-meter wide chimney. Hot air, warmed by the Earth’s surface, will enter the base of the chimney and flow through turbines, generating electricity. From there, air will rise through the chimney, gradually cooling and transferring energy from the atmosphere at Earth’s surface to five kilometers altitude. This is the idea behind the Super Chimney, It’s an engineering concept comparable to building a dam across the Strait of Gibraltar, a system of gigantic mirrors in Earth’s orbit, or anything built under an Atoms for Peace project. In short, this is fringe engineering.
This is also, ‘saving the world with wacky waving inflatable arm flailing tube men.’
The idea of building tens of thousands of fabric chimneys, placing them all around the globe, and cooling the Earth while sequestering carbon dioxide is fantastic. Ideas are simple, implementation is something else entirely. There are also obvious problems with the physics presented in the Super Chimney presentation, but these problems don’t actually make a Super Chimney impossible. We need more eyes on this, so we’re opening this one up as an Ask Hackaday. What do you think of this audacious scheme, and is it even possible?
I have storage on the mind, and it comes from two facts in my life:
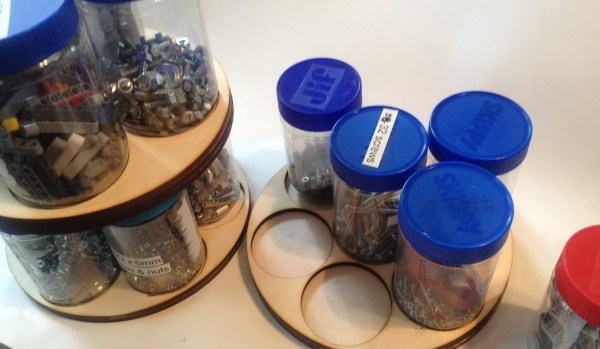
First, I have tons of stuff in my workshop, far too much for the amount of space I have. A lot of this material is much easier to use if it’s well-organized. Think electronics, robotics, building sets. Modular parts that need to go together a certain way for them to be useful. It is imperative, therefore, that I come up with some sort of organization system to keep the chaos in check.
Second, my favorite tool is the laser cutter, born from my love for building vector designs. I can do art on the computer and have it manufactured in front of my eyes, and share my designs with someone else who can remix it into something even cooler.
So with those two facts in mind, I set about creating a modular storage system in Inkscape and cutting out the design from pine boards using a laser cutter. Let us go on a journey through my thought process:
Microcontrollers today are much more powerful and much more capable than the 8051s from back in the day. Now, they have awesome peripherals and USB device interfaces. It’s about time a slightly more modern language was used to program these little chips.
During this Friday’s Hack Chat, we’re going to be talking about JavaScript on microcontrollers. [Gordon Williams] will be joining us to talk about Espruino. This is a tiny JavaScript interpreter that runs on the little embedded chips, has a debug interface, and allows you to program your board on any platform without any external programming hardware.
[Gordon] is the key developer of Espruino, and so far he’s launched a full-sized Espruino, and a pico Espruino on Kickstarter, both with amazing success. The software stack has been extremely popular as well — it’s been ported to the ESP8266 and dozens of other microcontrollers that will soon be in the Internet of Things.
During the Hack Chat, we’ll be discussing interpreted languages on microcontrollers, interpreter design and optimization, with a special emphasis on creating devices with Espruino and putting Espruino boards on the Internet with WiFi, Bluetooth, and other crazy radios. As always, we have a spreadsheet open to everyone if you’d like to ask a question.
Here’s How To Take Part:
Our Hack Chats are live community events on the Hackaday.io Hack Chat group messaging. Hack Chats are mostly, usually, and this week noon, Pacific time on Friday. Here’s a time and date converter!
Log into Hackaday.io, visit that page, and look for the ‘Join this Project’ Button. Once you’re part of the project, the button will change to ‘Team Messaging’, which takes you directly to the Hack Chat.
You don’t have to wait until Friday; join whenever you want and you can see what the community is talking about.
What does body building, anti-aging cream and Bleomycin (a cancer drug) have in common? Peptides of course! Peptides are large molecules that are vital to life. If you were to take a protein and break it into smaller pieces, each piece would be called a peptide. Just like proteins, peptides are made of amino acids linked together in a chain-like structure. Whenever you ingest a protein, your body breaks it down to its individual amino acids. It then puts those amino acids back together in a different order to make whatever peptide or protein your body needs. Insulin, for instance, is a peptide that is 51 amino acids long. Your body synthesizes insulin from the amino acids it gets from the proteins you eat.
Peptides and small proteins can be synthesized in a lab as well. Peptide synthesis is a huge market in the pharmaceutical and skin care industry. They’re also used, somewhat shadily, as a steroid substitute by serious athletes and body builders. In this article, we’re going to go over the basic steps of how to join amino acids together to make a peptide. The chemistry of peptide synthesis is complex and well beyond the scope of this article. But the basic steps of making a peptide are not as difficult as you might think. Join me after the break to gain a basic understanding of how peptides are synthesized in labs across the world, and to establish a good footing should you ever wish to delve deeper and make peptides on your own.
Foam core, dollar tree foam board, Adams foam board, or whatever we’re calling a thin sheet of foam sandwiched between two pieces of poster board, is an invaluable hacker’s tool. Everyone should have a few sheets on hand, and not just because each sheet is a dollar each at any Dollar Store. [Eric] has been working on a technique to create compound curves in foam board, and the results look great. It’s a true three-dimensional plane with weird curves, and certainly has applications for something.
The Apollo Lunar Module is the first, and only manned space-only spacecraft ever made. The design of this spacecraft isn’t constrained by trivialities like ‘atmosphere’, and the design didn’t need ‘bulkheads thicker than a stack of paper towels’. It is a beautiful ship, and now a company wants to produce a gorgeous 1/32 scale model of the LEM. The goal is $25k, which is quite high for the real space modeling market, but if this GoFundMe campaign succeeds, this will be one of the finest real space models ever created. It’ll also match the scale of the 1/32 Revell CSM.
Speaking of Apollo-related technology, here’s a slight bit of drama. [Fran] has been working on recreating the DSKY — the user interface for the Apollo Guidance Computer — for a few years now. She’s set up a crowdfunding campaign to recreate the electroluminescent, screen printed segment display, and things are going great. Now there’s a company selling commercial DSKYs (with a stupid TFT display), that potentially uses the same art. Is this copyright infringement? Maybe, but probably not. It is a dick move not to credit [Fran], though.
There’s a complete solar eclipse happening across the United States tomorrow. Many schools should have started classes by then, but they’re calling tomorrow a snow day. Everyone who is traveling to see the eclipse is probably already where they’re going to be, and there are clouds on the horizon. Literal clouds. Everyone is watching the weather channel to see what the cloud cover will be tomorrow. Some people don’t have to worry: [Dan] is building a high-altitude balloon to get 100,000 feet above any clouds. There’s a 360° camera onboard, and the resulting video will be awesome. At least one person in Charleston will be renting a plane; I question the wisdom of renting a 172 over a Piper or Cirrus or another low-wing plane, but whatever. If you’re working on a project that will look at the eclipse from above the clouds, leave a note in the comments. For those of you looking at clouds tomorrow, Hackaday is doing another eclipse meet up on the Pacific coast of Mexico on April 8, 2024.
If you sign up for a European hacker camp such as CCC Camp in Germany or SHA Camp in the Netherlands, you’ll see among the items recommended to take with you, a DECT handset. DECT, or Digital Enhanced Cordless Telecommunications, refers to the set of standards that lie behind the digital cordless telephones that are ubiquitous across Europe and some countries elsewhere in the world. These standards cover more than just the simple two-way telephone calls through a base station that most Europeans use them for though, they define a fully functional multi-cell 3G phone and data networking system. This means that an event like SHA Camp can run its own digital phone network without having to implement cell towers.
Olivetti promotional Net3 image
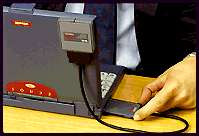
Reading the history of DECT, there is the interesting snippet that the first DECT product on the market in 1993 was not a telephone but a networking device, and incidentally the first wireless LAN product on the European market. Olivetti’s Net3 provided 512kB/s wireless networking to a base station with Ethernet or Token Ring interfaces for connection to a LAN. In its original form it was an internal card for a desktop PC coupled to a bulky external box containing radio circuitry and antenna, but its later incarnations included a PCMCIA card with a much smaller antenna box. The half-megabit speed seems tiny by today’s standards, but in the pre-multimedia world of 1993 would have been perfectly adequate for a Novell Netware fileserver and an HP Laserjet 4.
[Heinz Wolff] swallows a condom in another Olivetti promotional image.
Mystery Technology
So DECT is an interesting technology that can do more than just a simple cordless phone, and its first product was unexpectedly somewhat groundbreaking. It then becomes even more interesting to find that Net3 has left very little evidence of itself to find that can be found on the Web, and learning more about it requires a little detective work.
The Wikipedia entry has the bare bones, but it speaks volumes about the obscure nature of the product that the encyclopedia’s only picture of it is a tiny thumbnail-sized promotional image of the PCMCIA variant in a chunky mid-1990s laptop. A further search reveals a 1993 British Olivetti staff newsletter (PDF) carrying another promotional image of the desktop Net3 device featuring the then-well-known TV personality and academic [Heinz Wolff] demonstrating the technology bizarrely by swallowing a DECT medical instrumentation transponder wrapped in a condom. Some press releases remain in the fossilized remnants of the 1990s internet, and a Net3 design team member’s LinkedIn page led us to the patent covering the system, but that’s pretty much it. We can’t even find a high enough resolution image of a Net3 card for our featured image slot.
Wireless Things Before Their Time
It’s obvious that Net3 and DECT networking as a high-end wireless LAN before a need for wireless LANs existed never made it, but what is perhaps more interesting is that it seems to have left no legacy for other more mundane applications. We are in the midst of an explosion of hype around the Internet of Things and it seems new short-range wireless networking technologies appear almost daily, yet the world seems to have overlooked this robust, low power, and mature wireless network with its own dedicated frequency allocation that many of us already have in our homes. It seems particularly surprising that among the many DECT base stations on sale at your local consumer electronics store there are none with an Internet connection, and there is no market for IoT devices that use DECT as their backhaul.
In the open-source community there has been some work on DECT. The OsmocomDECT project for example provides a DECT software stack, and deDECTed.org states an aim to “better understand DECT and its security and to create an Open Source implementation of the DECT standard”. But there seems to have been very little hardware work in our community on the standard, for example there are no DECT-specific projects on Hackaday.io.
Net3 then was a product before its time, a herald of what was to come, from that twilight period when the Web was definitely a thing but had yet to become the world’s universal information repository. Public wireless networking was still several years in the future, so there was no imperative for road warriors to equip themselves with a Net3 card or for computer manufacturers — not even Olivetti themselves! — to incorporate the technology. It thus didn’t take the world by storm, and unusually for such a ground-breaking computer product there remains little legacy for it beyond a rarely-used feature of the protocol Europeans use for their cordless phones.
Did you have a Net3 card? Do you still have one? Let us know in the comments.
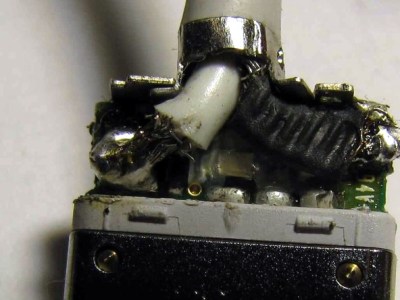
So I made an awful, kludgey, “there I fixed it” level repair, and I need to come clean. This is really a case of an ill-advised ground.
My thirteen-year-old daughter asked for help repairing her Macbook charging cable. Macbook chargers really aren’t meant to flex around a lot, and if you’re the kind of person who uses the laptop on, well, the lap, with the charger in, it’s gonna flex. Sooner or later the insulation around the plug housing, where it plugs into the laptop, cracks and the strands of wire can be seen. This type of cable consists of an insulated lead wire surrounded by a stranded ground wire. The problem with this configuration is that the stranded ground also gets flexed until it breaks, one strand at a time, until the cable stops working.
So it was with my daughter’s Macbook cable. I didn’t have the money to buy her a new one, and I figured we could repair the break. We busted out her WLC100 and sat down to get our solder on. She started off working while I supervised, then I took over later on.
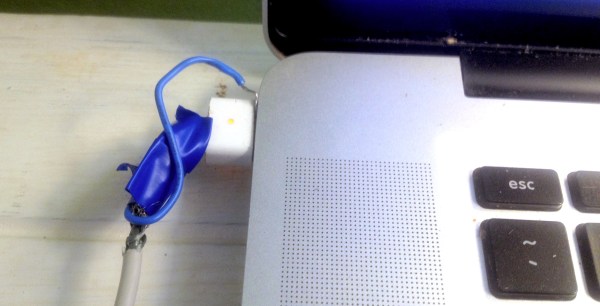
We began by using an Xacto to cut away enough insulation to expose about half an inch of the stranded wire. We pulled the wire away from the insulated lead wire and twisted it into a single stranded wire parallel to the lead wire. Grabbing for the iron, we tinned the ground and soldered a length of 22-gauge solid wire to it. The way the ground connects to the plug is by passing through a conductive ring. My idea was to solder the other end of the 22-gauge wire to the metal ring. Here’s where things started to go wrong. This is, by the way, the part where I took over so you can blame me and not my kid.
My daughter was using the WLC100’s default tip. I should have grabbed my own iron, a WES51, or at least swapped in its ninja-sharp tip. The WLC100’s default tip is a big fat wedge and it was too big to put next to the plug, and the conductive ring quickly got covered in melted plastic and I couldn’t solder anything to it. Worse, I had accidentally burned through the insulation protecting the lead wire, and had to cover it in electrical tape.
What now? We were left with not being able to use the cable at all. One option was to wait until the goop had cooled and burnish it clean with a Dremel, then attempt to re-solder using an appropriate tip. However, that sounded like a lot of work. The solid wire was still securely soldered to the ground, so instead of trying to attach it to the cable side of the plug, I could connect it to the computer side, by shoving it into the socket alongside the plug. The business end of the plug has a big silver ground surrounding small gold positive leads, and touching the ground with the wire should work just fine, right?
It did. The computer charged up as happy as you’d like. And yet, I was left with the distinct feeling the solution could have been, I don’t know, cleaner. Certainly, the iFixit route shown here comes out much cleaner by sliding off the housing, clipping the damaged wire, and beginning anew. Clean as this is, it’s just waiting to happen the same way again.
So, brethren and sistren, lay on with brickbats and tell what I did wrong. What approaches have you used to fix cables broken where they meet the plug housing, and how do you improve the situation for the future?