This excellent content from the Hackaday writing crew highlights recurring topics and popular series like Linux-Fu, 3D-Printering, Hackaday Links, This Week in Security, Inputs of Interest, Profiles in Science, Retrotechtacular, Ask Hackaday, Teardowns, Reviews, and many more.
The BBC has commissioned a new series of Robot Wars. This is not Battlebots; that show was revived last year, and a second season will air again this summer. Robot Wars is the one with the ‘house’ robots. We would like to take this opportunity to remind the BBC that Robot Wars is neither Scrapheap Challenge nor Junkyard Wars, and by virtue of that fact alone is an inferior show.
Here’s your monthly, ‘WTF is this thing on eBay’ link. It’s a clamshell/toilet seat iBook (c.2000), loaded up with an Intel i5 Broadwell CPU, 128 GB of Flash storage, 4 GB of RAM, a 12″ 1024×768 LCD, Gigabit Ethernet, WiFi, Bluetooth, and runs OS X El Capitan. I might be mistaken, but it looks like someone took the motherboard out of a 2015 MacBook Air, crammed it into a sixteen year old computer, and put it up on eBay. I’m not saying that’s what it is; this is from China, and there are people over there making new improved motherboards for a Thinkpad x61. Weirder stuff has already happened.
In the last installment of the Travelling Hacker Box, I asked if anyone can receive mail in Antarctica. A person with friends in the British survey team emailed me, but nothing came of that. It’s summer, so if Antarctica is going to happen, it needs to happen soon.
Ultrasound refers to any audio signal above the range of human hearing. Generally that’s accepted as 20 kHz and up. Unlike electromagnetic signals, ultrasonics are still operating in a medium – generally the air around us. Plenty of animals take advantage of ultrasonics every day. So do hackers, makers, and engineers who have built thousands of projects based upon these high frequency signals. This weeks Hacklet is all about the best ultrasonic projects on Hackaday.io!
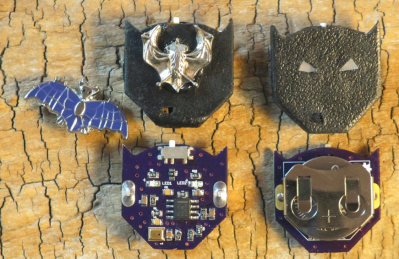
We start with [spambake] and World’s Smallest Bat Detector. [Spambake] is interested in bats. These amazing creatures have poor eyesight, but that doesn’t slow them down. Bats use echolocation to determine their surroundings. Ultrasonic chirps bounce off obstacles. The bat listens to the echos and changes its flight path accordingly. While we can’t hear most of the sounds bats make, electronics can. [Spambake] cooked this circuit up starting with a MEMs microphone. These microphones pick up human sounds, but unlike our ears, they can hear plenty above the 20 kHz range. The audio signal is passed through an amplifier which boosts the it up around 10,000 times. The signal is filtered and then used to trigger LEDs that indicate a bat is present. The final circuit works quite well! Check out [spambake’s] video to see the bat detector in action!
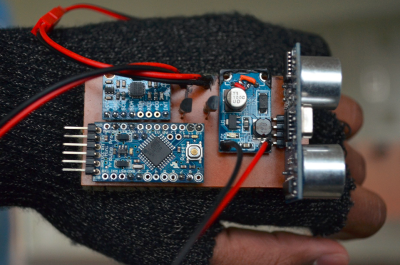
Next up is [Neil Movva] with Pathfinder – Haptic Navigation. Pathfinder uses ultrasonic transducers to perform echolocation similar to bats. The received data is then passed on to a human wearer. [Neil’s] idea is to use Pathfinder to help the visually disabled and blind navigate the world around them. Pathfinder was a 2015 Hackaday Prize finalist. The ultrasonic portion of Pathfinder uses the ubiquitous HC-SR04 distance sensor, which can be found for as little as $2 USD on eBay and Alibaba. These sensors send out a 60 kHz signal and listen for the echos. A microcontroller can then measure the time delay and determine the distance from the sensor to an obstacle. Finally the data is passed on to the user by a vibrating pager motor. [Neal] was kind enough to give a talk about Pathfinder at the 2015 Hackaday SuperCon.
[HoboMunching] likes his ultrasonic devices ultra powerful, and that’s just what he’s got with Ultrasonic Levitation Rig. Inspired by a similar project from Mike, [HoboMunching] had to build his own levitation setup. Ultrasonic levitation used to be a phenomenon studied only in the laboratory. Cheap transducers designed for the industrial world have made this experiment practical for the home hackers. [HoboMunching] was able to use his rig to levitate up to 8 tiny balls on the nulls between the 28.5 kHz sound waves produced by his transducer. The speed of sound can be verified by measuring the distance between the balls. Purists will be happy to hear that [HoboMunching]’s circuit was all based upon the classic 555 timer.
Finally we have [Alan Green] with Ultrasonic Directional Speaker V1. Most audio signals are not very directional, due to wavelength and practical limitations on speaker size. Ultrasonics don’t have this limitation. Couple this with the fact that ultrasonic signals can be made to demodulate in air, and you have the basis for a highly directional speaker setup. “Sound lasers” based on this system have been around for years, used in everything from targeted advertising to defensive weapons. [Alan] is just getting started on this project. Much of his research is based upon [Joe Pompei’s] work at the MIT media lab. [Alan] plans to use an array of ultrasonic transducers to produce a directional signal which will then demodulate and be heard by a human. This project has a hard deadline though: [Alan] plans to help his son [Mitchell] with a musical performance that is scheduled for May, 2016. The pair hope to have a prototype in place by March.
If you want to see more ultrasonic projects, check out our new ultrasonic projects list! If I missed your project, don’t be shy! Just drop me a message on Hackaday.io. That’s it for this week’s Hacklet. As always, see you next week. Same hack time, same hack channel, bringing you the best of Hackaday.io!
I’m writing a series of articles on resin casting as an extension to my experiences with the instructions found in the wonderful Guerrilla Guide. However, mistakes were made. Having run out of my usual mold release I went to a back-up jar that was lying around from a casting project long, long ago in a workshop far, far away.
Never much for readin’ the nutrition facts myself.
I’m refining a technique of making a mold the quick and dirty way. Everything was going well, the sprues looked good and the master released from the silicone. It was time to do the second half of the mold. As usual I applied a generous amount of mold release. Since it was the first time this mold was to be used I went ahead and did all the proper steps. Rubbing off the dried release and applying a few more coats just to be sure.
I was completely unaware that I was applying mold release designed for urethane molds only. In other words I thoroughly covered my silicone mold in silicone bonding agents. I remained unaware until trying to separate the halves of the mold and found them thoroughly joined. After going through the stages of grief I finally figured out where it all went wrong.
Oh well. I’m ordering some of my regular pick, Stoner A324, and that should do the trick. There’s also Mann- Ease Release 200. While having probably the best name a release agent can have, it doesn’t work as well and needs approximately 100 years to dry. After this setback I’d rather just, grudgingly, learn my lesson and order the correct thing.
Oh. Yes I see. Urethane… Urethane…
So now that we know the right way to fix this is to order the right product, is there a hack to get around it? Does anyone have a homebrew trick for release agent that can be used in a pinch? Leave your comments below.
Léon Theremin built his eponymous instrument in 1920 under Soviet sponsorship to study proximity sensors. He later applied the idea of generating sounds using the human body’s capacitance to other physical forms like the theremin cello and the theremin keyboard. One of these was the terpsitone, which is kind of like a full-body theremin. It was built about twelve years after the theremin and named after Terpsichore, one of the nine muses of dance and chorus from Greek mythology.
Recently I’ve been learning more about classic analog music synthesizers and sequencers. This has led me to the Baby10, a classic and simple analog sequencer design. In this article I’ll introduce its basic operation, and the builds of some awesome hackers based on this design.
Sequencers produce, a sequence of varying voltages. These control voltages (CV) can then be use to control other components. Often this is a simple tone generator. While the concept is simple, it can produce awesome results:
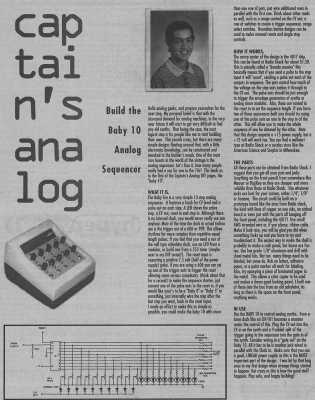
A basic sequencer is a great beginners project. It’s easy to understand the basic operation of the circuit and produces a satisfyingly entertaining result. The Baby 10 was originally published in a column called “Captain’s Analog”, but has now been widely shared online.
The original Baby10 article.
The circuit uses the 4017, a simple CMOS decade counter. The 4017 takes an input clock signal then sequentially outputs a high pulse on each of 10 output pins. As such, the 4017 does almost everything we need from a sequencer in a single IC! However, we want our sequencer to output a varying voltage which we can then use to generate differing tones.
To accomplish this variable resistors are connected to each of the output pins. A diode in series with the variable resistor stops the outputs fighting against each other (in layman’s terms).
To make the sequencer more visually attractive (and give some feedback) LEDs are often also added to the output of the 4017. A complete Baby 10 sequencer is shown in the schematic below. The original circuit used 1N917s, these are no longer available but the part has been replaced by the 1N4148.
Perhaps the tolerances on today’s hobbyist machines just aren’t good enough for you, or perhaps the work area is just too cramped. Either way, there are times when an off-the-shelf solution just wont fit your needs, and you resolve to build your own CNC machine. Fortunately, none of us are alone in this endeavor because hobbyists have been building their own automation equipment for years. Whether you’re talking building the machine, generating the G-code, or interpreting that G-code into motor signal pulses, the DIY CNC community has evolved a sophisticated set of tools aimed at getting the job done. I thought I’d take a tour of some of the hobbyist’s tools that hallmark 2016 as the best year yet to build your CNC machine.
Hardware
In the last few years, affordable extruded profiles and brackets have made leaps and bounds to satisfy a hungry DIY 3D printer community. Beyond 3D printers, these beams and brackets are a good start for some of our needs in the world of linear motion control. Here’s a quick look at a few components off-the-shelf.
Makerslide Extruded Profiles
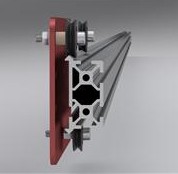
Unless you’ve discovered a deal on eBay or AliExpress, building up a machine from precision linear rails can be a pricey ordeal. Linear rails offer us a rigid, wiggle-free guide for motion along a single axis, but in some cases, the cost needed for hobbyists to afford this precision is outside their budget. [Barton Dring] took the idea of guided linear motion and launched a custom extruded rail that enables bearings to slide freely along an axis. Dubbed Makerslide, this extruded rail features a groove embedded directly into the extrusion and aims to be compatible with most other 20-mm extruded profiles like those from Misumi and Rexroth.
On a similar note, the folks at OpenBuilds took [Barton’s] concept in a slightly different direction. For many of us who have already committed to extrusions from one vendor and have our closets gushing with excess tubes, Open Rail is an extruded v-groove attachment that enables bearing-mounted plates to slide freely just like the extrusions of Makerslide. Unlike Makerslide, however, almost any 20-mm extrusion can be retrofitted with Open Rail, rather than requiring a specialized extrusion.
OpenBuilds Linear Actuator Kits
CNC machines encompass a wide variety of machine designs that spans far beyond this article’s scope. For conventional machines, however, a single motor drives a motion along a single axis. To add direction in a separate dimension, we can sometimes chain together two of the same linear motion units. The folks at OpenBuilds have taken this principle to heart offering single-axis systems as kits. With some creativity and forethought, users can develop a number of automated solutions based on the principle of appending multiple axes. Of course, the folks at OpenBuilds haven’t stumbled upon a never-before-seen solution. Misumi, Rexroth, and other professional automation equipment companies have been selling linear motion systems for years; however, their price range easily leaps beyond the 10K mark.
Not an End-All, but a Solid Start
Despite the design flexibility, neither Makerslide nor OpenBuilds is the all-encompassing solution for every CNC endeavor. Specifically, for rigid machines that can chew through steel, a structure built from bolted aluminum extrusions will be far less rigid than professional machines of a similar scale. Nevertheless, for machines that don’t experience heavy loads, like a 3D printer, a laser cutter, or even some small routers, both Makerslide and OpenBuilds offer an excellent starting point.
Software
With our hands full of stepper motors, extruded profiles, and belts, it’s time to start exploring a software solution to drive it all. While there are plenty of machine-specific solutions, I thought I’d highlight two that are flexible enough to be tuned to a custom machine.
G-code Interpreters
G-code interpreters do just that: they accept input commands in G-code (be it directly from a file or serially through a cable) and convert the commands to step and direction digital outputs with the right timings to produce the control signals for stepper motor drivers. In one sense, they’re the “brains” of the machine, taking the G-code “instruction set” and outputting behaviors that correspond to the input instructions.
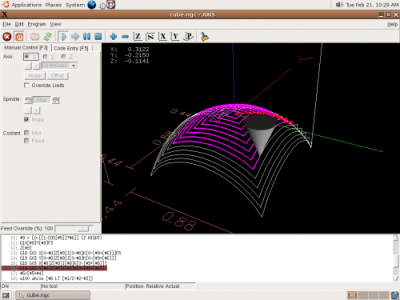
LinuxCNC
Image Credit: LinuxCNC Wiki
LinuxCNC spun out from a US-government-funded initiative to develop a motion control package for standards testing back in the 90s. Over time, it has evolved into a software package designed to turn a PC into a G-code interpreter, and it’s currently packaged as real-time Linux distribution. From your LinuxCNC-configured PC, you can simply connect your stepper motors, limit switches and other digital I/O devices to the PC’s parallel port which, in turn, outputs motor step and direction pulses to drive your physical hardware.
LinuxCNC isn’t just a G-code interpreter, though. The 15+ years of active development have given it a solid foundation which makes it one of the most adaptable software packages for developing custom machines. By enabling custom kinematics, users can drive non-Cartesian machines like SCARA arms. With a core operating system based on Debian Linux, users can link additional PC peripherals, like USB game controllers, to drive their machines. Some devoted software hackers have even fleshed out the current user interface to directly generate G-code for simple cuts, rather than simply run existing G-code.
Grbl
With over 7 years of active development, Grbl has proven itself to be simple, reliable G-code interpreter firmware for the Arduino Uno. Simply connect your motor controllers and limit switches to the Uno, and Grbl firmware handles the step and direction pulse timing for all 3 axes of your machine. Grbl doesn’t aim to be an all-encompassing interpreter like LinuxCNC, but in exchange it’s a far simpler solution that is relatively easy to set up and works for most, if not all, typical use-cases for a 3-axis machine.
Though Grbl drives the physical hardware, it still requires a serial interface to receive G-code instructions to execute. Fortunately, G-code-streaming packages exist: bCNC and UGS, which have been tested specifically with Grbl.
G-code Generators
Having a fancy CNC machine doesn’t say much if we can’t generate instructions to drive it to cut parts! We need a solution for generating G-code, and, once again, the open source software community has jumped in to provide several packages.
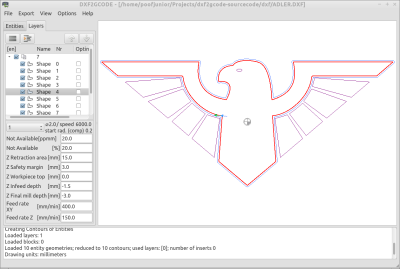
dxf2gcode
It’s not unlikely that many of your designs may boil down to a collection of flat plates with simple features on them. For 2D milling, dxf2gcode simplifies the process of generating G-code based on an original design file, in this case: a dxf. The project also features automatic cutter compensation done in software, a very handy feature that will generate an offset toolpath based on the diameter of the tool and the type of cut (pocket or outside edge).
gcmc
Image Credit: gcmc homepage
If you’ve ever tried writing G-code manually, you’ll quickly realize just how unreadable it is without having memorized the majority of the commands. GCMC is a front-end language aimed at producing human-readable machine routines. By abstracting away the unnecessary idiosyncrasies of the language, gcmc facilitates the generation of complex tool motions and patterns simply by tweaking a few parameters.
Doing the Research
Building your own CNC machine may just be your next labor of love, but unless you prefer to reinvent the wheel (and, hey, starting from first principles isn’t always a bad thing), it’s worth taking a look at the tomes of build logs, forum posts, and existing software from the gurus who have built CNCs before us. While I’ve highlighted a few of the more common tools in the land of hardware and software, this list is far from complete. So go forth! Do your research–and, of course, let us know what you find in the comments.
This weekend is ShmooCon, a hacker convention held in Washington DC. Brian Benchoff and I will be there, both of us for the first time. We’d love your input on what talks look the most interesting. Check out the schedule of speakers, then leave a comment below to let us know which talks you think we should cover.
It’s great hearing the big presentations, but I find a lot of times great hacks can be found in smaller venues, or just by walking around. Two examples from 2015 DEF CON: the best talk I sat in on had about 10 people spectating in the IoT village, and I had a great time trying to track down everyone who had an unofficial hardware badge. If you’re at ShmooCon and have something to show off, please find us (@szczys, @bbenchoff)!
On Saturday join us for a Hackaday meetup in the lobby of the Washington Hilton. ShmooCon is well-regarded for the quality of its “lobby-con”, what better place to gather? Look for the Hackaday crowd starting Saturday 1/16 at 8:45am. We’ll bring the donuts, and some swag like Hackaday Omnibus Vol. 02 and of course, some Jolly Wrencher stickers.


 Unless you’ve discovered a deal on eBay or
 It’s not unlikely that many of your designs may boil down to a collection of flat plates with simple features on them. For 2D milling, dxf2gcode simplifies the process of generating G-code based on an original design file, in this case: a dxf. The project also features automatic cutter compensation done in software, a very handy feature that will generate an offset toolpath based on the diameter of the tool and the type of cut (pocket or outside edge).