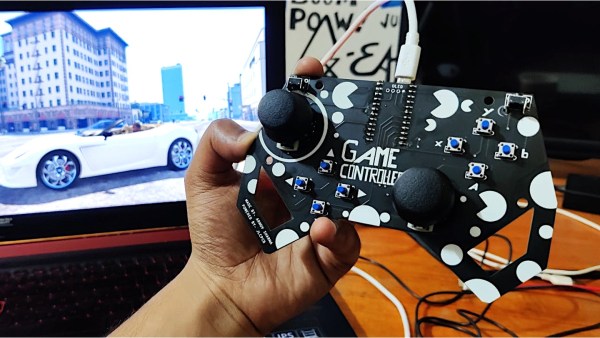
[Arnov] is bringing his own custom-made controller to the party and it is sure to impress. The design appears to have been inspired by the Xbox controller layout. Two joysticks for fine control of game characters, 4 face buttons, and two shoulder buttons. He opted for all through-hole components to make the assembly easier. No messing with tiny surface mount components here. We really appreciate the detail given to the silkscreen and the homage paid to a staple of retro gaming.
We were pretty impressed with how smoothly the controller translated to the game. He mentioned that was a huge improvement over his previous design. His original design had buttons instead of joysticks, but switching to joysticks gave him much better in-game control. That could also have a lot to do with the Xbox controller emulator running the background, but still.
Given that gift-giving season is upon us, you could really impress the video game enthusiast in your life with this as a custom gift. You could even run Retro games like Doom if you hook it up to a RetroPie. That ought to get a few people’s attention.
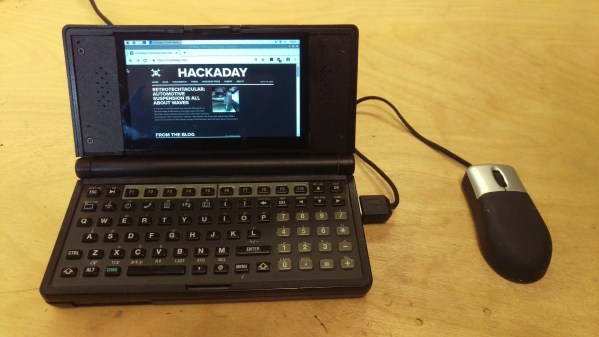
A few decades ago, palmtop computers were mostly based on MS-DOS, and while many users tried to mimic the UNIX experience, the results were mixed. Fast forward to the present and business-card-sized Linux computers modules abound. Canadian tinkerer [Rune Kyndal] decided to make his own Linux palmtop by sacrificing an old HP-95LX and replacing the guts with a Raspberry Pi Zero and a color LCD screen. We’re impressed with the rich set of features he has crammed into the limited volume of the case:
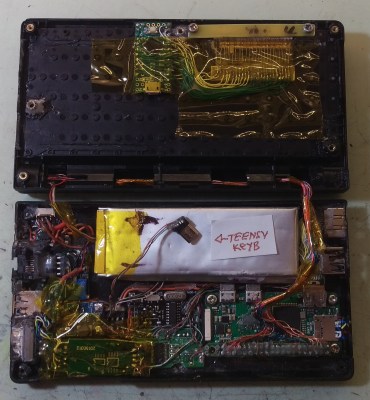
Inside View: Everything fits, barely
Raspberry Pi Zero W
Color LCD, 4.3 inch, 800×480 w/Backlight
Capacitive touch screen (not connected yet)
Stereo speakers + microphone
Ethernet 10/100
USB 2.0, 2 each
RS-232, DE-9 connector
microSD card
HDMI
IR dataport
Webcam (TBD)
LiPo Battery w/Charger
One problem that any palmtop faces is how to make a usable keyboard, and HP had one of the better designs. The keys are the same famous style as used in HP calculators. And while no human with normal hands could touch-type on it, the keyboard’s layout and tactile feel was well-suited to “thumb typing”. [Rune] made a good decision by keeping the original keyboard.
While fully functional, this is more of a proof of concept than a polished project. [Rune] primarily used bits and pieces that he had laying around. [Rune] says if he did it again, he would replace all the hot-glued accessory parts with a custom PCB, which is probably good advice. If you want to make your own, check out the project comments for some suggestions.
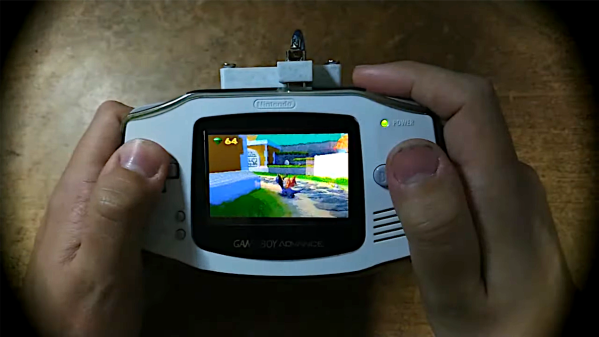
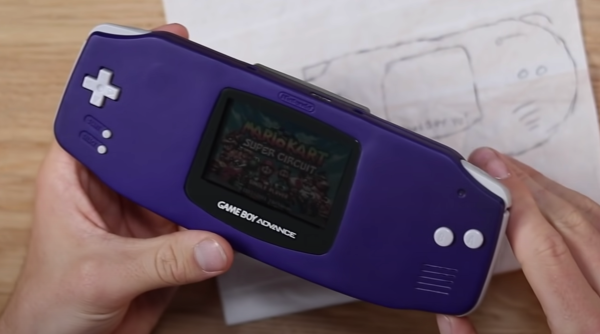
The Nintendo Game Boy Advance was basically the handheld gaming situation of its era, by virtue of the fact that it had no serious competitors in the market. The system was largely known for 2D games due to hardware limitations.
However, [Rodrigo Alfonso] has recently upgraded his GBA Remote Play system that lets him play PlayStation games and others on his classic Game Boy Advance. We first featured this project back in July, which uses a Raspberry Pi 3 to emulate games and pipe video data to the handheld for display, receiving button presses in return.
Since then, [Rodrigo] has given the project some upgrades, in the form of a 3D-printed case that mounts a battery-powered Pi directly to the back of the console for portable play. Additionally, overclocking the GBA allows for faster transfer rates over the handheld’s Link Port, which means more pixels of video data can be clocked in. This allows for more playable frame rates when running at 240×160, the maximum resolution of the GBA screen.
The result is a Game Boy Advance which you can use to play Crash Bandicoot on the bus just to confuse the normies. Of course, one could simply build a Raspberry Pi handheld from scratch to play emulated games. However, this route takes advantage of the GBA form factor and is pretty amusing to boot. Video after the break.
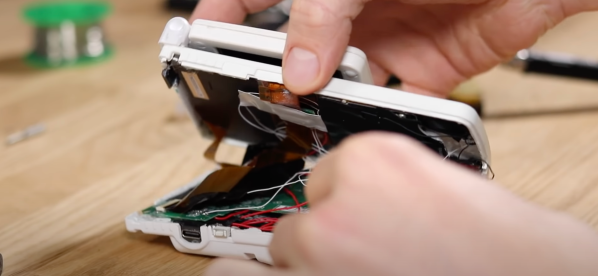
Many holiday recipes and console hacks share a common theme: cramming a thing inside another thing. Whether it’s turducken or a Nintendo DS inside a Gameboy, the result is always unexpected. The chassis for this mod is a humble Gameboy color with a Gameboy SP screen tackled on the top to serve as the secondary display. Unfortunately, this mod lost touch screen functionality, limiting some of the games you can play.
[TheRetroFuture] received the custom handheld from [GameboyCustom], which was somewhat damaged in shipping. The original screw mounts had to be removed and the case glued back together to fit the DS motherboard. So for [TheRetroFuture] to get inside to start troubleshooting involved a razor blade and patience. Testing various points and swapping components got [TheRetroFuture] closer to the root problems. The fix ended up being a few wires that came loose during shipping. Finally, after reseating a display connection and some careful soldering, it booted and started playing games.
Overall, it’s pretty impressive to see Mario Kart DS running on both screens on the tiny handheld. But you might be asking, why? Why shove one handheld inside another handheld? Sometimes it’s to gain new functionality like this Raspberry Pi inside a PSP body. Sometimes, it’s just because we can. Video after the break.
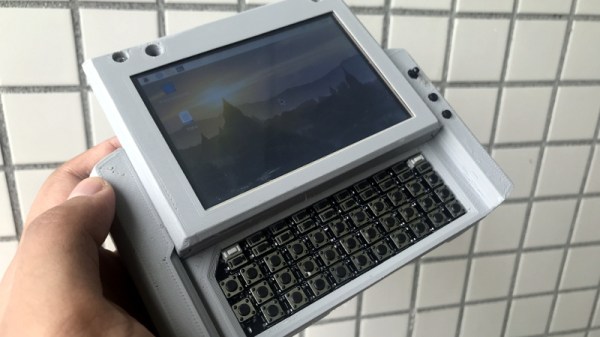
Back in 2019 we first came across the mutantC, an open source 3D printable Raspberry Pi handheld created by [rahmanshaber] that took more than a little inspiration from Sony’s VAIO ultra-mobile PCs (UMPCs) from the early 2000s. It was an impressive first effort, but it clearly had a long way to go before it could really be a practical mobile device.
Well after two years of development and three iterative versions of this Linux powered QWERTY slider, [rahmanshaber] is ready to show off the new and improved mutantC_v4. Outwardly it looks quite similar to the original version, with the notable addition of a tiny thumbstick and a pair of programmable buttons on the right side that can be used for input in addition to the touch screen. But inside it’s a whole other story, with so many changes and improvements that we hardly even know where to start.
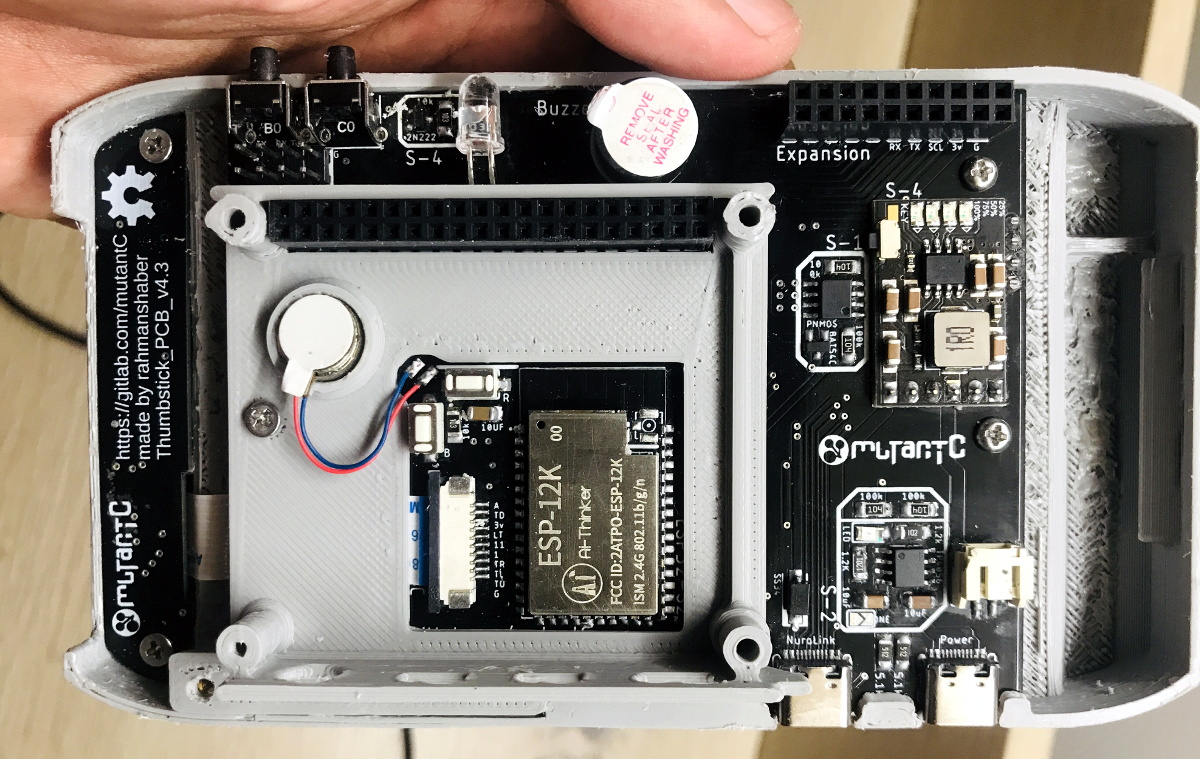
Inside the mutantC_v4, showing off the ESP32-S2
Probably the most notable improvement is the addition of an ESP32-S2, specifically a bare ESP-12K module, to the main PCB. Previous versions of the hardware used an Arduino Pro Micro to interface with all the hardware, but the added horsepower of the ESP32 should come in handy with the array of sensors, controls, and NeoPixels that [rahmanshaber] has tasked the chip with. There’s even a buzzer and a coin-style vibration motor in there to provide some feedback to the user. While the board has changed significantly, it still retains compatibility with the Pi Zero, 2, 3, and 4.
Another notable addition is the expansion connector on the bottom of the handheld that has pins for I2C, UART, and 3.3 V. In the video below, [rahmanshaber] mentions that this feature was previously implemented with a standard 2×6 female header block, but is now using a far slimmer female USB-C port. We do wonder if it’s not a bit confusing to have this faux-USB port right next to the real one that’s actually used to charge the system, but with such cramped quarters occasionally you’ve got to make some tough decisions like that.
While there’s nothing quite like running retro games on their original hardware, using older consoles in today’s day and age can be a hassle due to incompatibilities with modern chargers and headphones. [tito] and [kyle] worked together to update Nintendo’s Game Boy Advance SP with a whole bunch of new features, tightly packed inside a 3D-printed replacement backshell. (Video, embedded below.)
The original 600 mAh battery has been replaced with a 1600 mAh pack for several hours of additional screen time. A Qi standard wireless power module as well as a USB-C connector allows charging the battery without carrying the original mains adapter. A Bluetooth module enables the use of wireless headphones, and a 3.5 mm jack enables classic earbuds as well, a feature lost when the SP replaced the original GBA.
The new backshell fits exactly on the original console, making it about 10 mm thicker. Although this makes it slightly less portable, it is apparently more comfortable to hold for those with big hands. The new functionality is implemented using off-the-shelf circuit boards, connected together with flying wires that are soldered to the required points on the GBA’s circuit board. The original connectors and switches remain in place and functional, and the entire operation can be undone if you want to return the device to its original state.
Others have added USB charging to the original GBA, or even stretched that handheld to become twice as wide. But adding significant new functionality previously required replacing the handheld’s entire contents.
Here at Hackaday, we see all sorts of projects, some born out of a deep necessity or itch that couldn’t be scratched. Others are born out of a world of “why not” and it is perhaps these projects that put the biggest smile on our faces. The WideBoy Advance by [Elliot] of Retro Future is one such project.
Starting with a working Game Boy Advance and a donor one with a busted motherboard, the frankenstein-ification could start. A Dremel split one case in half and removed the sides on another, while trusty old car body filler helps fill and smooth the gaps. A particularly clever trick is to use the Dremel to create channels for the filler to adhere easier. Several areas had to be built up with filler and glued in bits of plastic as a base. As you can see in the video below, the countless hours of sanding, priming, sanding, and more priming led to a beautifully smooth finish. The choice of purple paint really sells the impression of a factory-fresh Game Boy Advance.
The working circuit board was desoldered and the donor board was cut into pieces to fit in the extended sides. Using some magnet wire, connections were bridged over to the original motherboard via the test points on the PCB. [Elliot] didn’t opt to swap the screen to an IPS display or add a backlight. These quality of life improvements are nice, but a dead giveaway that Nintendo didn’t make it. The goal is to get the user to wonder, even if just for a second, what if Nintendo just happened to make this wide one-off handheld console.
[Elliot] made it simply because he found it interesting and enjoyed the form of the thing he made. Is it a hack? Is it art? Probably a little bit of both. This isn’t his first modified Nintendo handheld either. He previously made a long Nintendo Gameboy DMG-01. We love seeing all the wild hacks and tweaks made to Game Boy line, such as this Game Boy Color inside the DMG-01.