A Closer Look At The Tanmatsu

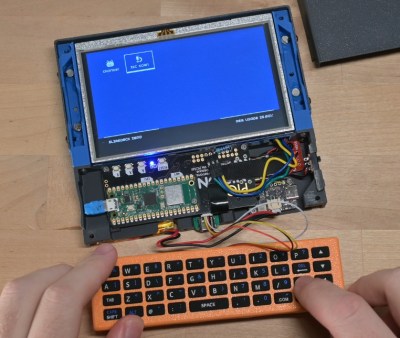
A few weeks ago we brought you news of a new palmtop computer for hackers, powered by the new Espressif ESP32-P4 application processor. The Tanmatsu (Japanese for “Terminal”) is a compact handheld device with a QWERTY keyboard and an 800×480 DSI display, and while it currently exists at the final prototype stage there is a pre-order page upon which you can reserve an early production model for yourself. We’ve been lucky enough to be invited to give one a close-up inspection, so it was time to hot-foot it on the train to a Dutch hackerspace in order to bring you a preview.

A Little History, And First Impressions

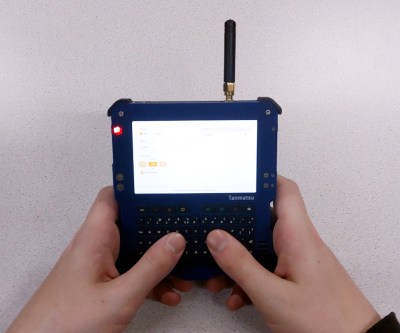
The Tanmatsu, held in both hands.
Recesses in the case fit well against the hands.

Before looking at the device, it’s time for a little history. The Tanmatsu has its origin in badge.team, the Netherlands-based group that has produced so many European event badges over the years, and it was destined to eventually become the badge for the upcoming WHY2025 hacker camp. As sometimes happens in any community there has been a significant difference of opinion between the event orga and the badge.team folks that it’s inappropriate to go into here, so now it exists as a standalone project. It’s destined to be open-source in its entirety including hardware and software (and we will hold them to that, never fear), but because of the events surrounding its conception the full repositories will be not be made public until some time late in the summer.

Picking the Tanmatsu up and holding it, it’s a rectangular slab a bit larger and thicker than a CD case with that QWERTY keyboard and display on its front face, an array of ports including an SMA socket for a LoRA antenna on its sides, and an expansion connector on its rear. It has a sandwich construction, with a PCB front face, a 3D printed spacer, the PCB itself, and a 3D printed back cover all held together with a set of screws. The recesses on its bottom edge and the lower halves of the sides locate neatly with fingers and thumbs when it’s held in two hands for two-thumb typing. The keyboard is a silicone moulding as is common on this type of device, and while the keys are quite small it was not difficult to type on it. The display meanwhile feels of much higher quality than the SPI parts previously seen on badges. Continue reading “A Closer Look At The Tanmatsu”

Casio Calculator Gets New Keyboard

What do you do with a circa 1985 Casio FX-451 calculator with a bad keyboard? Well, if you are [Poking Technology], you transplant the inside of the calculator to a new custom keyboard. There are two videos that cover the process in detail, which you can watch below.

The calculator has a unique design. It looks like a simple calculator in a wallet. But the wallet opens to reveal an extended keyboard with all the scientific features onboard. Unsurprisingly, the membrane keys didn’t survive over four decades. Disassembling the unit was a challenge. Soldering wires to the keyboard lines was further complicated by the fact that some of the lines are on the back of the PCB and pass through to the top under the main IC.

The new keyboard is quite a bit larger than the original, making this more of a desk calculator, but that also means you can use high-quality keys. We’d love to see a 3D printed case to wrap it all up, but the bare PCB look has its charms, too.

If you can’t understand how [Poking] can love a calculator so much, you probably never owned an HP-41C, either. Of course, our retro calculator dreams also include Star Trek.

Continue reading “Casio Calculator Gets New Keyboard”

A black box with the words "Steam BRICK" emblazoned in white and orange text. It sits on a grey surface with various electronic parts surrounding it.

Steam Brick Makes Your Steam Deck Headless

Handhelds are designed to be portable, but what if you need something smaller than OEM? The Steam Brick pulls basically everything off of a Steam Deck to make it as portable as possible.

[crastinator-pro] found they rarely used the controller or screen on their Steam Deck, and the form factor was too bulky to conveniently chuck into their bag, negating the advantage of owning a portable console. As to be expected from any self-respecting hacker, they did a couple quick tests with components unplugged then got to work with the rotary tool.

After excising the main board from its handheld bonds and trimming unnecessary bits from the aluminum frame around the mainboard, they designed a case that can be tossed in a bag without any special treatment. The case was printed in polycarbonate to better withstand the heat of the console running at full tilt, and the colorful details were added in PLA with a 3D pen.

We’ve discussed using a Steam Deck as a single-board computer before, but if you want to keep it in one piece, you could also get it setup in a slick keyboard case.

DIY Handheld Is An Emulation Powerhouse

If you’re into handheld gaming, you’ve got a wide array of hardware options to choose from these days that are capable of running everything from console classics to full-fledged PC titles. But that doesn’t mean there aren’t enterprising gamers out there who are still building their own custom handhelds —  like the Retro Lite CM5.

For this project, [StonedEdge], [GinKage], and [notime2d8] set out to create a powerful enough handheld that could emulate games spanning the PlayStation 2, GameCube, and 3DS eras. Using a Radxa Rk3588s compute module as a base, the build navigates the design and construction of things like the carrier board, custom controllers, and the enclosure.

Continue reading “DIY Handheld Is An Emulation Powerhouse”

A PDA From An ESP32

The ESP32 series of microcontrollers have been with us for quite a few years now and appeared in both Tensilica and RISC-V variants, both of which deliver an inexpensive and powerful device. It’s thus shown up in quite a few handheld computers, whether they be conference badges or standalone devices, and this is definitely a field in which these chips have more to give. We’re pleased then to see this e-ink PDA from [ashtf8], which we think raises the bar on this type of device.

At its heart is an ESP32-S3, on the back side of a QWERTY keyboard PCB, and for a display it has an e-ink screen. To get over the annoying e-ink refresh when typing text it uses a hybrid of e-ink and OLED, with a small OLED holding the current line which can be periodically sent to the e-ink. Perhaps the nicest thing about the hardware though is the clear resin printed clamshell case, and a hand-cast silicone membrane for the keyboard. That has always been a part considered difficult to produce, and here he is making one from scratch. Take a look at the video below the break.

Software-wise it has a range of apps with more promised, but even as it stands it looks useful enough to work with. If that’s not enough, then perhaps an ESP32 operating system would help.

Continue reading “A PDA From An ESP32”

3D Printed Case Turns Pixel 6 Pro Into Palmtop

Despite initial interest in the 1990s and early 2000s, palmtop computers never really took off. Realistically most consumers were probably satisfied enough with smartphones as they became more widely available, but those of us who would prefer a real keyboard on our mobile devices are still feeling the pain. Today there are still a few commercial palmtop-like machines out there, but they aren’t exactly mainstream.

Which is why this 3D printed case for the Pixel 6 Pro from [TypingCat] is so interesting. It takes a relatively popular and capable contemporary phone, pairs it with a physical keyboard, and manages to create something that looks quite practical. Thanks to Termux, you can even get a fairly usable Linux environment going on the thing.

There aren’t too many components at play here, but still, we appreciate the fact that [TypingCat] provided links for not only the specific Bluetooth keyboard used, but the fasteners required to hold the three printed parts together. A link is also provided to the Termux-Desktops project, which allows you to get a Linux X11 desktop environment running on Android. It’s not the pocket Linux computer of our dreams, but it’s pretty close.

While the Pixel 6 Pro is a solid enough choice to base this project around, we’re interested in seeing if the community will come up with variants of this case to hold other similarly sized phones. It’s interesting to note that [TypingCat] has decided to use the “No Derivatives” variant of the Creative Commons license for the bottom half of the case. But since the top half is a remix of an existing Pixel 6 Pro case from [JoshCraft3D], it carries a more permissive license and must be distributed separately. Long story short, folks can create and distribute custom versions of the phone-side of this case, but the bottom needs to remain the same.

If you’ve got filament to burn extrude and would rather have a more pure Linux experience, we saw a printable Raspberry Pi Zero palmtop a couple months back that looked quite promising.

Pico Pal Puts RP2350 Into Game Boy Color Shell

While modern gaming systems deliver ever more realistic experiences, there’s still something to be said for the consoles and handhelds of the 80s and 90s. For many, the appeal is nostalgic. Others are attracted to the “lo-fi” graphical and sound design of these games, necessitated by the limited hardware of the time.

That said nobody would claim those old systems were perfect. Which is why a hybrid approach like [Peter Khouly] has been working on with the Pico Pal might be the ultimate solution. This replacement motherboard for the Game Boy Color (GBC) is powered by the RP2350, meaning the external hardware will have the same look and feel as it did back in 1998, but you’ll still be able to reap the benefits of modern emulation.

While the origins of the project go a bit farther, [Peter] has been working on this particular variation of the Pico Pal GBC since August, and has kept a fascinating log of his progress. Just getting the RP2350 to emulate Pokémon isn’t really that big of a deal, but getting all the ancillary hardware implemented and fitted inside the case of the GBC is a different story. Especially since [Peter] intends to pack plenty of features into the final product, such as rechargable batteries, Bluetooth audio, real-time clock support, and digital video out.

The most recent status update is from just last week, where [Peter] goes over some of the new features he’s been working on. A major one is the soft power solution, where the physical power switch doesn’t just pull the plug like it did back in the 1990s. Instead, the switch triggers the board to save the game and enter into a low-power mode so that it can come right back on to where you left off. This does impact battery life, but so far, it looks like the Pico Pal GBC will be able to run for at least five hours on a charge, and more than twice that if you don’t mind turning off the audio.

It sounds like there’s still several gremlins to track down in the design, but even in its current state, the Pico Pal GBC looks very interesting. We’re immediately reminded of the phenomenal work [Bucket Mouse] has put in on a similar refit for the original DMG-1 Game Boy.