Classic gaming aficionados who prefer to play on real hardware know the struggle of getting their decades-old consoles connected to a modern TV. Which is why many gamers chose to keep a contemporary CRT TV around for when they want to take a walk down memory lane. Unfortunately those old TVs usually didn’t offer more than a few A/V ports on the back, so you’ll probably need to invest in a A/V switch to keep them all hooked up at once.
That’s the situation [Thomas Sowell] found himself in, except he couldn’t find one with enough ports. Rather than chain switches together, he decided to build his own custom 12-port console selector. With an integrated amplifier to keep everything looking sharp, a handsome walnut and metal enclosure, and a slick graphical interface that shows the logo of the currently selected console on a Vacuum Fluorescent Display (VFD), the final product is a classic gamer’s dream come true.
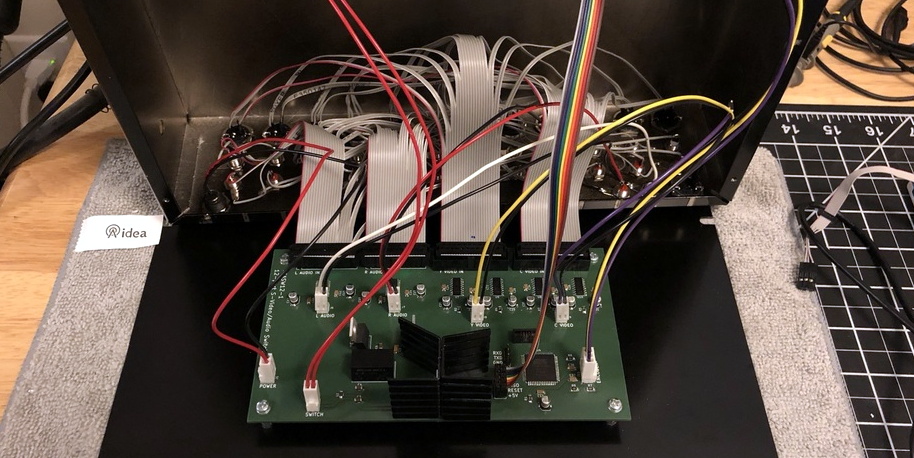
To switch the audio [Thomas] is using a pair of ADG1606 16-channel analog multiplexers, while video is shuffled around with four MAX4315 8-channel video multiplexer-amplifiers. The math might seem a bit off at first, but he’s using one ADG1606 for each stereo channel and since the switch is for S-Video, each device has a luminance and color signal that needs to be handled separately. The multiplexers are flipped with a ATmega2561 microcontroller, which is also responsible for reading user input from a rotary encoder on the front of the case and displaying the appropriate console logo on the 140×32 Noritake VFD.
You may be surprised to find that [Thomas] considered himself an electronics beginner when he started this project, and that this is only the second PCB he’s ever designed. Was this a bold second project? Sure. But it also speaks to how far DIY electronics has come over the last years. Powerful open source tools, modular components, and of course a community of creative folks willing to share their knowledge and designs, has gone a long way towards redefining whats possible for the individual hacker and maker.
Continue reading “Custom Built 12-Port A/V Switch Keeps CRT Well Fed”