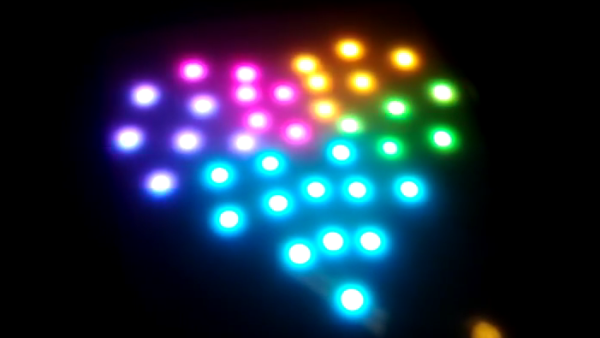
Approximating An ADC With Successive Approximation

[Igor] made a VU meter with LEDs using 8 LEDs and 8 comparators. This is a fast way to get one of 8 bits to indicate an input voltage, but that’s only the equivalent of a 3-bit analog to digital converter (ADC). To get more bits, you have to use a smarter technique, such as successive approximation. He shows a chip that uses that technique internally and then shows how you can make one without using the chip.

The idea is simple. You essentially build a specialized counter and use it to generate a voltage that will perform a binary search on an unknown input signal. For example, assuming a 5 V reference, you will guess 2.5 V first. If the voltage is lower, your next guess will be 1.25 V. If 2.5 was the low voltage, your next guess will be 3.75 V.

The process repeats until you get all the bits. You can do this with a microcontroller or, as [Igor] shows, with a shift register quite simply. Of course, you can also buy the whole function on a chip like the one he shows at the start of the video. The downside, of course, is the converter is relatively slow, requiring some amount of time for each bit. The input voltage also needs to stay stable over the conversion period. That’s not always a problem, of course.

If that explanation didn’t make sense, watch the video. An oscilloscope trace is often worth at least 1,000 words.

There are, of course, many ways to do such a conversion. Of course, when you start trying to really figure out how many bits of resolution you have or need, it gets tricky pretty fast.

Continue reading “Approximating An ADC With Successive Approximation”

Witch’s Staff Build Is A Rad Glowing Costume Prop

Let’s say you’re going to a music festival. You could just take water, sunscreen, and a hat. Or, you could take a rad glowing witch’s staff to really draw some eyes and have some fun. [MZandtheRaspberryPi] recently undertook just such a build for a friend and we love how it turned out.

The concept was to build a staff or cane with a big glowing orb on top. The aim was to 3D print the top as a very thin part so that LEDs inside could glow through it. Eventually, after much trial and error, the right combination of design and printer settings made this idea work. A Pi Pico W was then employed as the brains of the operation, driving a number of through-hole Neopixel LEDs sourced from Adafruit.

Power was courtesy of a long cable running out of the cane and to a USB power bank in the wielder’s pocket. Eventually, it was revealed this wasn’t ideal for dancing with the staff. Thus, an upgrade came in the form of an Adafruit Feather microcontroller and a 2,000 mAh lithium-polymer battery tucked inside the orb. The Feather’s onboard hardware made managing the lithium cell a cinch, and there were no more long cables to worry about.

The result? A neat costume prop that looks fantastic. A bit of 3D printing and basic electronics is all you need these days to build fun glowing projects, and we always love to see them. Halloween is right around the corner — if you’re building something awesome for your costume, don’t hesitate to let us know!

Very Tiny Cube Has 384 RGB LEDs

When it comes to making things that glow, there are two ways to stand out from the crowd. You can make something very big, or something very small. [DIY GUY Chris] has done the latter, producing a tiny LED cube that he says is the world’s smallest.

As is so often the way, the build relies on tiny WS2812B-compatible LEDs in a 1 mm x 1 mm form factor. They’re mounted on a series of teeny interlocking PCBs that come together to build a cube that’s just 8 cubic centimeters in volume. Power is courtesy of a small lithium-ion cell that lives inside the cube. Data and power signals flow around the cube via solder connections along the edges of the faces of the cube.  Running the show is an ATmega328P, the same microcontroller you’d find in an Arduino Uno. It’s responsible for sending out commands to the LEDs to create various animations.

We can’t speak to [Chris’s] claim about being the world’s smallest, but it is small. We’ve seen other builds in a similar vein, like this barely-larger D20 with a full 2400 LEDs, though. Video after the break.

Continue reading “Very Tiny Cube Has 384 RGB LEDs”

Blinking An LED Passively

It is a pretty common first project to use an Arduino (or similar) to blink an LED. Which, of course, brings taunts of: you could have used a 555! You can, of course, also use any sort of oscillator, but [Mustafa] has a different approach. Blinking an LED with three resistors and a capacitor. Ok, ok… one of the resistors is a light-dependent resistor, but still.

In reality, this is a classic relaxation oscillator. The capacitor charges until the LED lights. This, however, causes the capacitor to discharge, which eventually turns off the LED, and the process starts again.

There is one wrinkle that could be considered a feature. In daylight, the capacitor will stay in the off state, so the blinking only occurs in darkness. Of course, the resistor also has to have a sufficient view of the LED. You might use this as a safety light that only works in the dark.

A simple circuit, but it just goes to show that we tend to forget the simple solutions in a world where a computer costs less than a dollar.

Of course, you can get a chip whose sole purpose is to blink LEDs. We always like examples of doing more with less.

Continue reading “Blinking An LED Passively”

Custom Mini-Neon Signs In 10 Minutes

Sometimes, you see a project that isn’t a technical powerhouse but just looks so good you can’t help but think about duplicating it. That’s how we felt with the mini-neon signs made by [makerverse]. From an electronics point of view, it is just some filament LEDs and a 3D-printed casing. But, as you’ll see in the video below, these look like little miniature neon signs, and they look great.

Although we might use a different set of tools to get there, the idea is to create your text in DXF, extrude it in CAD, and then print a dark shell with a light or translucent center using a filament change. Glow-in-the-dark filament is also an option. Obviously, if you are handy in any CAD tool, you could easily pull this off.

Continue reading “Custom Mini-Neon Signs In 10 Minutes”

Build Yourself A Beautiful Interactive Light Toy

Sometimes, we build things with LEDs as indicator lamps or to illuminate something important. Sometimes, we build things with LEDs purely to glow and be beautiful. This interactive light toy from [Jens] falls into the latter category.

The build uses a 16×16 addressable LED matrix.  [Jens] then ported some “Bouncy Bubbles” Processing code from Keith Peters to the Arduino Mega, and set it up to display on the matrix. An accelerometer was used to control the bouncing ball animations, while a second Arduino was then tapped to act as a musical synthesizer to add more vibes. The whole kit was then built into a 3D-printed housing with a nice hazy diffuser to give the LEDs a smoother, even look. [Jens] steps through how he got the diffuser just right, including a support structure that made all the difference to the aesthetic of the finished product. Getting diffusion right is key to making a nice LED project, and [Jens] got it very right here.

It’s a nice little art piece that looks kind of relaxing to play with in a dark room. We love a good glowable project here at Hackaday, so if you’ve built your own—don’t hesitate to let us know! Video after the break.

Continue reading “Build Yourself A Beautiful Interactive Light Toy”

Demonstrating The Photoelectric Effect Using Neon Lamps

Neon lamps are fun to play with. These old-school indicators were once heavily utilized in many types of equipment for indication purposes but now seem largely relegated to mains voltage indication duties. Here’s a fun video by [Ashish Derhgawen], discussing the photoelectric effect of neon lamps with some simple demonstrations.

Orange light makes it light!

[Ashish] demonstrates the well-known photoelectric effect by triggering a sub-biased neon lamp with visible light from an LED. Neon bulbs work on the principle of voltage-induced ionization, creating a visible glowing plasma. If the applied voltage is high enough, around 60 to 80 V, electrons get knocked off the neutral neon atoms. The now free electrons, roaming around highly energized, will eventually come across a neon ion (missing an electron) and recombine to make it neutral again.

The results are a lower total energy state, and the difference in energy is resolved by the emission of a photon of light, which, in the case of neon, is a dull reddish-orange. Nothing unusual there. However, nothing will happen if the applied voltage bias is just below this device-specific threshold. There’s not enough energy to strip electrons.

Apply an external light source, and this threshold can be exceeded. The photons from the LED are just energetic enough to strip a small number of electrons from the surface of the electrodes, and this causes a cascade, or avalanche effect, lighting up the plasma and turning on the neon lamp. Take away the external light source, and it dies down and goes dark.

Continue reading “Demonstrating The Photoelectric Effect Using Neon Lamps”