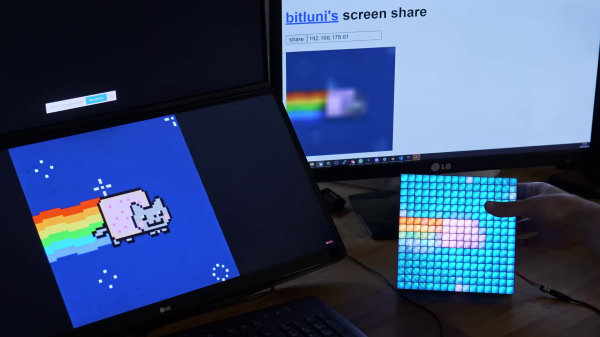
DIY All-Transistor Addressable Pixel

By now most readers should be used to addressable LEDs, devices that when strung out in a connected chain can be individually lit or extinguished by a serial data stream. Should you peer at one under a microscope you’ll see alongside the LED dies an integrated circuit that handles all the address decoding. It’s likely to be quite a complex device, but how simply can its functions be replicated? It’s a theme [Tim] has explored in the TransistorPixel, and addressable LED board that achieves addressability with only 17 transistors.

It uses a surprisingly straightforward protocol, in which a pulse longer than 500ns enables the LED while a shorter one turns it off. Subsequent pulses in a train are passed on down the line to the next device. A 20µs absence of a pulse resets the string and sets it to wait for the next pulse train. Unlike the commercial addressable LEDS there is only a single colour and no suport for gradated brightness, but it’s still an impressive circuit.

Under the hood is some very old-school RTL logic, a monostable to detect the pulse and a selection of gates and a latch to capture the state and forward to the chain. It’s laid out on a PCB in order of circuit function, and while we can see that maybe it’s not a practical addresssable LED for 2021, it’s likely that it could be made into a much smaller PCB if desired.

Perhaps unsurprisingly given the ready availability of addressable LEDs, we’ve not seen many home made ones. This addressable 7-segment display may be the closest.

“MORPH” LED Ball Is A There-Is-No-Spoon, Reality-Bending Art Installation

Marvelously conceived and exquisitely executed, this huge ball made up of hexagon tiles combines the best of blinky LEDs and animatronics into one amorphic ball.

The creation of [Nicholas Perillo] of Augmentl along with [MindBuffer], full details of the “morph v2” project have not yet been published. However, some tantilizing build progress is documented on [Nicholas’] Insta — most especially through the snapshots in the story thread spanning the last seven months. The scope of the project is brought into focus with time lapse video of hundreds of heat-set inserts, bundles of twisted wire, a pile of 1500 sliding rails, cases full of custom-order stepper motors, and thick cuts of copper bus bars to feed power up the shaft and out to the panels.

The demo video after the break is mesmerizing, shot by [nburdy] during a demo at MotionLab Berlin where it was built. Each hex tile is backed by numerous LEDs and a stepper motor assembly that lets it move in and out from the center of the ball. Somehow it manages to look as though it’s flowing, as they eye doesn’t pick up spaces opening between tiles as they are extended.

The Twitter thread fills in some of the juicy details: “486 stepper motors, 86,000 LEDs and a 5 channel granular synth engine (written by @_hobson_ no less, in @rustlang of course).” The build also includes speakers mounted in the core of the ball, hidden behind the moving LED hexes. The result is an artistic assault on reality, as the highly coordinated combinations of light, sound, and motion make this feel alive, otherwordly, or simply a glitch in the matrix. Watching the renders of what animations will look like, then seeing it on the real thing drives home the point that practical effects can still snap us out of our 21st-century computer-generated graphics trance.

It’s relatively easy to throw thousands of LEDs into a project these days, as PCBA just applies robots to the manufacturing problem. But motion remains a huge challenge beyond a handful of moving parts. But the Times Square billboard from a few years ago and the Morph ball both show it’s worth it.

As you’ve guessed from the name, this is the second Morph ball the team has collaborated on. Check out details of v1, a beach ball sized moving LED ball.

Continue reading ““MORPH” LED Ball Is A There-Is-No-Spoon, Reality-Bending Art Installation”

Hacking A Non-Dimmable LED Fixture

For most of us, the solution to having a non-dimmable LED light bulb but needing a dimmable one is a simple as a drive to the store to get the right kind of bulb. But that seems downright boring, not to mention wasteful, so when [Leo Fernekes] was faced with this problem, he looked for a way to make a non-dimmable bulb dimmable.

To be fair, there was a financial aspect to this hack, too. [Leo] had a bunch of cheap non-dimmable light fixtures he wanted to put to use. He started with a teardown and reverse-engineering of a light strip, which contains little more than LEDs and a small buck converter. His analysis of the circuit led him to a solution for dimming the light: inserting a MOSFET as a shunt around the LEDs. That and the addition of a diode to isolate the LEDs from the current regulator would allow for simple PWM-control of the lights via a microcontroller.

As is typical with these things, there were complications. [Leo] found that a timing problem resulted in flickering LEDs; the fix came from adding a sync circuit that cleverly leveraged a flip-flop inside the PIC16 microcontroller he chose for the circuit. His prototype incorporates these modifications, plus an interface that supports the DALI protocol for architectural lighting control. As always, [Leo] is quick to point out that mixing line voltage into your projects is not without risks, which he takes pains to mitigate. And as is also typical for his projects, [Leo] gives just the right amount of detail to understand the theory behind his design.

Continue reading “Hacking A Non-Dimmable LED Fixture”

Useful Build Tips For Making LED Panel Frames

[NotLikeALeafOnTheWind] has created many LED-based display projects, and shares his method for making attractive LED panel frames and mounts. At first glance it may look as though slapping a rectangle of aluminum extrusion around a display is all it takes, there is also the mounting and management of wiring, power supply, and possibly a Raspberry Pi to deal with. The process of building an attractive frame also has a few hidden gotchas that can be avoided with a bit of careful planning.

Magnetic feet on the LED panels makes mounting much easier and more flexible.

Here is one tip that will resonate with some readers: don’t rely on specified dimensions of parts; measure the actual parts yourself. There can be small differences between what a data sheet says to expect, and the dimensions of the actual part in one’s hands. It may not be much, but it can be the difference between an ideal fit, and something that looks like a bit of a hack job.

[NotLikeALeafOnTheWind] provides some basic frame layouts, and suggests using two- or three-channel extrusions to provide a flat bezel around the display edge if desired. Mounting the LED panel itself is done with magnetic feet and providing a length of steel bar to which the display can attach. This can provide a flush mount while avoiding the whole issue of screw-mounting the display panels themselves, or sliding them into channels. For mounting all the other hardware, a piece of DIN rail and some 3D-printed parts takes care of that.

The result looks slick and sturdy, and some of the tips are sure to be useful even if the whole process isn’t applied. We like the way the basic design scales and is flexible about the thickness and size of the LED panels themselves, making it a promising way to accommodate perfectly functional oddball panels that end up in the trash.

LED Spectrum Visualizer Driven By Raspberry Pi

Back in the 1980s, spectrum displays on audio equipment were absolutely must have, and the aesthetic came to define the era. This lingered on through the 1990s, and remains a cool look even to this day. [Arduino Guy] decided to put together such a display using a Raspberry Pi and a large LED display.

The LED display in question is of the 64×64 RGB type, available from Aliexpress and other electronics suppliers online. To run the display, an Adafruit RGB Matrix Hat is used with the Raspberry Pi 3B, which makes driving the panel a cinch. The visual effect is run via a Python script, which plays a wave file and produces the spectrum graphics via a Fast Fourier Transform.

While the code isn’t able to act as a general-purpose equalizer display for any content played on the Raspberry Pi, creating such a script could be an entertaining exercise for the reader. Alternatively, the Pi could be hooked up to a microphone to run the display based on ambient room noise. In any case, we’ve seen great projects like this before, such as this laser-based display. Video after the break.

Continue reading “LED Spectrum Visualizer Driven By Raspberry Pi”

Beautiful And Bouncy RGB LED Skirt Reacts To Movement

Is there any garment so freeing to wear as a skirt, assuming it isn’t skin tight? (Well, unless that’s your thing — we won’t judge.) Skirts and dresses are pretty darn freeing compared to pants, so it’s too bad that most of them come without pockets. And it’s really too bad that pretty much all skirts and dresses come without RGB LEDs that can react to movement. Maybe someday.

Until then, we’ll just have to design our own LED skirt like [makeTVee] and his girlfriend did, and hope that it looks half as good. This skirt has six RGB LED strips running down the front for a total of 120 LEDs. The strips are held in place with hook and loop tape and all the electronics — an Adafruit QT Py, a 6-DOF IMU, and a USB power bank — are tucked into the waistband and can be easily removed when it’s time to wash the skirt. Continuing with the practicality theme, there are no LEDs on the back, though they could easily be added in for getting down on the dance floor.

We really love the fabric choices here. The overlay fabric looks good on its own, but it also does a great job of showing and diffusing the light, while at the same time hiding the LED strips themselves. It’s clear that they took comfort and practicality into consideration and made a wearable that’s truly wearable. [makeTVee] calls this a work in progress, but has already got a few nice animations going, which you can see in the video after the break.

If you don’t care whether your wearables are practical, try this fiber optic jellyfish skirt on for size.

Continue reading “Beautiful And Bouncy RGB LED Skirt Reacts To Movement”

Volumetric 3D Television Is Here!

Volumetric 3D displays that allow the viewing of full 3D images without special glasses are not unknown in our community, usually taking the form of either a 3D LED matrix or a spinning rotor either with an image projected onto it or holding an LED array. They are impressive projects, but they are often limited in what they can display. Pretty patterns and simple 3D models are all very well, but they are hardly 3D television. Thus we’re quite impressed with [Evlmnkey]’s bachelor’s degree project, which combines motion capture and a volumetric display for a genuine volumetric 3D closed-circuit television system.

Finding the details takes a bit of dredging through the Reddit thread, but the display is an off-the-shelf Adafruit single-sided LED matrix driven by an ESP32, all mounted on a motor with a pair of slip rings for power. Data is fed to the ESP via WiFi, with the PC responsible for grabbing the image sending it as uncompressed frames. There’s little detail on the 3D capture, but since he mentions a Kinect library we suspect that may be the source.

This is perhaps not the highest resolution TV you’ll ever have seen, indeed we’d liken it to the flickering 30 lines of 1930s mechanical TV, but it’s still a functioning volumetric 3D live CCTV system. If you’re interested by 3D displays, you might like to see our examination of the subject.

Thanks [nandkeypull] for the tip.