Creating Lookalike Valves With Resin Casting

Valves (tubes) certainly have a die hard fan base in the electronic community, praised for their warm sound, desirable distortion characteristics and attractive aesthetic. However, sometimes you just want the look of a valve for a prop or a toy, without actually needing the functionality. For those cases, this project from [Ajaxjones] might be just the ticket.

The build consists of taking an existing valve, combining it with a 3D printed base, and using this to create a silicone mould. 3D printed parts and dressmaker’s pins are then used to create the internal parts of the valve, and are inserted into the mould. Clear resin is then degassed, and poured into the mould to create the part. Once cured, the part is removed and the base painted to complete the look. An LED is then installed into a void in the base to give the piece a warm glow as you’d expect.

It’s a simple tutorial to producing high-quality clear plastic parts, and one that should prove useful to many prop builders and cosplayers alike. If you’re wanting to take your resin game to the next level, consider trying some overmolded parts. Video after the break.

Continue reading “Creating Lookalike Valves With Resin Casting”

Gaze Deeply Into These Infinity Mirror Coasters

Infinity mirrors have been gaining in popularity recently, thanks in no small part to the availability of low-cost RGB LED strips to line them with. Generally such pieces are limited to wall art, or the occasional table build, which is what makes these infinity mirror drink coasters from [MnMakerMan] so unique.

Built from an ATtiny85 and a WS2812B LED strip nestled into a 3D printed enclosure, these coasters are relatively cheap and easy to assemble should you want to run a few off before the holiday party season. [MnMakerMan] mentions the LEDs can consume a decent amount of energy, so he’s included a module to allow recharging of the internal 3.7 V 1500 mAh battery over USB.

Of course, a couple of PLA pieces and a custom PCB doesn’t make an infinity mirror. To achieve the desired effect, he’s created a stack consisting of a 4″ glass mirror, a 1/8″ thick plexiglass disc, and one-way mirror tint film. The WS2812B strip mounted along the circumference lights up the void between the two surfaces, and produces a respectable sense of depth that can be seen in the video after the break.

This isn’t the first high-tech piece of surface protection we’ve seen around these parts, as some very nice wirelessly charged supercapacitor coasters were entered into the 2019 Hackaday Prize. Of course, if you’re of the opinion that coasters should remain as cheap as possible, we’ve seen a number of automated attempts to add some flair to the classic paperboard discs.

Continue reading “Gaze Deeply Into These Infinity Mirror Coasters”

This RGB Tree Has Its Roots In A PCB

[Paczkaexpress]’s RGB tree is a mix of clever building techniques and artistic form that come together into quite a beautiful sculpture.

The branches of his tree are made from strands of enameled copper wire capped with an RGB LED and terminated in a female header. The separate wires are all wound and sculpted into the form of a tree. The wire is covered in a very thin layer of plastic, which we highly recommend observing under a microscope, that allow it to maintain a uniform and reflective copper color without shorting, adding to the effect.

The part we found an especially pleasing mix of form and function was how the “roots” of the tree clicked home in the PCB base. The PCB holds the STM32, power components, and an LED Driver. It doesn’t hide how the magic works, and the tree really does get its nutrients from the soil it’s planted in. This would be a fun kit to build. Very clever and you can see the final effect after the break.

Continue reading “This RGB Tree Has Its Roots In A PCB”

Improving Exposure On A Masked SLA Printer

It’s taken longer than some might have thought, but we’re finally at the point where you can pick up an SLA 3D printer for a few hundred bucks. These machines, which use light to cure a resin, are capable of far higher resolution than their more common FDM counterparts, though they do bring along their own unique issues and annoyances. Especially on the lower end of the price spectrum.

[FlorianH] recently picked up the $380 SparkMaker FHD, and while he’s happy with the printer overall, he’s identified a rather annoying design flaw. It seems that the upgraded UV backlight in the FHD version of the SparkMaker produces somewhat irregular light, which in turn manifests itself as artifacts on the final print. Due to hot spots on the panel, large objects printed on the SparkMaker show fairly obvious scarring.

Now you might expect the fix for this problem to be in the hardware, but he’s taken it in a different direction. These printers use an LCD panel to block off areas of the UV backlight, thereby controlling how much of the resin is exposed. This is technique is officially known as “masked SLA”, and is the technology used in most of these new entry level resin printers.

As luck would have it, the SparkMaker FHD allows showing various levels of grayscale on the LCD rather than a simple binary value for each pixel. At least in theory, this allows [FlorianH] to compensate for the irregular backlight by adjusting how much the UV is attenuated by the LCD panel. He’s focusing on the printer he personally owns, but the idea should work on any masked SLA printer that accepts grayscale values.

The first step was to map the backlight, which [FlorianH] did by soaking thin pieces of paper in a UV reactant chemical, and draping them over the backlight. He then photographed the illumination pattern, and came up with some OpenCV code that takes this images and uses the light intensity data to compensate for the local UV brightness underneath the sliced model.

So far, this method has allowed [FlorianH] to noticeably reduce the scarring, but he thinks it’s still possible to do better. He’s released the code for this backlight compensation script, and welcomes anyone who might wish to take a look at see how it could be improved.

An uneven backlight is just one of the potential new headaches these low-cost “masked” SLA printers give you. While they’re certainly very compelling, you should understand what you’re getting into before you pull the trigger on one.

Ambitious LED Cube Provides Endless Video Game Scrolling; Plays Castlevania

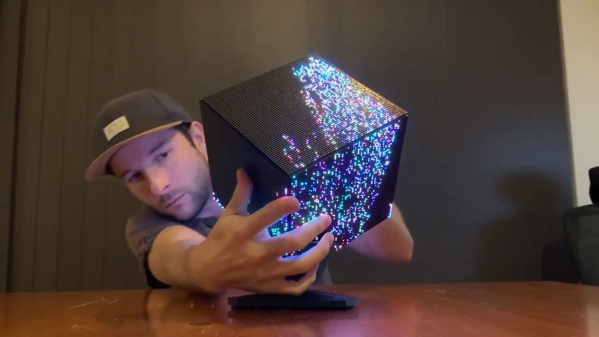
LED cubes are all the rage right now, and rightly so given the amount of work that goes into them and the interesting things people find to do with them. Not content to make yet another position-sensitive display or an abstract design, though, [Greig Stewart] opted for something a bit more ambitious: an LED cube with a playable game of Castlevania.

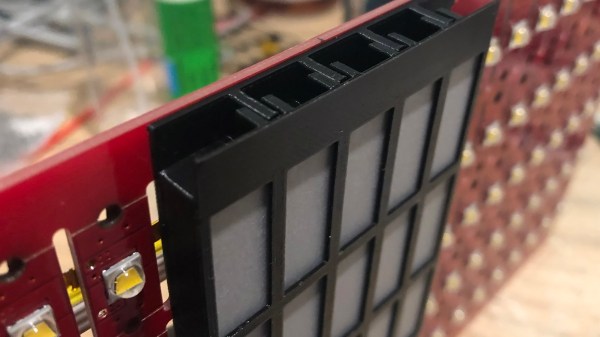
As ambitious projects often do, this one required leveraging the previous art, some of which we’ve featured before. [Greig] pulled inspiration and information from cube builders like [polyfloyd], [Greg Davill], and [kbob] to put the six 64-LED matrix panels to work. Getting the structural elements figured out was an early stumbling block, but [Greig] pulled it off with 3D-printed brackets and a hinge that’s a work of art in itself; the whole thing looks like something the Borg would have built. The Raspberry Pi inside made a Gameboy emulator possible, and his first stab at it was to have six different games running at once, one on each panel. He settled on just one game, the classic side-scroller Castlevania, played on just four of the panels. Some wizardry was required to de-scroll the game so that the character walks around the cube rather than having the background scroll; you can check out the results in the clip below.

Currently, the cube sits on a lazy susan with a small motor controlling the swiveling in response to a foot control. [Greig] wants to put the motor under control of the game so that physical scrolling is synced with gameplay; we heartily endorse that plan and look forward to the results.

Continue reading “Ambitious LED Cube Provides Endless Video Game Scrolling; Plays Castlevania”

Rise And Shine With This Japanese-Inspired Clock

On the Hackaday.io page for his gorgeous “Sunrise Alarm Clock”, [The Big One] is quick to point out that his design is only inspired by Japanese lanterns, and does not use authentic materials or traditional woodworking techniques. Perhaps that’s an important fact to some, but we’ll just say that the materials used seem far less important when the end result looks this good.

Unfortunately [The Big One] hasn’t provided any interior shots of his clock, as it sounds like the aesthetics of the internal wiring isn’t quite up to the standard set by the outside of it. But he has provided a concise parts list, a wiring diagram, and source code, so we’ve got a pretty good idea of what’s under the hood.

The clock is powered by the uBBB 32u4, an ATMega32u4 development board that [The Big One] developed in conjunction with [Warren Janssens]. It uses the popular MAX7219 LED matrix for the display, and a DS3231 RTC module to help keep the time. There’s also a DFPlayer Mini module onboard that allows him to play whatever sound effects or music he wants when the alarm goes off.

Of course the star of the show is the LED strips which illuminate the shōji-style column. These have apparently been wrapped around a coffee can of all things, which not only serves as a convenient way of holding the strips, but [The Big One] says actually makes the speaker sound a bit better. Hey, whatever works.

This isn’t the first “lantern” clock to grace these pages, but compared to the high-tech presentation of previous projects, we can’t help but be impressed by the grace and elegance of this wooden masterpiece.

IR Hack Turns Kid’s Lamp Into Temp Display

Sometimes a clever hack of an off-the-shelf product can come courtesy of its dismantling and hardware modification, but at other times the most elegant of hacks can be made without ever turning a screwdriver. [Brian Lough] was given the request by a friend to replicate a commercial child’s night light that changed colour with temperature, and his response was to use an off-the-shelf colour changing kids light unmodified, sending it temperature-related colour commands via its infra-red control.

His device is a spectacularly simple one hardware-wise using an off-the-shelf Wemos D2 Mini ESP8266 board running an Arduino bootloader, coupled with a BME280 temperature sensor, IR receiver, and transmitter. His video which we’ve placed below the break is a handy primer to anyone with an interest in infra-red reverse engineering, and we can see that there will be other projects that could be seeded by it. For those curious enough to look, it can be found on GitHub.

[Brian] has appeared here so many times, and is definitely worth a follow. One of his more recent builds featured another child’s toy augmented to make it something really special.

Continue reading “IR Hack Turns Kid’s Lamp Into Temp Display”