Smart Reflow Oven Is Over-Engineered

reflow

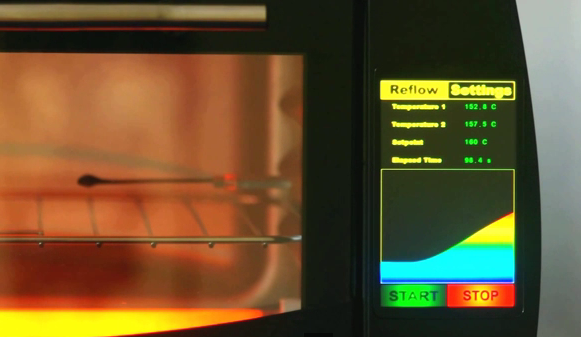
[Linas] reverse engineered an AMOLED HTC 800×480 screen and interfaced it with an STM32 micro-controller, along with some other components, to make a gorgeously over engineered reflow oven.

Under the hood there is a PSoC5LP PID controller to control the 800W IR heating coil and two K-type thermocouples for sensing.

The real beauty is in the relatively small STM32 chip powering the HTC AMOLED screen. The AMOLED screen is high contrast and has a wide viewing angle, giving it a clear crisp view from all front facing viewpoints. Though pushing the limits of what the STM32F429i can do, [Linas] managed to make a very nice “home-grown” user interface, complete with user configurable settings and current temperature graphs.

The user interface looks very responsive and using some clever programming, [Linas] was able to make use of the potential of the screen to provide beautiful plots and interface widgets.

[Linas] goes into quite a bit of detail about the programming involved with rendering to the screen, so be sure to check out the video after the jump.

Continue reading “Smart Reflow Oven Is Over-Engineered”

Open Bitcoin ATM

openBitcoinAtm

If there’s one thing Bitcoins can benefit from, it’s easier accessibility for first-time users. The process can be a bit daunting if you’re new to cryptocurrency, but [mayosmith] is developing an open Bitcoin ATM to help get coins in the hands of the masses. There are already some Bitcoin dispensers out there. The Lamassu is around 5k a pop, and then there’s always the option of low-tech Condom Vending Machine conversions.

[mayosmith’s] build is still in the proof-of-concept phase, but has some powerful functionality underway. The box is made from acrylic with a front plate of 12″x12″ aluminum sheet metal, held on by 2 aluminum angles and some bolts. Slots were carved out of the aluminum sheet for the thermal printer and for bill acceptor—the comments identify it as an Apex 7000. Inside is an Arduino with an SD Shield attached. Dollars inserted into the acceptor trigger the Arduino to spit out a previously-generated QR code for some coins via the thermal printer, though all values are pre-determined at the time of creation and stored sequentially on the SD card. Stick around for a quick video below, and check out the official page for more information: http://openbitcoinatm.org

Continue reading “Open Bitcoin ATM”

FT232RL: Real Or Fake?

Above are two FTDI FT232RL chips, an extremely common chip used to add a USB serial port to projects, builds, and products. The one on the left is a genuine part, while the chip on the right was purchased from a shady supplier and won’t work with the current FTDI drivers. Can you tell the difference?

[Zeptobars], the folks behind those great die shots of various ICs took a look at both versions of the FT232 and the differences are staggering. Compared to the real chip, the fake chip has two types of SRAM etched in the silicon – evidence this chip was pieced together from different layouts.

The conclusion [Zeptobars] reached indicated the fake chip is really just a microcontroller made protocol compatable with the addition of a mask ROM. If you’re wondering if the FTDI chips in your part drawers are genuine, the real chips have laser engraved markings, while the clone markings are usually printed.

STM32 Nucleo, The Mbed-Enabled, Arduino-Compatable Board

The STM32 line of microcontrollers – usually seen in the form of an ST Discovery dev board – are amazingly powerful and very popular micros seen in projects with some very hefty processing and memory requirements. Now, ST has released a great way to try out the STM32 line with the Nucleo board.

There are two really great features about these new Nucleo boards. First, they’re mbed compatable, making them a great way to get started in the ARM development world. Secondly, they have Arduino pin headers right on the board, giving you access to all your shields right out of the box.

Right now, there are four varieties of the Nucleo board based on the STM32F030, -F103, -F152, and -F401 microcontrollers. The STM32F401 is the high-powered variant, An ARM Cortex-M4 microcontroller running at 84 MHz, 512kB of Flash, and enough I/O for just about any project.

If you’d like to get your hands on one of the STM32 Nucleo boards, you can order a voucher to pick one up at Embedded World in Germany next week. Otherwise, you’re stuck ordering from Mouser or Farnell. Bonus: the high-end F401-based board is only $10 USD.

Expanded Memory For The Teensy++ 2.0

RAM

Sometimes with a microcontroller project you need to do some very RAM-hungry operations, like image and audio processing. The largish AVR chips are certainly fast enough to do these tasks, but the RAM on these chips is limited. [xxxajk] has come up with a library that allows the use of huge RAM expansions with the Teensy++ 2.0 microcontroller, making these RAM-dependant tasks easy on one of our favorite microcontroller board.

[xxajk]’s work is actually a port of XMEM2, an earlier project of his that added RAM expansion and multitasking to the Arduino Mega. Up to 255 banks of memory are available and with the supported hardware, the Teensy can address up to 512kB of RAM.

XMEM2 also features a preemptive multitasking with up to 16 tasks, the ability to pipe messages between tasks, and all the fun of malloc().

The build is fairly hardware independent, able to work with Rugged Circuits QuadRAM and MegaRAM expansions for the Arduino Mega as well as [Andy Brown]’s 512 SRAM expansion. With the right SRAM chip, etching a board at home for XMEM2 is also a possibility.

Dad-Built Rocket Control Module

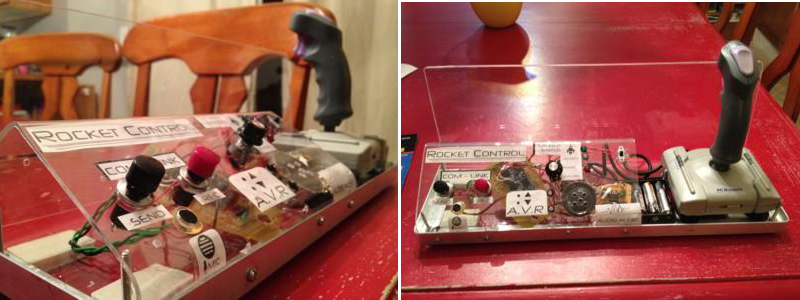
Like a lot of parents, [justbennett]’s kids like to play rocket and spaceship command. His kids’ imagination-assigned controls kept shifting from this LEGO to that banana to the dog’s tail, so [justbennett] did what he had to do: make this Dad-built rocket control module for them.

The module supports all of the vital sub-modules required for rocket and spaceship administration. There is a launch status indicator, an acceleration vector resonator (AVR), and a com-link. He used mostly parts on hand, and the Arduino count is zero. He built a NASA-grade Plexiglas enclosure to avoid juice box incidents. The two pieces are connected with aluminum angle bar so that he can make repairs or modifications.

The analogue joystick was a thrift store find. [Justbennett] wired the trigger and thumb buttons up as the AVR which activate a recycled PICAXE 08M project of his. The PICAXE senses the button pushes to flash an LED and play an ascending or descending tone. Long-pressing one button will result in an explosion noise as you might expect.

The launch status indicator is a potentiometer wired to a second PICAXE and three LEDs that light up in sequence. In the future, [justbennett] intends to add haptic feedback with a tiny vibration motor. The com-link packet messaging system is a Radio Shack recording module and two big, tempting buttons. The control module ships with a message from Star Command that explains the controls.

Nrf24l01+ Using 3 ATtiny85 Pins

[Ralph] wasn’t satisfied with the required 5 control pins to drive his nrf24l01+ transceiver module, so he used this circuit needing just 3 pin using an ATtiny85.

One of the key components was to effectively drive the chip select (CSN) line from the clock (SCK) line. The nrf24l01+ needs the CSN line to transition from high to low on the beginning of a communication.  [Ralph] put the SCK line behind a diode, put a capacitor in parallel with the CSN line and altered the arduino-nrf24l01 library to encode extra delays for the clock line.  This allowed the CSN line to be driven by the SCK line. Subsequent line transitions during transmission happen too fast to charge the capacitor, leaving the CSN line in a low state.

After tying the chip enable line high and dropping the 5V power line to 1.9-3.6V across a red LED, [Ralph] had an ATtiny85 controlling a nrf24l01+ module.

Though deceptively simple, a very cool hack that opens up a couple more lines on the ATtiny85.