Arduino Astronomic Clock Automates Lights

ardAst

[Paulo’s] garden lights are probably a bit more accurately automated than anyone else’s on the block, because they use latitude and longitude clock to decide when to flip the switch. [Ed Note from the far future: this page no longer exists, but you can still read it on the Wayback Machine. The TimeLord library has also been superceded, so you’ll have some porting to do.]

Most commercial options (and hobbiest creations) rely on mechanical on/off timers that click on an off every day at the same time, or they use a photosensitive element to decide it’s dark enough. Neither is very accurate. One misplaced leaf obscuring your light-dependent resistor can turn things on unnecessarily, and considering the actual time of sunset fluctuates over the year, mechanical switches require constant adjustment.

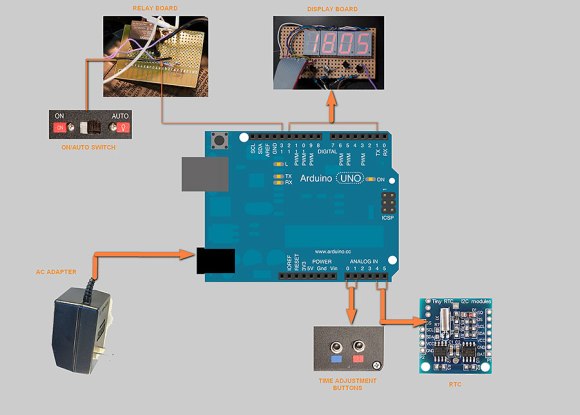
[Paulo’s] solution addresses all of these problems by instead relying on an algorithm to calculate both sunrise and sunset times, explained here, combined with swiftek’s Timelord library for the Arduino. The build features 4 7-segment displays that cycle through indicating the current time, time of sunset and of sunrise. Inside is a RTC (real time clock) with battery backup for timekeeping along with an Omron 5V relay to drive the garden lamps themselves. This particular relay comes with a switch that can force the lights on, just in case.

Check out [Paulo’s] project blog for the full write-up, links to code and more details, then take a look at some other home automation projects, like the SMS-based heater controller or occupancy-controlled room lighting.

A Simple Servo Hack For An Iron Man Helmet

iron man helmet

[James] makes some seriously awesome Iron Man props. In one of his latest helmet builds, he came across a handy hack to lock the faceplate servo in place.

You see, as awesome as it is walking around like Iron Man all day, you’re going to want to keep your faceplate up for extended periods of time. Simply holding the servo in place electronically is a waste of power, and results in the annoying sound of a servo under strain. On the other hand, cutting power to it will keep it in place momentarily — but it will also start to close under the force of gravity.

The solution is actually quite simple, by reprogramming the Picaxe-08M microcontroller, the board now shorts the motor terminals to hold it in place. This is called magnetic motor braking, and it works by creating a closed loop that makes it much harder to induce a current under load. We once added this feature to a motorized push-scooter — it’d stop on a dime, although you wouldn’t…

Stick around after the break to see an extremely in depth video on how he setup the entire system.

Continue reading “A Simple Servo Hack For An Iron Man Helmet”

Brute Forcing An Android Phone

[Brett’s] girlfriend is very concerned about cell phone security — So much so that she used a PIN so secure, even she couldn’t remember it.

Beyond forgetting the PIN, the phone also had encryption enabled, the bootloader locked, and zero permissions for the Android Device Manager to change the PIN. Lucky for her, [Brett] had purchased an STM32F4Discovery Development Board a few months ago, and was itching for a suitable project for it.

Now unfortunately, Android allows you to pick a PIN of anywhere between 4 and 8 digits, which as you can guess, results in a massive number of possible permutations. She was pretty sure it was only 6 digits, and that she didn’t use a 1, 2, or 3… and she thought it started with a 4 or a 7… and she didn’t think any of the digits were repeated… This helped narrow it down a bit, from 1 million possibilities to about 5,000 — assuming all of the boundary conditions she remembers are in fact correct.

[Brett] started by writing a C library to generate permutations of the PIN, testing the board on his own phone to make sure it works with a known PIN, and boom, they were in business.

28,250 PIN attempts later, they decided they were not. Did we mention you can only enter 5 PINs in every 30 seconds?

Continue reading “Brute Forcing An Android Phone”

Freeside’s Infinity Portal

sidebyside

If infinity mirrors aren’t cool enough, the 10-foot-tall infinity portal should blow you away. Strictly speaking, the mirror itself is only 7’x4′, but you’ll still find yourself engulfed in the archway. The portal began as a simple prototype that we covered earlier this summer, which was just a frame of 2×4’s, some acrylic and LED strips. It works by putting lights between a two-way mirror and another mirror, reflecting most light internally and creating the illusion of depth.

The giant archway also began as a small-scale prototype, its shape and engravings carved out by a laser cutter. Once they were satisfied with its design, it was time to scale things up. The full-sized portal needed a a tremendous amount of stability, so the guys at Freeside built the base from wooden palettes. They needed the portal to travel to a few different venues, so the rest of the frame breaks down into components, including a removable wooden frame from which the acrylic hangs. A Teensy 3.0 runs all the WS2812 LED strips, which were chosen because each of their LEDs is individually addressable.

Check out the video below for an extremely detailed build log, which should give you a better idea of how massive and impressive this portal really is!

Continue reading “Freeside’s Infinity Portal”

Tricking A USB Power Supply

battery_load_pulser6

[Paul] recently purchased an inexpensive USB power pack, hoping to use it for powering small electronics projects. Unfortunately it has been designed to only stay on when a device is drawing a lot of power (like charging a cell phone), so he set out to fix it.

He started by experimenting to see just how much current is required to keep the battery pack on, and for how long. Testing a few resistors he discovered that a 22 ohm one will keep the power supply on indefinitely. If there’s no load, it only remains powered on for about 13 seconds. Now you can’t just hook up the 22 ohm resistor to a 5V power supply for the sake of keeping it on — that would draw 1.1watts and get very hot!

His next step was to determine how long the load needs to be on for, and at what interval in order to keep the power supply active. He created a test circuit using a Teensy microcontroller and determined that a 20ms pulse every 1.4 seconds was enough to keep it on — any less and it would  switch off after a few minutes. The final transistor based circuit draws about 222mA — but at a 1.6% duty cycle, resulting in only a 3.5mA draw! [Paul] suspects the switching power supply inside battery pack probably draws more than that! He can’t take all the credit though, he learned of the idea from a forum post — but he certainly has made a very nice write up for people to follow in his footsteps!

Now that’s a good old fashioned product hack!

Wireless Encryption Between Galileo And A MSP430

[Mark] recently finished his latest project, where he encrypts wireless communications between the new Intel Galileo and a Texas Instruments MSP430. The wireless interfaces used are the very common nRF24L01+ 2.4GHz transceivers, that had a direct line of sight 15 feet range during [Mark]’s tests. In his demonstration, the MSP430 sends an encrypted block of data representing the state of six of its pins configured as inputs. This message is then received by a sketch running on the Galileo and stored in shared memory. A python script then wakes up and is in charge of decrypting the message. The encryption is done using AES-128bits in Electronic Codebook mode (ECB) and semaphores are used to prevent simultaneous accesses to the received data. As it is the first project using an Intel Galileo we received, don’t hesitate to send us a tip if you found other ones.

A Killer Arcade Cabinet For Halloween

slaughterhouseArcade

It’s already pretty cool that [Clay] co-owns an Arcade, but he’s really impressed us with his custom-made Splatterhouse cabinet built to get his patrons in the Halloween spirit! A Namco brawler title from 1988, Splatterhouse came in an unadorned and otherwise forgettable cabinet. [Clay] salvaged an old Williams Defender, coating the sides with a cocktail of drywall compound, sand, and paint to achieve a stone texture. He then carved up some pink insulation foam into a tattered “wooden” frame and used it as a monitor bezel. For accents, he fashioned strips of latex to resemble torn flesh and placed them among the boards. The control panel is yet another work of art: [Clay] 3D printed a life-size human femur for the game’s joystick, and converted the buttons to look like eyeballs.

[Clay] decided to go beyond the stunning cosmetics, though, and tapped into the game’s CPU with a custom daughterboard that detects different in-game events and state changes such as player health. An ATMega165 uses four PWM outputs connected to a number of LEDs inside the cabinet and around the monitor bezel to react to the different events. If a player takes damage, red lights flash around the monitor. Inserting a coin or dying in the game causes a different set of LEDs behind the marquee to go nuts.

Check out his detailed project page for more information and see a video overview below. If building a full-scale arcade machine is out of your budget, you can always make a tiny one.

Continue reading “A Killer Arcade Cabinet For Halloween”