Perpetual Pong

perpetual-pong

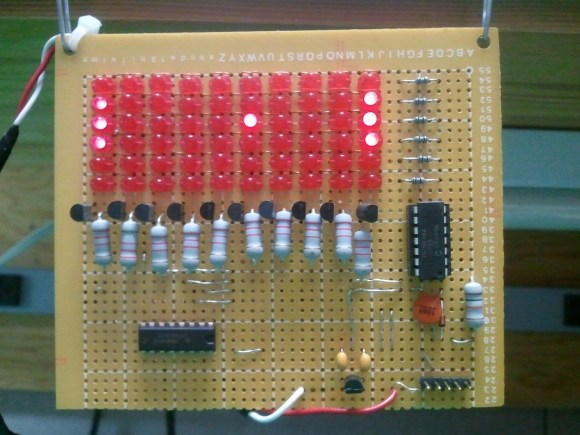
[Jeff Joray] wrote in to show off this perpetual Pong device he built. The six by ten LED matrix acts as a game board for Pong but there are no controls. The board simply plays against itself. It’s pretty much a pong clock without the clock.

The brain of the device is a PIC 16F684 which drives the six rows of the display directly. He went with a decade counter (CD74HC401) to scan the rows one at a time. Now what would you expect to find on the underside of this hunk of protoboard? A rat’s nest of point to point wiring? If so you’re going to be disappointed. [Jeff] spent the time to generate a schematic and board layout in Eagle. While at it, he knew he was going to be using protoboard so the artwork is designed to use solder bridging as much as possible. What he ends up with is one of the cleanest mutiplexed one-off projects you’re going to find. See it in action after the jump.

Continue reading “Perpetual Pong” →

Another Way To Look At Charlieplexing

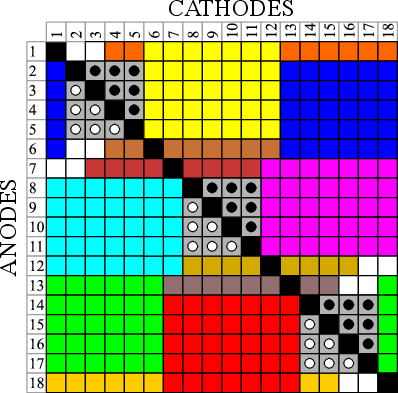
Charlieplexing is a technique that allows you to drive a larger number of LEDs than wouldn’t be possible with the same number of I/O pins on a traditional multiplexed matrix. If we lost you there just think of it as lots of blinky lights connected to a small number of pins. It works by leveraging the one-way nature of a diode. Current will only flow through an LED in one direction so if you hook up your display in a clever way you can drive multiple LEDs from one I/O by switching the polarity of that pin between voltage and ground. [M.Rule] recently looked at using Charlieplexing with LED modules. His conceptual approach to the problem is different from those we remember seeing before and it’s worth a look.

Instead of just using the formula to calculate how many LEDs he can drive [M.Rule] is using a table of I/O pins to establish how many and in what order these displays can be connected. Each colored set of blocks represents an LED module. The graphic above shows how 18-pin can be utilized. He even filled in the unused pin combinations with input buttons.

Retrotechtacular: The Fourier Series

Here’s a really quick video which takes a different approach to understanding the Fourier Series than we’re used to. If you’re a regular reader we’re sure you’ve heard of the Fourier Series (often discussed as FFT or Fast Fourier Transform), but there’s a good chance you know little about it. The series allows you to break down complex signals (think audio waves) into combinations of simple sine or cosine equations which can be handled by a microcontroller.

We’ve had that base level of understanding for a long time. But when you start to dig deeper we find that it becomes a math exercise that isn’t all that intuitive. The video clip embedded after the break changes that. It starts off by showing a rotating vector. Mapping the tip of that vector horizontally will draw the waveform. The Fourier Series is then leveraged, adding spinning vectors for the harmonics to the tip of the last vector. The result of summing these harmonics produces the sine-based square wave approximation seen above.

That’s a mouthful, and we’re sure you’ll agree that the video demo is much easier to understand. But the three minute clip just scratches the surface. If you’re determined to master the Fourier Series give this mammoth Stanford lecture series on the topic a try.

Continue reading “Retrotechtacular: The Fourier Series” →

Embedded Web Server Is All About Clever Formatting

embedded-web-server

Take a look around here and you’ll find all kinds of embedded web servers. This one doesn’t look all that interesting, especially because it’s just a NIC plugged into a development board. But for us the interesting part is in how [Andrew Rossignol] chose to format the webpage assets to best utilize the under-powered server.

The project was spawned as part of a class in Internet Embedded Systems which [Andrew] is taking. The board has an ATmega16 microcontroller and he’s using the ever popular ENC28J60 on that Ethernet adapter board. The TuxGraphics TCP/IP Stack takes care of communications with the network.

One constraint which [Andrew] imposed upon himself was to use just a single response which the available RAM limits to about  700 bytes. Any decent webpage needs to have at least some graphics but that’s tough with the size limit. He managed to display an AVR logo by optimizing an SVG in Inkscape then stripped the rest of the cruft using VIM (explained in the demo after the break). With that piece of Linux-fu in his pocket he set to work streamlining the CSS file. The webpage isn’t just static either. He displays the server up-time and even allows the relays and LEDs on the Olimex board to be controlled.

Despite the limitations of the ATmega family they still seem to do some amazing Internet-connected stuff. Here’s one used as a Minecraft server.

Continue reading “Embedded Web Server Is All About Clever Formatting” →

Adding Bluetooth Remote Control To PC Speakers

adding-bluetooth-remote-control-to-pc-speakers

[Andrzej’s] plain old computer speakers are ordinary no more. He pulled off a fairly complicated hack which now lets him control speakers via Bluetooth.

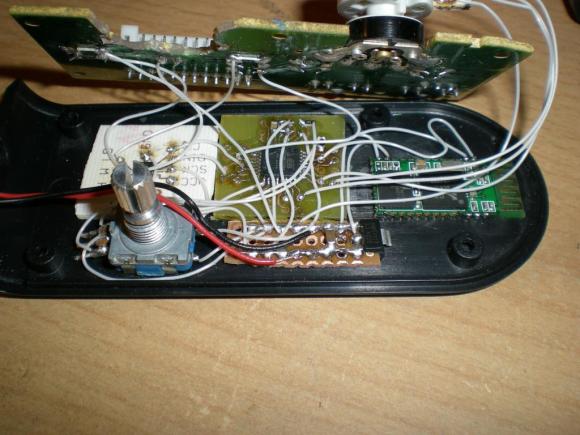
He had a set of Creative brand computer speakers with a volume potentiometer that needed replacing. He was having trouble finding a drop-in replacement part and decided he would just go with a rotary encoder. Obviously you can’t just drop one of those in, he would need a microcontroller to monitor the encoder and translate the change into the appropriate resistance. He figured if he was going this far he might as well make the most out of the uC.

Above you can see all the stuff he crammed into the original case. The rotary encoder is seen on the lower left. An ATmega8 is on a PCB he made himself. The white part to the left is a digital potentiometer which feeds the resistance to the original speaker PCB. On the left is the Bluetooth module which lets him control everything from his phone. You can see a demo of that after the break.

Continue reading “Adding Bluetooth Remote Control To PC Speakers” →

AVR VGA Generator

avr-vga-generator

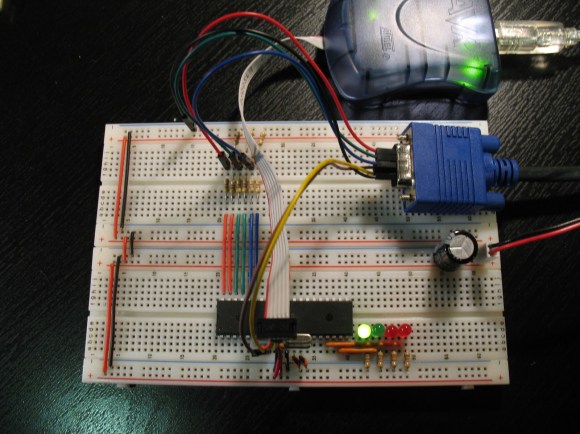
This simple circuitry makes up the hardware for [Andrew’s] AVR-based VGA generator. He managed to get an ATmega1284 to output a stable VGA signal. Anyone who’s looked into the VGA standard will know that this is quite an accomplishment. That’s because VGA is all about timing, and that presented him with a problem almost immediately.

The chip is meant to run at a top speed of 20 MHz. [Andrew] did manage to get code written that implemented the horizontal and vertical sync at this speed. But there weren’t enough clock cycles left to deal with frame buffering. His solution was to overclock the chip to 25 MHz. We assume he chose that because he had a crystal on hand, because we think it would have been easier to use a 25.174 MHz crystal which is one of the speeds listed in the specification.

Red, green, and blue each get their own two-bit range selected via a set of resistors for a total of 64 colors. As you can see in the video after the break, the 128×96 pixel video is up and running. [Andrew] plans to enlarge the scope of the project from here to make it more versatile than just showing standard images. The code (written in assembly) is available at his GitHub repository.

Continue reading “AVR VGA Generator” →

Reverse Engineering Challenge Starts Off Simple

img_20130326_102537

We love seeing hard-core firmware reverse engineering projects, but the number of hackers who can pull those off is relatively small. It’s possible to grow the ranks of the hacker elite though. A hackerspace is a great place to have a little challenge like this one. [Nicolas Oberli] put together a capture the flag game that requires the contestants to reverse engineer Teensy 3.0 firmware.

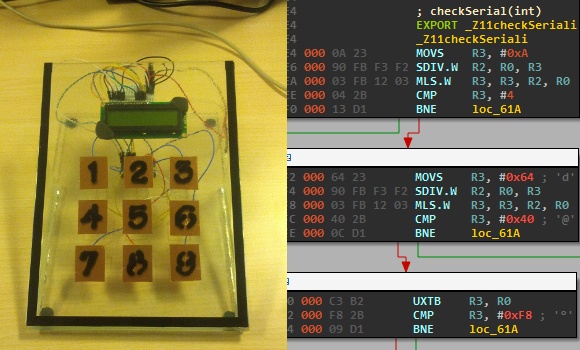
He developed this piece of hardware for the Insomni’hack 2013 event. It uses the Teensy 3.0 capacitive touch capabilities to form a nine-digit keypad with a character LCD screen for feedback. When the correct code is entered the screen will display instructions on how to retrieve the ‘flag’.

To the right you can see the disassembly of the .elf file generated by the Arduino IDE. This is what [Nicolas] gave to the contestants, which gets them past the barrier of figuring out how to dump the code from the chip itself. But it does get them thinking in assembly and eventually leads to figuring out what the secret code is for the device. This may be just enough of a shove in the right direction that one needs to get elbow deep into picking apart embedded hardware as a hobby.

Continue reading “Reverse Engineering Challenge Starts Off Simple” →