N64 Controller Input Using An ATtiny85

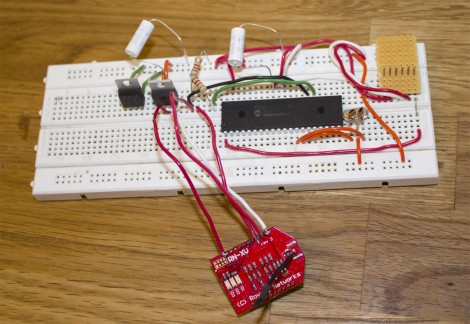
[Larsim] worked out the timing necessary to read button and joystick data from an N64 controller using an ATtiny85 microcontroller. The project was spawned when he found this pair of controllers in the dumpster. We often intercept great stuff bound for the landfill, especially on Hippie Christmas when all the student switch apartments at the same time.

Instead of cracking the controllers open and patching directly to the buttons, [Larsim] looked up the pinout of the connector and patched into the serial data wire. In true hacker fashion, he used two 5V linear regulators and a diode in series to step his voltage source down to close to 3.6V, as he didn’t have a variable regulator on hand. It does sound like this causes noise which can result if false readings, but that can be fixed with the next parts order.

The controller waits for a polling signal before echoing back a response in which button data is embedded. This process is extremely quick, and without a crystal on hand, the chip needs to be configured to use its internal PLL to ramp the R/C oscillator up to 16Mhz. With the chip now running fast enough, an external interrupt reads the serial response from the controller, and the code reacts based on that input.

It seems the biggest reason these N64 controllers hit the trash can is because the analog joystick wears out. If you’ve got mad skills you can replace it with a different type.

Electronic Die Rolls Up To 100

If you’re gaming on the road, or just don’t have a die with the right number of sides on hand, an electronic polyhedral die will be quite handy. [Marcus] built this using a printed circuit board of his own design, and we think an electronically simple project like this is a great way to get your feet wet with PCB fab house techniques. He suggests Seeed Studios’ service, or the DorkBotPDX group PCB order. But this would not be a hard project to build on perfboard as well.

The concept is simple. A two-digit 7-segment display shows the value of the top face of your die. when it’s time to roll, just pick up the box and tip it over. A tilt switch senses this action and rolls the die by displaying the next pseudo-random number. The single button, seen here with a pyramid die glued to it, lets you select between die with different number of sides; from 2 (like a coin flip) all the way up to 100.

We like [Marcus’] projects. He’s the same guy that built a scoring system in a game storage box.

Ultrasonic Rangefinder As Scanning Radar

Ultrasonic rangfinders are a cheap and easy way to gather obstacle avoidance data. When added to a servo motor they form something of a scanning radar for near-proximity objects.

In this implementation, [Rui Cabral] is driving the servo, and collecting data from the sensor using a PIC 18F4520. The servo rotates 180 degreees, taking sensor measurements in increments of nine degrees. If it discovers obstacles, the distance and orientation are recorded. Feedback is displayed on a 20-LED bar graph display which shows a moving LED to track the sensor orientation, with LEDs remaining lit whenever an object is found. Right now the obstacle data is pushed over a serial connection with a PC, but could easily be injected into navigation logic for a robot in order to triangulate a path around the obstruction. You can see [Rui’s] project in action after the break.

We looked in on the same concept with a different display technique a couple of years back. That hack used an Arduino and Processing to map sensor data with a traditional green sweep display.

Continue reading “Ultrasonic Rangefinder As Scanning Radar”

Tinywrench Controls Motors With ATtiny24 Chips

Tinywrench is [Tanjent’s] take on a motor controller board. It aims to replicate all of the functions that a standalone motor controller chip offers at as low a cost as possible. Early results are in. It works, and as seen can be assembled for about $8.

The top of the device offers a terminal block for connecting motors, ground, and 24V input. A pin header on the bottom has all the connections you would expect to find with a stepper motor driver board. Looking back on top there’s also a pair of ATtiny24 chips, each with its own trimpot for balancing the constant current output. Hiding on the underside of the board are two H-bridges built using high and low-side MOSFETs along with some diodes for protection, and various passive components for driving them.

As it stands, each of those H-bridges can handle around 9 amps which should be more than enough for projects with small motors. [Tanjent] mentions that one of the main advantages of working with this instead of a single motor-driver chip is that if you fry one of the MOSFETs you can replace it instead of trashing the entire board.

8-pin Micro Plays Pong On Your Widescreen

[Fernando] sent in a tangential project update that uses an ATtiny45 to play Pong on his television. Last time we looked in on his work he had just finished getting the eight-pin chip to display a big number on the TV via the VGA port. This expands on the idea while he continues to wait for parts.

Right now the chip plays against itself, but he’s got one input pin left and we’d love to see a button added for a simple one-player game. We’re thinking the paddle would always be moving in one direction or the other, with a click of the button to reverse that direction. The part that he’s waiting for is a Bluetooth module, which we’d love to see used for 2-player games via a pair of Wiimotes (we’re just wishing at this point and don’t know if that would even be possible). The end goal for the hardware is a Bluetooth connected scoreboard for Android devices.

The code is written in Assembly, and we found it relatively easy to follow what [Fernando] is doing with the game logic. On the graphics side of things he gets away with a 120×96 resolution because Pong is supposed to look pixelated. We love the result, which you can see for yourself after the break.

Continue reading “8-pin Micro Plays Pong On Your Widescreen”

Meet The Pinguino – A Completely Open PIC-based Dev Platform

pinguino

[Phillip Torrone] from Make recently sat down with [Jean-Pierre Mandon] and [Tsvetan Usunov], creators of the Pinguino, to hear more about their product. While the name might not sound familiar, we’re pretty sure you’ll be seeing more of this development platform as time goes on.

Essentially created by makers for makers, the Pinguino is a 32-bit PIC based Arduino-compatible prototyping platform, much like Microchip’s chipKIT. The Pinguino boasts 100% Arduino compatibility just as the chipKIT, though their tool chain has been built from scratch, meaning it is completely open source. The Pinguino even include an on-board microSD slot and a built-in Li-Po charger – two huge features that make this a solid chipKit competitor.

Phil discusses the history of the Pinguino with the pair, diving into technical differences between the two platforms, as well as where they plan on taking the platform in the future. It’s certainly an interesting read for anyone interested in open software and hardware that has been considering giving the chipKIT a try.

Open Source Makes This USB Arcade Controller Build A Breeze

[Jamie] built his own USB connected arcade controller. We’ve been seeing a lot of these lately, and they usually involve soldering buttons to a keyboard PCB. But [Jamie] decided to go a different route and use his own microcontroller. This method always gets a bit hairy when it comes to deciding how to connect it to a computer. Dealing with the USB stack used to be quite tricky, but the LUFA project is slowly taking the pain out of the process.

The Lightweight USB Framework for AVRs is an open source project that handles the hard work associated with USB capable AVR microcontrollers. [Jamie] knew that they already had a sample implementation of a hardware joystick. He’s not using one of the supported boards and so wasn’t able to just compile and go. But porting the code to work with his minimus board was simple enough. With the code in place, the physical build was quite simple. The buttons and joystick were mounted on the surface of an overturned drawer. Each is connected to one pin of the controller board and to ground. LUFA makes sure that the device enumerates as a joystick, and [Jamie] was gaming in no time.