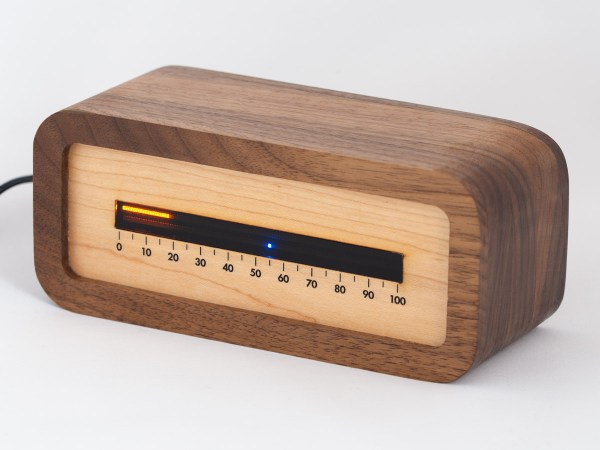
AVR Configurable Custom Logic As A Frequency Divider At 4x Chip’s Clock Speed

What a time to be alive when you can find inexpensive microcontrollers that come with programmable(ish) logic that can operate independently of the system clock. [David Johnson-Davies] recently built a proof of concept using the Configurable Custom Logic (CCL) that is available in some of the newer AVR microcontroller designs. It’s a simple implementation, a set of frequency dividers that blink three LEDs with up to a 90 MHz input signal. But the simplicity is the reason to love his write-up — you can wrap your head around it right away.

There are four lookup table (LUTs) used to form the frequency divider. Think of these like a NAND or XOR gate, but you get to decide how the output truth tables will perform. The output is fed into a sequencer which can be configured as a D/JK flip-flop or a D/RS latch, plus you can specify the signal edge, and of course define the clock source. An interesting trick here is to hold the G input of both D flip-flops high by feeding them LUTs set to all ones. Note that the output of the first divider (PA3) is feeding the external input (PD2) of the second divider.

While the CCL is configured using the C code you flash to the microcontroller, it’s a hardware peripheral capable of operating independent of the chip’s system clock. The AVR128DA28 that’s used here tops out at 24 MHz (double that if you use the PLL) but [David] got reliable results from his clock divider feeding a signal as high as 90 MHz to the input pin. Of course you have the option of feeding internal clock signals to the CCL, but that wouldn’t seem nearly as interesting here. For the demo, [David] is actually toggling an IO pin which is connected to PA2 as the external input for the logic. Make sure you click through to his write-up linked above as he does an excellent job of walking through the sample code (just a couple-dozen lines to set this all up). Here’s the datasheet for this chip (PDF, page 447 for pertinent registers) and for a deeper dive the appnote on CCL (PDF).

So what is this all good for? We already saw an answer to that question back in January when [SM6VFZ] used the CCL peripheral to build a software-defined switch-mode converter. How awesome is that?

Arduboy FX Mod-Chip: Now You’re Playing With Power

Traditionally, a forum full of technical users trying integrate their own hardware into a game system for the purposes of gaining unfettered access to its entire software library was the kind of thing that would keep engineers at Sony and Nintendo up at night. The development and proliferation of so called “mod chips” were an existential threat to companies that made their money selling video games, and as such, sniffing out these console hackers and keeping their findings from going public for as long as possible was a top priority.

But the Arduboy is no traditional game system. Its games are distributed for free, so a chip that allows users to cram hundreds of them onto the handheld at once isn’t some shady attempt to pull a fast one on the developers, it’s a substantial usability improvement over the stock hardware. So when Arduboy creator Kevin Bates found out about the grassroots effort to expand the system’s internal storage on the official forums, he didn’t try to put a stop to it. Instead, he asked how he could help make it a reality for as many Arduboy owners as possible.

Now, a little less than three years after forum member Mr.Blinky posted his initial concept for hanging an external SPI flash chip on the system’s test pads, the official Arduboy FX Mod-Chip has arrived. Whether you go the DIY route and build your own version or buy the ready-to-go module, one thing is for sure: it’s a must-have upgrade for the Arduboy that will completely change how you use the diminutive handheld.

Continue reading “Arduboy FX Mod-Chip: Now You’re Playing With Power”

Volumetric OLED Display Shows Bladerunner Vibe, Curious Screen Tech

[Sean Hodgins] is out with his latest video and it’s a piece of art in itself. Beyond a traditional project show and tell, he’s spun together a cyberpunk vibe to premiere the volumetric display he built from an OLED stackup. Update: He’s also documented the build.

The trick of a volumetric display is the ability to add a third dimension for positioning pixels. Here [Sean] delivered that ability with a stack up of ten screens to add a depth element. This is not such an easy trick. These small OLED displays are all over the place but they share a common element: a dark background over which the pixels appear. [Sean] has gotten his hands on some transparent OLED panels and with some Duck-Duck-Go-Fu we think it’s probably a Crystalfontz 128×56 display. Why is it we don’t see more of these? Anyone know if it’s possible to remove the backing from other OLED displays to get here. (Let us know in the comments.)

The rest of the built is fairly straight-forward with a Feather M4 board driving the ten screens via SPI, and an MPU-6050 IMU for motion input. The form factor lends an aesthetic of an augmented reality device and the production approach for the video puts this in a Bladerunner or Johnny Mnemonic universe. Kudos for expanding the awesome of the build with an implied backstory!

If you can’t find your own transparent displays, spinning things are a popular trend in this area. We just saw one last week that spun an LED matrix to form cylindrical display. Another favorite of ours is a volumetric display that spins a helix-shaped projection screen.

Wireless, Low Power E-Ink Weather Gadget

Not that long ago, making a low-power and wireless weather display complete with an e-ink screen would have required a lot of work and almost certainly would have been larger than the device [Dmitry] created.

(1) Weather alert indicator, (2) Current temperature, (3) Humidity and wind, (4) 24-hour temperature graph, (5) 24-hour precipitation probably graph

His low power e-ink weather gadget takes advantage of one of the niftier developer boards out there to create a useful and slim device that does exactly what he needs and not a lick more. It’s fast to look up weather online, but not as fast as glancing at a display in a convenient location.

The board [Dmitry] selected is a LilyGO TTGO T5s, an ESP32-based board that integrates an e-ink display, which requires no power unless being updated. It has been loaded with just enough smarts to fetch weather information using the OpenWeather API, and update the display accordingly.

Powering up the WiFi to fetch an easily-parsed JSON file and update the display only once per hour means that a battery can provide months of runtime. As a bonus, the LilyGO board even includes the ability to charge the battery, making things awfully convenient.

The bill of materials is here and code for the device, including setup directions, is on the project’s GitHub repository. And if your tastes happen to run more towards the artistic than utilitarian, we have just the weather display for you.

Micro:bit Makes Cardboard Pinball More Legit

What have you been doing to ward off the winter blues? [TechnoChic] decided to lean in to winter and make a really fun-looking game out of it by combining the awesome PinBox 3000 cardboard pinball sandbox with a couple of Micro:bits to handle and display the player’s score. Check it out the build and gameplay in the video after the break.

The story of Planet Winter is a bittersweet tale: basically, a bunch of penguins got tired of climate change and left Earth en masse for a penguin paradise where it’s a winter wonderland all year round. There’s a party igloo with disco lights and everything.

[TechnoChic] used a Micro:bit plugged into a Brown Dog Gadgets board to keep track of scoring, control the servo that kicks the ball back out of the igloo, and run the blinkenlights. It sends score updates over Bluetooth to a second Micro:bit and a Pimoroni Scrollbit display that sit opposite the pinball launcher. She went through a few switch iterations before settling on conductive maker tape and isolating the ball so it only contacts the tape tracks.

There are two ways to score on Planet Winter — the blizzard at the end of the ball launcher path nets you ten points, and getting the ball in the party igloo is good for thirty. Be careful on the icy lake in the middle of the playfield, because if the ball falls through the ice, it’s gone for good, along with your points. It’s okay, though, because both the party igloo and the ice hole trigger an avalanche which releases another ball.

Seriously, these PinBox 3000 kits are probably the most fun you can have with cardboard, even fresh out of the box. They are super fun even if you only build the kit and make a bunch of temporary targets to test gameplay, but never settle on a theme (ask us how we know). Not convinced? Hackaday Editor-in-Chief [Mike Szczys] explored them in depth at Maker Faire in 2018.

Continue reading “Micro:bit Makes Cardboard Pinball More Legit”

Slick Web Oscilloscope Is Ready In A Flash (Literally)

A bench oscilloscope is one of the most invaluable tools in the hardware hacker’s arsenal, but even the slimmest digital models are a bit large to be part of your everyday electronic carry. Sure you could throw one of those cheap pocket scopes in your bag, but what if there was an even easier way to take a peek at a few signals while you’re on the go?

For those who roam, the Arduino-web-oscilloscope project created by [David Buezas] is worth a close look. Using the Web Serial API built into recent versions of Google’s Chrome browser, this project allows you to pop open a software oscilloscope without installing anything locally. Whether it’s a public computer or that cheap Chromebook you keep around for emergencies, a valuable tool is just a few clicks away.

Flashing the MCU from the web interface.

Of course, there has to be some hardware involved. Despite what you might think given the name of the project, the code currently only supports the Logic Green LGT8F328P microcontroller. This cheap ATmega328P clone not only runs at 32 Mhz but according to [David], many operations can be done in fewer clock cycles than on the original 328P. In short it’s fast, and fast is good if you want more samples.

One of the best parts about this project is that a function to flash the firmware to the LGT8F328P is built right in the web interface. With the oscilloscope running in the browser, you just need to plug in a blank board, click the button to flash it, and start taking measurements. You could outfit a whole classroom or hackerspace with basic oscilloscopes in minutes, with a per-seat cost of just a few bucks.

Now as you might expect, there are some pretty hard limits on what you can realistically measure with this setup. For one thing, the board can’t handle anything higher than 5 volts. Even the cheapest oscilloscope kit is still going to be an upgrade, but the fact you can spin this up almost anywhere for the cost of a cheap MCU board makes it hard to complain about the results.

[Thanks to Bill for the tip.]

How Tiny Can A Microcontroller Dev Board Be!

With innumerable microcontroller boards on the market it’s sure that there will be one for every conceivable application or user. Among them are some seriously tiny ones, but this wasn’t enough for [Alun Morris]. Wanting to see how small he could make an ATtiny board without a custom PCB, he took a SOIC-8 version of the popular minimalist processor and mated it to a 6mm by 8mm piece of 0.05″ prototyping board to create a device that is dwarfed by its connectors.

It’s an extremely simple circuit and hardly something that hasn’t been done before, but the value here is in the tricky soldering to make it rather than its novelty. The ATtiny402 and three passive SMD components are fitted on the smallest possible sliver of prototyping board to contain them, and the female headers and set of programming pins contribute far more to the volume of the device than the board itself. He also tried a side-on design with two smaller slivers of board before settling on the more conventional layout. The demonstration of the system in action seen in the video below the break is a magnetic flux detector, dwarfed by the 40-pin DIP Z80 it is sitting on.

A lot of boards claim to be tiny, but few are this small. This ESP32 is a more usual contender.

Continue reading “How Tiny Can A Microcontroller Dev Board Be!”