Even for those of us who are fans of retrocomputing, it’s fair to say that not everyone plays their old-school games on real old-school hardware. The originals are now fragile and expensive, and emulators are good enough that if the gaming experience is all you’re after there’s little point in spending all that cash.
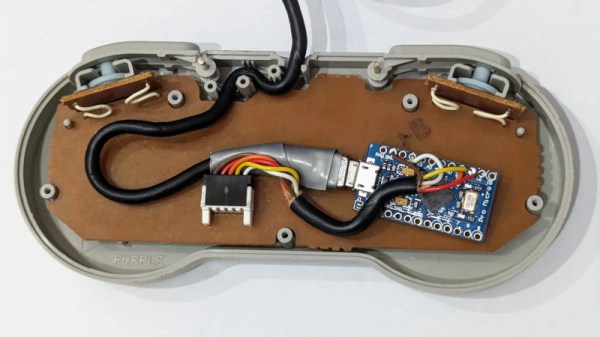
There’s one place in which the originals sometimes have the edge though, the classic controllers are the personal interface with the game. So when [Dome] found a SNES controller in an Akibahara shop, of course he picked it up. How to make it talk to a PC? Tuck an Arduino Pro Micro inside it, of course!
What we like about this project is that instead of ripping out the original electronics it instead hooks the Arduino board onto the original serial interface. We might have made a Nintendo socket to USB box to keep the original cable, but either way, the SNES (technically Super Famicom, because it’s a Japanese market unit) original stays true to its roots. The Arduino polls the clock line at the speed of the console, reads the result, and translates it to a USB interface for the computer. There’s a full run-down of the code and how it was made, should you wish to try.
Of course, if you don’t always have a PC handy, you could also put the whole computer in the controller.