The release of the Raspberry Pi 4 brought us a new SoC, up to 4 Gigs of memory, and most importantly, got away from that janky USB to USB and Ethernet solution. The Raspberry Pi 4 has a PCI Express interface buried under some chips, and if you’re very good at soldering you can add a PCIe x1 device to the new best single board computer.
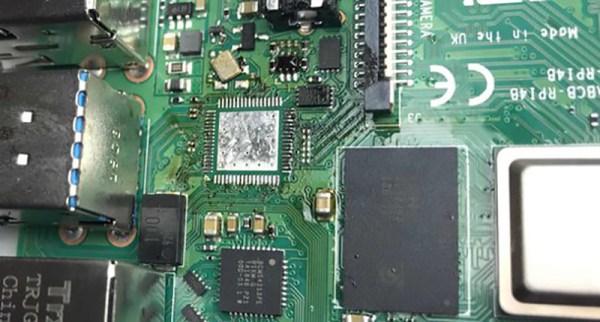
[Thomasz] took a look at the Raspberry Pi 4 and realized the new USB 3.0 chip is attached to the PCI Express interface on the SoC. That is, if you remove this chip and you have some very fine wires, you can patch in a real PCI Express slot. Removing the chip is easy enough with a hot air gun, although a few caps did get messed up. Throw that in an ultrasonic cleaner, and you have a blank canvas to work PCI magic.
This hack requires six wires, or three differential pairs, there’s a reference clock, a lane 0 transmit, and a lane zero receive. Working backwards from a PCI Express riser, [Thomasz] traced out these connections and soldered a few wires in. On the Pi side, a few capacitors were required to be compliant with the PCI Express spec, but the soldering isn’t too bad. You can do a lot with a small tip on an iron and a microscope.
The Pi was successfully wired up to a PCI Express riser card, along with the lines for ground, 5V, link reactivation, and a power good signal. The only thing left to do was to plug in a PCI card and test. This didn’t go as well as expected, because the PCI Express adapter didn’t like being enumerated by the Raspberry Pi kernel. In subsequent experiments, an Adaptec SAS controller worked. Does this mean external graphics cards for the Pi? No, not quite; this is only one lane of PCIe, where modern graphics cards require an x16 slot for the best performance. Still, if you’ve ever wanted a SCSI card for a Pi, this is the best option yet.