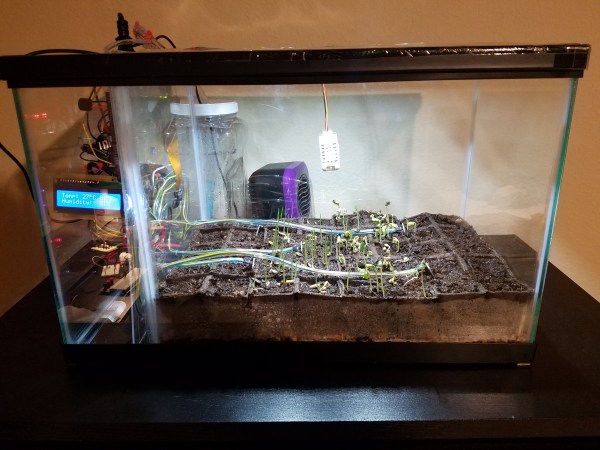
Homebrew Dash Cam Enables Full Suite Of Sensors

You heard it here first: dash cams are going to be the next must-have item for your daily driver. Already reaching market saturation in some parts of the world but still fairly uncommon in North America, we predict that car makers will soon latch onto the trend and start equipping cars with dash cams as standard equipment. And you can just bet that whatever watered-down, overpriced feature set they come up with will be sure to disappoint, so you might want to think about building your own Raspberry Pi dash cam with an accelerometer and lots of LEDS.

Still very much in the prototyping phase, [CFLanger]’s project is at its heart a dash cam, but it looks like he wants to go far beyond that. Raspivid and a PI NoIR camera take care of the video streaming, but the addition of a Pi SenseHAT gives [CFLanger] a bunch of options for sensing and recording the car’s environment. Not content with the SenseHAT’s onboard accelerometer, he added an ADXL345 to the sensor suite. The 64-pixel LED display is just for fun – it displays pitch and roll of the platform – and a yet-to-be-implemented bar-graph display will show acceleration in the X-axis. He figures the whole thing is good for a couple of days of video, but we hope he adds audio capture and perhaps ECU data from an OBDII-Bluetooth adapter.

We’ve seen surprisingly few DIY dash cams on Hackaday, at least so far. There has been a dash cam teardown and retasking, and there are plenty of dashboard computer builds, though. Seems like most hackers want that DIY self-driving car first.

Continue reading “Homebrew Dash Cam Enables Full Suite Of Sensors”

An Amateur Radio Repeater Using An RTL-SDR And A Raspberry Pi

An amateur radio repeater used to be a complex assemblage of equipment that would easily fill a 19″ rack. There would be a receiver and a separate transmitter, usually repurposed from commercial units, a home-made logic unit with a microprocessor to keep an eye on everything, and a hefty set of filters to stop the transmitter output swamping the receiver. Then there would have been an array of power supply units to provide continued working during power outages, probably with an associated bank of lead-acid cells.

More recent repeaters have been commercial repeater units. The big radio manufacturers have spotted a market in amateur radio, and particularly as they have each pursued their own digital standards there has been something of an effort to provide repeater equipment to drive sales of digital transceivers.

But what if you fancy setting up a simple repeater and you have neither a shed full of old radios or a hotline to the sales department of a large Japanese manufacturer? If you are [Anton Janovsky, ZR6AIC], you make your own low-powered repeater using an RTL-SDR, a low-pass filter, and a Raspberry Pi.

[Anton]’s repeater is a clever assemblage through pipes of rtl_sdr doing the receiving, csdr demodulating, and [F5OEO]’s rpitx doing the transmitting. As far as we can see it doesn’t have a toneburst detector or CTCSS to control its transmission so it is on air full-time, however we suspect that may be a feature that will be implemented in due course.

With only a 10 mW output this repeater is more of a toy than a useful device, and we’d suggest any licensed amateur wanting to have a go should read the small print in their licence schedule before doing so. But it’s a neat usage of a Pi and an RTL stick, and with luck it’ll inspire others in the same vein.

We’ve touched on the Pi as a transmitter before, from a straightforward broadcast FM unit to crossing continents with WSPR, and even transmitting digital TV in another [F5OEO] hack.

Thwomp Drops Brick On Retro Gaming

[Geeksmithing] wanted to respond to a challenge to build a USB hub using cement. Being a fan of Mario Brothers, a fitting homage is to build a retro-gaming console from cement to look just like your favorite Mario-crushing foe. With a Raspberry Pi Zero and a USB hub embedded in it, [Geeksmithing] brought the Mario universe character that’s a large cement block — the Thwomp — to life.

[Geeksmithing] went through five iterations before he arrived at one that worked properly. Initially, he tried using a 3D printed mold; the cement stuck to the plastic ruining the cement on the face. He then switched to using a mold in liquid rubber (after printing out a positive model of the Thwomp to use when creating the mold). But the foam board frame for the mold didn’t hold, so [Geeksmithing] added some wood to stabilize things. Unfortunately, the rubber stuck to both the foam board and the 3D model making it extremely difficult to get the model out.

Like [Han] in carbonite, that's a Rapsberry Pi Zero being encased in cement
Like [Han] in carbonite, that’s a Raspberry Pi Zero being encased in cement
Next up was regular silicone mold material. He didn’t have enough silicone rubber to cover the model, so he added some wood as filler to raise the level of the liquid. He also flipped the model over so that he’d at least get the face detail. He found some other silicone and used it to fill in the rest of the mold. Despite the different silicone, this mold worked. The duct tape he used to waterproof the Raspberry Pi, however, didn’t. He tried again, this time he used hot glue – a lot of hot glue! – to waterproof the Pi. This cast was better, and he was able to fire up the Pi, but after a couple of games his controller stopped working. He cracked open the cement to look at the Pi and realized that a small hole in the hot glue caused a leak that shorted out the USB port on the Pi. One last time, he thought, this time he used liquid electrical tape to waterproof the Pi.

The final casting worked and after painting, [Geeksmithing] had a finished cement Thwomp console that would play retro games. He missed the deadline for the USB Hub Challenge, but it’s still a great looking console, and his video has a lot of detail about what went wrong (and right) during his builds. There’s a great playlist on YouTube of the other entries in the challenge, check them out along with [Geeksmithing]’s video below!

Continue reading “Thwomp Drops Brick On Retro Gaming”

Running Intel TBB On A Raspberry Pi

The usefulness of Raspberry Pis seems almost limitless, with new applications being introduced daily and with no end in sight. But, as versatile as they are, it’s no secret that Raspberry Pis are still lacking in pure processing power. So, some serious optimization is needed to squeeze as much power out of the Raspberry Pi as possible when you’re working on processor-intensive projects.

This simplest way to accomplish this optimization, of course, is to simply reduce what’s running down to the essentials. For example, there’s no sense in running a GUI if your project doesn’t even use a display. Another strategy, however, is to ensure that you’re actually using all of the available processing power that the Raspberry Pi offers. In [sagiz’s] case, that meant using Intel’s open source Threading Building Blocks to achieve better parallelism in his OpenCV project.

Continue reading “Running Intel TBB On A Raspberry Pi”

NixieBot Films Your Tweets

[Robin Bussell]’s NixieBot is a mash up of new age electronics and retro vintage components and he’s got a bunch of hacks crammed in there. It’s a Nixie tube clock which displays tweets, takes pictures of the display when it encounters tweets with a #NixieBotShowMe hash tag, and then posts requested pictures back to twitter. If a word is eight characters, it takes a snapshot. If it’s a longer message, NixieBot takes a series of pictures of each word, converts it to an animated GIF, and then posts the tweet. In between, it displays random tweets every twenty seconds. You can see the camera setup in the image below and you should check out the @nixiebot twitter feed to see some of the action.

nixiebot_05For the display, he’s using eight big vintage Burroughs B7971 Nixie Tubes. These aren’t easy to source, and current prices hover around $100 each if you can find them. The 170V DC needed to run each tube comes from a set of six 12V to 170V converter boards specifically designed to drive these tubes. Each board can drive at least a couple of nixies, so [Robin]’s able to use just four boards for the eight tubes. Each nixie is driven by its own “B7971 SmartSocket“, a dedicated PIC16F690 micro-controller board custom designed for the purpose. A serial protocol makes it easy to daisy-chain the SmartSockets to build multi character displays.

Continue reading “NixieBot Films Your Tweets”

Slack, Backwards Compatible With 1982

Slack is great, but there are a few small problems with the current implementations. There isn’t a client for Palm, there isn’t a client for the Newton, and there isn’t a client for the Commodore 64. The last of these severe oversights was recently fixed by [Jeff Harris]. He built a native Slack client in 6502 assembly for the Commodore 64.

When dealing with network applications and the C64, the first question that comes to mind is how to talk to the outside world. There are C64 NICs, and ESP dongles, but for this build [Jeff] turned to the C64 Userport. This card edge combination of a serial and parallel port allows the C64 to talk to anything with RS-232, and with a simple adapter, [Jeff] got his old computer talking to a Raspberry Pi connected to the Internet.

The C64 Slack client itself is written in 6502 assembly, and features everything you would expect. The Pi is required to talk to the Slack API, though, and uses a NodeJS app to translate the bits from the C64 to something the API can understand.

Does it work? Of course it does. Slack is just text, after all, and there doesn’t seem to be any PETSCII weirdness here. You can check out a video of the build in action below.

Continue reading “Slack, Backwards Compatible With 1982”

Controlling Your Instruments From A Computer: Doing Something Useful

Do you know how to harvest data from your bench tools, like plotting bandwidth from your oscilloscope with a computer? It’s actually pretty easy. Many bench tools make this easy using a standard protocol with USB to make the connection.

In the previous installment of this article we talked about the National Instruments VISA (Virtual Instrument Software Archetecture) standard for communicating with your instruments from a computer, and introduced its Python wrapper with a simple demonstration using a Raspberry Pi. We’ll now build on that modest start by describing a more useful application for a Raspberry Pi and a digital oscilloscope; we’ll plot the bandwidth of an RF filter. We’ll assume that you’ve read the previous installment and have both Python and the required libraries on your machine. In our case the computer is a Raspberry Pi and the instrument is a Rigol DS1054z, but similar techniques could be employed with other computers and instruments.

Continue reading “Controlling Your Instruments From A Computer: Doing Something Useful”