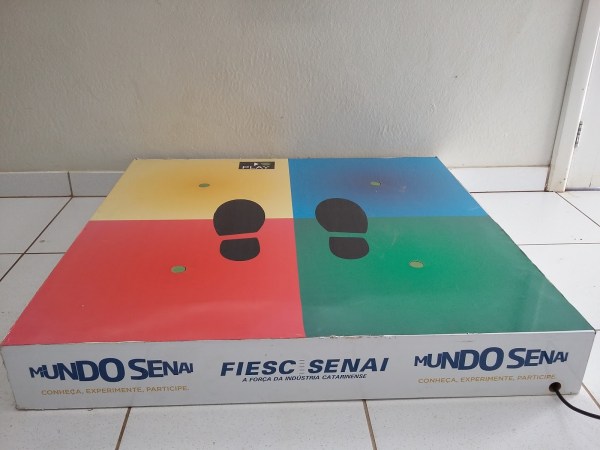
Pressure Gauge Used to Monitor Internet Usage

Steam Gauge Keeps Track Of Your Internet Usage

There’s a certain appeal to analog gauges in a vastly digital world. [Ed Konowal] is a Network Operations Supervisor for a school district in Florida — part of his job is to ensure a stable and fast internet connection, so he decided to make an internet usage gauge for his office.

What we really like about this hack is the fact that [Ed] had no idea how to do it. It’s a simple enough idea, right? Google was his friend and Ed started learning about all kinds of things. Raspberry Pi’s and Arduinos, wireless receiver/transmitters, servos and steppers, Python…

After quite a bit of trial and error, [Ed] eventually settled on a wired design which uses a Raspberry Pi running a Python program to poll the internet bandwidth, which in turn calculates the servo position for the dial and sends that number to the Arduino to move it into position. This repeats every 10 seconds. Pretty cool!

Kind of reminds us of this project to make custom gauges using a stepper motor breakout board!

[Thank Justin!]

Pivena – The Open Source Raspberry Pi Case

Raspberry Pi Laptop

Still not too sure how to house your awesome Raspberry Pi B model? Don’t worry, [Timothy Giles] has got you covered! He’s just finished this very sleek open source PIvena case for anyone to use.

Why is it called the PIvena? He’s basing it off of [Bunnie’s] Novena project which is a hobby-based open source laptop! For more information you can checkout the recent interview we had with [Bunnie] himself!

Anyway, back to the hack — it features a laser cut case which has plenty of room for the Pi and any additional hardware you want to add. Like the Novena, the screen also functions as a lid, opening up to reveal the electronics, allowing for easy tinkering. All the files can be acquired over at Thingiverse, and he has assembly instructions available on Instructables. Continue reading “Pivena – The Open Source Raspberry Pi Case”

PirateCade Is An Impressive Feat Of Woodworking And Design

Retro Arcade Machine Keeps the Classics

A six month journey of blood sweat and tears is finally over for [David Carver] and what he is left with is nothing short of beautiful. He calls it the PirateCade. We call it the perfect arcade cabinet.

This project is actually [David’s] very first Raspberry Pi project – at least it was, until his Pi crapped out on him. After running into too many problems with it and SD card corruptions, [David] decided against the RetroPie project platform and decided to upgrade to a full-blown PC, using an AtomicFE front-end and the Ultimark Ipac.

The entire cabinet is hand made out of solid wood; he didn’t have access to any fancy CNC routers or laser cutters. We gotta hand it to him, he’s quite the cabinet maker for an electronics guy. Continue reading “PirateCade Is An Impressive Feat Of Woodworking And Design”

Raspberry Pi Backup Scripts

Raspberry Pi

[Matthew’s] recent blog post does a good job explaining the basics of the Raspberry Pi’s file system. The Linux operating system installed on a Pi is generally installed on two different partitions on an SD card. The first partition is a small FAT partition. All of the files on this partition are used for the initial booting of the Pi. This partition also includes the kernel images. The second partition is the root file system and is generally formatted as ext4. This partition contains the rest of the operating system, user files, installed programs, etc.

With that in mind you can deduce that in order to backup your Pi, all you really need to do is backup all of these files. [Matt] has written some scripts to make this a piece of cake (or pie). The first script will simply copy all of the files into a gzipped archive. You can save this to an external SD card, USB drive, or network share.

The second script is perhaps more interesting. This script requires that you have one free USB port and a USB SD card reader. The script will automatically format the extra SD card to contain the two critical partitions. It will then copy the “boot” files to the new boot partition and the root file system files to the new SD card’s root partition. When all is said and done, you will end up with an SD card that is an exact copy of your current running file system.

This can be very handy if you have multiple Pi’s that you want to run the same software, such as in a Pi cluster. Another good example is if you have spent a lot of time tweaking your Pi installation and you want to make a copy for a friend. Of course there are many ways to skin this cat, but it’s always fun to see something custom-built by a creative hacker.

Raspberry Pi Spies On Your Front Door

doorbell pictures

One of [Sander]’s first projects with a Raspberry Pi was to get it to send messages to his iPhone. From there he decided to take it a step further and wire the tiny computer up to his doorbell, creating a system that can send push messages to his phone whenever someone is at the front door.

[Sander]’s doorbell is wireless, and he decided to keep all of its original functionality. All it took to signal the Pi was a simple circuit tied to the doorbell’s status LED which turns off whenever the doorbell is pushed.

The Raspberry Pi runs a python program that handles the GPIO pin which is wired to the doorbell. When the doorbell is pushed, the program processes and sends the push notification while taking pictures of the visitor with an attached webcam. The pictures are included in the message so [Sander] can see who is at the front door. The code for the project is included on his project page.

This project rang a bell for us since we’ve seen projects using a Raspberry Pi and push notifications. None of them so far have included a webcam or utilized an existing wireless doorbell though, and this is a great step forward!

Unlocking A Door With A Phone – Easy As Pi!

doorman2

[Ian] has created a way for his office colleagues to get inside the door, even if they have forgotten their keys. This office automation, Raspberry Pi set up is appropriately named the ‘Doorman’ and provided an alternative method of unlocking the entry system.

His solution tapped into the existing security circuit, which is closed by a simple relay, which is connected to the main piece of hardware; a Raspberry Pi. On one side of the Pi is the GPIO pins that allow control access while the other side links to the internet. The company’s internal system is responsible for authenticating users, issuing keys and processing access requests. A mobile client, aka a smartphone, can request a set of keys from the Doorman.

[Ian] used the Golgi SDK to speed up the development of the in-house app. With the wires in place, the Doorman has become a great success, and now forgotten keys are a thing of the past. And even though staff members no longer need to buzz into the office interrupting their co-workers, the development team has plans to beef up their office automation system. Already other innovations are being created to be integrated in with the Doorman.

Now all that’s left is to show a video demonstration of the Doorman, which can be seen after the break:

Continue reading “Unlocking A Door With A Phone – Easy As Pi!”

Raspi Ambilight Integrated In A 19″ Rack Packs Lots Of Peripherals

raspi ambilight

Ambilight systems create light effects around your monitor that correspond to the video content you’re playing. [Sébastien] just build his (French translated to English, original here) and embedded all the elements in a 19 inch rack he bought from Farnell.

As most ambilight systems we’ve covered over the years the HDMI signal is first split in two, one being sent to his monitor while the other is converted into a S-Video signal. The latter is then captured with a STK1160 stick connected to a Raspberry Pi. A python script using the OpenCV library is in charge of extracting the frames pixels and figuring out what colors should be sent to the SPI connected LPD8806 LEDs. A nice web interface also allows to drive the LEDs from any platform connected to his local network. Finally, a standard HD44780 LCD and an infrared receiver are connected to the raspberry, allowing [Sébastien] to control and monitor his platform. Funny thing: he also had to use two relays to power cycle his HDMI splitter and converter as they often crash. You can check out a demonstration video from a previous revision after the break.

Continue reading “Raspi Ambilight Integrated In A 19″ Rack Packs Lots Of Peripherals”