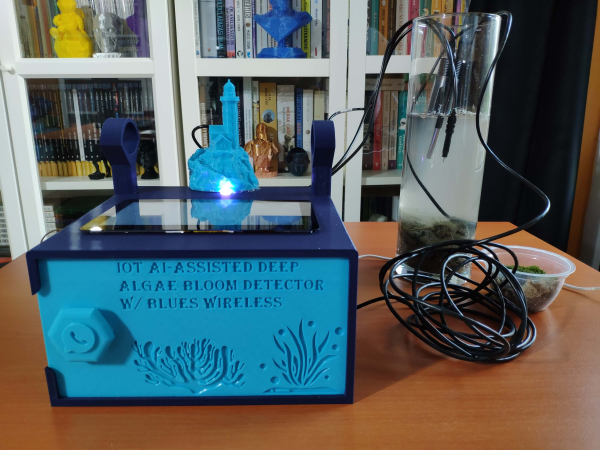
Learning The Ropes With A Raspberry Pi Mandelbrot Cluster

You’ve probably heard it said that clustering a bunch of Raspberry Pis up to make a “supercomputer” doesn’t make much sense, as even a middle-of-the-road desktop could blow it away in terms of performance. While that may be true, the reason most people make Pi clusters isn’t for raw power, it’s so they can build experience with parallel computing without breaking the bank.

So while there was probably a “better” way to produce the Mandelbrot video seen below, creator [Michael Kohn] still learned a lot about putting together a robust parallel processing environment using industry standard tools like Kubernetes and Docker. Luckily for us, he was kind enough to document the whole process for anyone else who might be interested in following in his footsteps. Whatever your parallel task is, and whatever platform it happens to be running on, some of the notes here are likely to help you get it going.

It’s not the biggest Raspberry Pi cluster we’ve ever seen, but the four Pi 4s and the RGB LED festooned enclosure they live in make for an affordable and space-saving cluster to hone your skills on. Whether you’re practicing for the future of software development and deployment, or just looking for something new to play around with, building one of these small-scale clusters is a great way to get in on the action.

Continue reading “Learning The Ropes With A Raspberry Pi Mandelbrot Cluster”

Portable PI Powered Music Player

There was a brief time in the early 2000s when we carried cellphones, wallets, keys, and a bespoke digital media player loaded with a small selection of our music libraries. Devices like iPods, Zunes, Sandisk Sansa, and iRiver. Then as cell phones gained more storage and processing power, the two devices became one, and audio players slipped to obscurity as sports accessories. Perhaps in that vein, [BalderDragonSlayer] made his own Raspberry Pi-powered media player.

The device was cobbled together using a Raspberry Pi Zero, an Adafruit OLED bonnet, a LiPo charger, and a cheap USB DAC. The interface software is written in python, which has all your usual player controls, using the directional joystick and two pushbuttons on the bonnet. DietPi is a slimmed-down Linux that offers an impressively fast boot time, which is why it was picked for this project. The case was a simple project case with some holes dremeled into the face for the screen and buttons.

It is a wonderful little project that seems wonderful for walks in the park. This isn’t the first Pi-powered media player we’ve seen before. But we’re hoping we see more in the future.

Automated Mushroom Cultivation Yields Delicious Fried Goodies

[Kyle Gabriel] knows mushrooms, and his years of experience really shine through in his thorough documentation of an automated mushroom cultivation environment, created with off-the-shelf sensors and hardware as much as possible. The results speak for themselves, with some delicious fried oyster mushrooms to show for it!

Fried oyster mushrooms, grown from scratch.

The most influential conditions for mushroom cultivation are temperature, humidity, and CO2 concentration, and to automate handling the environmental conditions [Kyle] created Mycodo, an open-source system that leverages inexpensive hardware and parts while also having the ability to take regular photos to keep an eye on things.

Calling [Kyle]’s documentation “comprehensive” doesn’t do it justice, and he addresses everything from setting up a positive pressure air filtration system for a work area, to how to get usable cultures from foraged mushrooms, all the way through growth and harvesting. He even includes a delicious-looking recipe for fried mushrooms. It just doesn’t get more comprehensive than that.

We’ve seen [Kyle]’s earlier work before, and it’s fantastic to see the continued refinement. Check out a tour of the whole thing in the video embedded below (or skip to 16:11 if you want to make yourself hungry.)

Continue reading “Automated Mushroom Cultivation Yields Delicious Fried Goodies”

A Tidy Cyberdeck That You Could Take Anywhere.

The cyberdeck trend has evolved to a relatively straightforward formula: take a desktop computer and strip it to its barest essentials of screen, PCB, and input device, before clothing it in a suitably post-apocalyptic or industrial exterior. Sometimes these can result in a stylish prop straight from a movie set, and happily for [Patrick De Angelis] his Raspberry Pi based cyberdeck (Italian, Google Translate link) fits this description, taking the well-worn path of putting a Raspberry Pi and screen into a ruggedised flight case. Its very unremarkability is the key to its success, using a carefully-selected wired keyboard and trackpad combo neatly dodges the usual slightly messy arrangements of microcontroller boards.

If this cyberdeck has a special feature it’s in the extra wireless interfaces and the stack of antennas on its right-hand side. The Pi touchscreen is a little small for the case and perhaps we’d have mounted it centrally, but otherwise this is a box we could imagine opening somewhere in the abandoned ruins of a once-proud Radio Shack store for a little post-apocalyptic Hackaday editing. After all, your favourite online tech news resource doesn’t stop because the power’s gone out!

Box with a hole. Camera and Raspberry Pi inside.

A Label Maker That Uses AI Really Poorly

[8BitsAndAByte] found herself obsessively labeling items around her house, and, like the rest of the world, wanted to see what simple, routine tasks could be made unnecessarily complicated by using AI. Instead of manually identifying objects using human intelligence, she thought it would be fun to offload that task to our AI overlords and the results are pretty amusing.

She constructed a cardboard enclosure that housed a Raspberry Pi 3B+, a Pi Camera Module V2, and a small thermal printer for making the labels. The enclosure included a hole for the camera and a button for taking the picture. The image taken by the Pi is analyzed by the DeepAI DenseCap API which, in theory, should create a label for each object detected within the image. Unfortunately, it doesn’t seem to do that very well and [8BitsAndAByte] is left with labels that don’t match any of the objects she took pictures of. In some cases it didn’t even get close, for example, the model thought an apple was a person’s head and a rotary dial phone was a cup. Go figure. It didn’t really seem to bother her though, and she got a pretty good laugh from the whole thing.

It appears the model detects all objects in the image, but only prints the label for the object it was most certain about. So maybe part of her problem is there were just too many objects in the background? If that were the case, you could probably improve the accuracy of the model by placing the object against a neutral background. That may confuse the AI a lot less and possibly give you better results. Or maybe try a different classifier altogether? Or don’t. Then you could just use it as a fun, gag project at your next get-together. That works too.

Cool project [8BitsAndAByte]! Hey, maybe this is a sign the world will still need some human intelligence after all. Who knows?

Continue reading “A Label Maker That Uses AI Really Poorly”

The Seductive Pull Of An Obsolete Home Movie Format

It’s dangerous for a hardware hacker to go into a second-hand store. I was looking for a bed frame for my new apartment, but of course I spent an age browsing all the other rubbish treasures on offer. I have a rough rule of thumb: if it’s not under a tenner and fits in one hand, then it has to be exceptional for me to buy it, so I passed up on a nice Grundig reel-to-reel from the 1960s and instead came away with a folding Palm Pilot keyboard and a Fuji 8mm home movie camera after I’d arranged delivery for the bed. On those two I’d spent little more than a fiver, so I’m good. The keyboard is a serial device that’s a project for a rainy day, but the camera is something else. I’ve been keeping an eye out for one to use for a Raspberry Pi camera conversion, and this one seemed ideal. But once I examined it more closely, I was drawn into an unexpected train of research that shed some light on what must of been real objects of desire for my parents generation.

A Thrift Store Find Opens A Whole New Field

One f the surprises comes in just how small this thing is.
One of the surprises comes in just how small this thing is.

The Fuji P300 from 1972 is typical among consumer movie cameras of the day. It takes the form of a film magazine with a zoom lens assembly on its front, a reflex viewfinder on its side, and a handle with a shutter trigger button on it protruding vertically below the magazine and also housing the batteries.

Surprisingly it still has a mercury cell that would have powered its light meter; a minor annoyance to dispose of this correctly. Sometimes these devices had clockwork motors, but this one has an electric motor. It also has a light sensor that is coupled to some kind of electromechanical aperture. It would have been an expensive camera when it was new, probably as much of a purchase as an SLR or a decent mirrorless camera here in 2021.

The surprise came when I opened it up, for it looked like no other 8mm camera I had seen. I’m familiar wit the two reels of a Standard 8 or the boxy cassette of Super 8, but this one used something different. That film magazine is made to fit a compact twin-reel cartridge whose film fits in a metal film gate. This is a Single 8 camera, Fuji’s entry in the all-in-one 8 mm film market, and a format I never knew existed. To explain my unexpected discovery it was necessary to delve into the world of home movie formats in the decade before videotape arrived and drove them out. Continue reading “The Seductive Pull Of An Obsolete Home Movie Format”

New Pi Zero Gains Unapproved Antennas Yet Again

We’ve only started to tap into the potential of the brand new Pi Zero 2. Having finally received his board, [Brian Dorey] shows us how to boost your Pi’s WiFi, the hacker way. Inline with the onboard WiFi antenna can be found a u.FL footprint, and you just know that someone had to add an external antenna. This is where [Brian] comes in, with a photo-rich writeup and video tutorial, embedded below, that will have you modify your own Zero in no time. His measurements show seeing fourteen networks available in a spot where he’d only see four before, and the RSSI levels reported have improved by 5 dB -10 dB, big when it comes to getting a further or more stable connection.

With old laptops being a decent source of WiFi antennas, you only need to procure a u.FL connector and practice soldering a bit before you take this on! The hardest part of such a project tends to be not accidentally putting any solder on the u.FL connector’s metal can – and [Brian] mostly succeeds in that! He shows how to disconnect the external antenna to avoid signal reflections and the like, and, of course, you will be expected to never power your Pi Zero on without an attached antenna afterwards, lest you have your transmitter become fatally confused by the mismatch of hardware-defined impedance expectations. A Pi Zero isn’t the only place where you’ll encounter footprints for connectors you can add, and arguably, that’s your duty as a hacker – modifying the things you work with in a way that adds functionality. Don’t forget to share how you did it!

This trick should be pretty helpful if you’re ever to put your new Pi Zero in a full-metal enclosure. Curious about the Raspberry Pi antenna’s inner workings? We’ve covered them before! If you’d like to see some previous Raspberry Pi mods, here’s one for the Pi 3, and here’s one for the original Zero W – from [Brian], too!
Continue reading “New Pi Zero Gains Unapproved Antennas Yet Again”