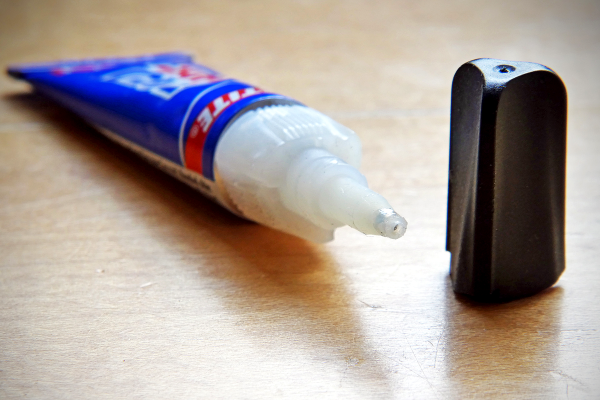
Headphones described in article, charging off a powerbank through an orange USB cable

Headphone Cable Trouble Inspires Bluetooth Conversion

[adblu] encountered the ever-present headphone problem with their Sennheiser Urbanite headphones – the cable broke. These headphones are decent, and despite the cable troubles, worth giving a new life to. Cable replacement is always an option, but [adblu] decided to see – what would it take to make these headphones wireless? And while they’re at it, just how much battery life could they get?

Armed with a CSR8635 Bluetooth audio receiver breakout module and a TP4056 charger, [adblu] went on rewiring the headphone internals. The CSR8635 already has a speaker amplifier inside, so connecting the headphones’ speakers didn’t require much effort – apart from general soldering difficulties, as [adblu]’s soldering iron was too large for the small pads on the BT module. They also found a 2400mAh battery, and fit it inside the headphone body after generous amounts of dremel work.

The result didn’t disappoint – not only does everything fit inside the headphone body, the headphones also provided 165 hours of music playback at varying volume. Electronics-wise, it really is that easy to retrofit your headphones with Bluetooth, but you can always go the extra mile and design an intricate set of custom PCBs! If firmware hacks are more to your liking, you can use a CSR8645 module for your build and then mod its firmware.

New Gear Saves Old Printer

As the digital photographic revolution took off, and everyone bought a shiny new film-less camera, there was a brief fad for photo printers. The idea was you’d have the same prints you’d always had from film, but the media for these printers would invariably cost a fortune so consumers moved on pretty quickly.

Now the pop up in second-hand stores and the like, which is how [Amen] acquired a Canon Selphy 740. It didn’t work, and on investigation it was found that a particularly tiny plastic gear had failed. Most people would have tossed the printer in the trash, but they instead opted to CNC-machine a new gear. It’s not everyday you tackle a job this small, so it makes for an interesting tale.

While the first instinct might be to reach reach for a CAD package, [Amen] instead wrote a script to create the raw GCode. The machining is done with a 0.2 mm bit ground to the desired profile. The result: a gear that gets the printer working again. It’s a dye-sublimation printer that leaves a negative image in the cartridge, allowing negative prints to be made with a bit of cartridge rewinding. And for those who might have ended up with a Selphy of their own, there’s a further post about using cheaper aftermarket cartridges.

Continue reading “New Gear Saves Old Printer”

AJAX COMMAND Radio Is An Oldie But Goodie

If you are a certain age, it is hard to wrap your head around the fact that an old radio might have transistors — the old ones all had tubes, right? But a radio from the 1960s or 1970s is reaching the 60+ year mark and people are restoring old transistor sets. [Adam] picked up his first old radio, a 1970s vintage Ajax Command S-74.

He was fortunate. The only repair needed was to replace a corroded battery holder and clean up the mess from the batteries. You can hear the radio doing its thing in the video below.

Continue reading “AJAX COMMAND Radio Is An Oldie But Goodie”

The circuit, assembled on a purple PCB, with a large capacitor and a sizeable white resistor, wires soldered to holes in the PCB

Protect Your Drivers When The Motor Stalls

[Mark Rehorst] tells us about a tragic incident involving an untimely demise of $200 worth of motor driving hardware, and shares a simple circuit so that we can prevent such tragedies in the future. His Arrakis sand table project has quite a few motors involved, and having forgotten to add limits into the software, he slammed a motor-driven mechanism into a well-fixed part of the table. The back EMF of the motor created a burst of energy, taking out the motor driver, the controller board, and the power supply.

With the postmortem done, he had to prevent this from happening again – preferably, in hardware. Based on a small appnote from Gecko Drives, he designed a simple PCB that shunts the motor with a high-power resistor, as soon as the current starts flowing into a direction it’s not supposed to flow into. He goes in depth about the way that the circuit works and the reasoning behind parts selection, as well as shows an LTSpice simulation and shares the PCB files. This was his first time designing PCBs in KiCad, and we believe he’s done a great job! This worklog is certainly worth reading if you’d like to understand how such circuits work and what goes into building one.

He dubs this a “bank account protection” circuit, and we can absolutely relate. It’s not just CNC tables that need such protections of course – we’ve seen a solution for small hacky makeshift electric vehicles, for instance. A motor’s generative properties aren’t always a problem, however – here’s just one example of a hacker trying to put them to good use.

Continue reading “Protect Your Drivers When The Motor Stalls”

Swapped ROM Revives Ailing HP-48S Calculator

Buying broken gear for cheap is time honored hacker tradition, and while we might not always be successful in reviving it, rarely do we come away empty handed. There’s always parts to salvage, and you can’t put a price on the knowledge to be gained when poking around inside an interesting piece of hardware. So we’re not surprised at all to hear that [Tomas Pavlovic] jumped at the chance to grab this faulty HP-48S calculator for a couple bucks.

Luckily for us, the story doesn’t end at the bottom of his parts bin. When he got the HP-48S back home, he immediately set out to see if it could be repaired. After changing out a few choice components and not seeing any result in the device’s behavior, he became suspicious that the problem may be with the firmware; specifically, the soldered-on chip that holds it.

Dumping the original ROM.

After carefully lifting the NEC uPD23C2000GC from its resting place for the last 30 years or so, he wired up an adapter that let him connect the chip to his programmer so its contents could be dumped. Rather than trying to find another ROM chip, he decided to wire in a socket and found a re-writable SST39SF040 that could stand in as a replacement. Flashing a fresh copy of the firmware to the new socketed chip got the calculator up and running again, with the added bonus of allowing [Tomas] to pull the chip and flash a different firmware version should he care to experiment a bit.

Now, we know what you’re thinking. Where was the fix? What exactly brought this piece of 1990s gear back to life? That part, unfortunately, isn’t very clear. You’d think if the original ROM chip was somehow faulty, [Tomas] wouldn’t have been able to so easily pull a valid firmware image from it. That leaves us with some pretty mundane possibilities, such as a bad solder joint on the chip’s pins. If that was indeed the case, this fix could have been as simple as running a hot iron over the pins…but of course, where’s the fun in that?

Update: We heard back from [Tomas], and it turns out that when compared to a known good copy, the dumped firmware did have a few swapped bits. His theory is that the NEC chip is in some weird failure mode where the calculator wouldn’t run, but it was still functional enough to get most of the content off of it. What do you think? Let us know in the comments.

A frosted glass disk with geometrical markers

Using A Laser Cutter To Replicate An Optical Comparator Screen

Precision instruments often contain specialized components that are essential to their function, but nearly impossible to replace if they fail. [Andre] had just such a problem with an optical comparator, which is an instrument typically used in machine shops to help check the tolerances of a finished part. It does this by projecting a magnified picture of an object onto a glass screen with markings showing angles and distances.

In the old comparator [Andre] bought on eBay, the markings on the glass had faded to such a degree that the instrument was almost unusable. So he contacted [James] over at Clough42, who was able to create a near-perfect replacement screen by using a laser cutter, as shown in the video embedded below.

The first step was to replicate the screen’s markings in a CAD program. [James] explains the process in Fusion 360, demonstrating how you can generate all the different scales nearly automatically through the proper use of constraints, variables and patterns. He then transferred the drawing to Lightburn, which drives the laser cutter and etches the markings into a sheet of glass covered with CerMark, a marking solution that turns a deep black when heated by a laser.

After etching, the final step was to apply frosting to the glass to turn it into a projection screen. While there are several ways to achieve this, [James] went for a simple spray-based method that gave surprisingly good results. It took a few experiments to find out that etching the markings on the back of the glass and applying the frosting on that side as well gave the best combination of sharpness and durability.

[James]’s project shows that even delicate instruments with custom glass components can be repaired, if you just have the right tools. A similar strategy might also work for creating custom scales for analog meters, or even old radio dials. If you’re not familiar with laser cutters, have a look at our experiments with an Ortur model. Thanks for the tip, [poiuyt]!

Continue reading “Using A Laser Cutter To Replicate An Optical Comparator Screen”

Resulting tweezer assembly, with a 3D printed replacement case for both of the probes

Hackaday Prize 2022: Glue-Hindered Smart Tweezer Repair Involves A Rebuild

[Dan Julio] owns a pair of Miniware multimeter tweezers, a nifty helper tool for all things SMD exploration. One day, he found them broken – unable to recognize any component between the two probes. He thought it could be a broken connection problem, and decided to take them apart. Presence of some screws on their case fooled him – in the end, it turned out that the case was glued together, and could only be opened destructively. For an entry in the “Reuse, Recycle, Revamp” round of 2022 Hackaday Prize, he tells us how he brought these tweezers back from the dead.

During the disassembly, he broke a custom flexible PCB, which wasn’t reassuring either. However, that was no reason to give up – he reverse-engineered the connections and the charging circuitry, then assembled parts of the broken tweezers together using a small generic protoboard as a base. Indeed, it was likely a broken connection between probes, because the reassembled tweezers worked!

Of course, having exposed PCBs wouldn’t do, and from the very start, assembling these tweezers back together was not an option. Instead, he developed a replacement case in OpenSCAD, bringing the tweezers back to life as his trusty tool – and still leaving repairability on the table. If you’re interested in the details, he goes more into how these tweezers are designed when it comes to charging and connectivity, and we recommend that you give his write-up a read!

We’ve been seeing smart tweezers around for over a decade now, from reviews and hacks of commercially made ones, to DIY chopstick-based and PCB-based ones. If you already own a pair of tweezers you’ve grown attached to, you can neatly retrofit them with a capacitance sensing function!