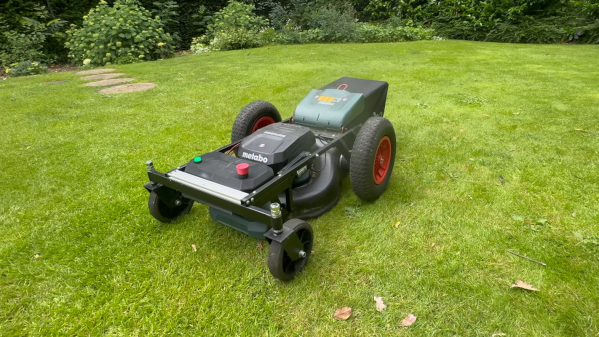
The Best Robot Mop System: Flat, Spinning, Or Roller?

When it comes to designing a mopping robot, there are a number of approaches you can pick from, including just having the movement of the robot push the soggy mop over the floor, having spinning pads, or even a big spinning roller. But what difference does it make? Recently the [Vacuum Wars] channel ran a comparison to find out the answer.

The two spinning pad design is interesting, because it allows for the bot to move closer to objects or walls, and the base station doesn’t need the active scrubber that the simple static pad requires. The weakness of both types of flat mop design is that they are quickly saturated with dirt and moisture, after which they’ll happily smear it over the floor.

The spinning roller is the most complex, with the robot having its own onboard water tank, and a way to extract the dirty water from the mop and store it for disposal in the base station. Theoretically this would be the clear winner, with basically all of them having features like avoiding carpet.

Continue reading “The Best Robot Mop System: Flat, Spinning, Or Roller?”

Building A Carousel Autosampler

A common task in a laboratory setting is that of sampling, where a bit of e.g. liquid has to be sampled from a series of containers. Doing this by hand is possible, but tedious, ergo an autosampler can save a lot of time and tedium. Being not incredibly complex devices that have a lot in common with e.g. FDM 3D printers and CNC machines, it makes perfect sense to build one yourself, as [Markus Bindhammer] of Marb’s Lab on YouTube has done.

The specific design that [Markus] went for uses a sample carousel that can hold up to 30 bottles of 20 mL each. An ATmega-based board forms the brain of the machine, which can operate either independently or be controlled via I2C or serial. The axes and carousel are controlled by three stepper motors, each of which is driven by a TB6600 microstep driver.

Why this design is a time saver should be apparent, as you can load the carousel with bottles and have the autosampler handle the work over the course of however long the entire process takes instead of tying up a human. Initially the autosampler will be used for the synthesis of cadmium-selenium quantum dots, before it will be put to work for an HPLC/spectrometer project.

Although [Markus] intends this to be an open hardware and software project, it will take a bit longer to get all the files and documentation organized. Until then we will have to keep manually sampling, or use the video as the construction tutorial.

Continue reading “Building A Carousel Autosampler”

A round, 3D-printed motor housing is shown, with one flattened side holding a fan mount. A circular plate is mounted above the face of the housing, and a cord runs around it and pulleys on the side of the housing.

Tying Up Loose Ends On A Rope-based Robot Actuator

One of the perennial challenges of building robots is minimizing the size and weight of drive systems while preserving power. One established way to do this, at least on robots with joints, is to fit each joint with a quasi-direct-drive motor integrating a brushless motor and gearbox in one device. [The 5439 Workshop] wanted to take this approach with his own robot project, but since commercial drives were beyond his budget, he designed his own powerful, printable actuator.

The motor reducing mechanism was the biggest challenge: most quasi-direct drives use a planetary gearbox, but this would have been difficult to 3D-print without either serious backlash or limited torque. A cycloidal drive was an option, but previous printable cycloidal drives seemed to have low efficiency, and they didn’t want to work with a strain-wave gearing. Instead, he decided to use a rope drive (this seems to be another name for a kind of Capstan drive), which doesn’t require particularly strong materials or high precision. These normally use a rope wound around two side-by-side drums, which are difficult to integrate into a compact actuator, but he solved the issue by putting the drums in-line with the motor, with two pairs of pulleys guiding the rope between them in a “C” shaped path.

The actual motor is a hand-wound stator inside a 3D-printed rotor with magnets epoxied into it. The printed rotor proved problematic when the attraction between the rotor and magnets caused it to flex and scrape against the housing, and it eventually had to be reinforced with some thin metal sheets. After fixing this, it reached five Newton-meters of torque at one amp and nine Newton-meters at five amps. The diminishing returns seem to be because the 3D-printed pulley wheels broke under higher torque, which should be easy to fix in the future.

This looks like a promising design, but if you don’t need the output shaft inline with the motors, it’s probably easier to build a simple Capstan drive, the mathematics of which we’ve covered before. Both makers we’ve previously seen build Capstan drives used them to make robot dogs, which says something for their speed and responsiveness.

2WD robot

Two-Wheeled Arduino Robot Project For Beginners

Here’s a fun build from [RootSaid] that is suitable for people just getting started with microcontrollers and robotics — an Arduino-controlled two-wheeled robot.

The video assumes you already have one of the common robotics kits that includes the chassis, wheels, and motors, something like this. You’ll also need a microcontroller (in this case, an Arduino Nano), a L293D motor driver IC, a 9 V battery, and some jumper wires.

The video goes into detail about how the two wheels connected to one motor each can move the robot in various directions: forward, backward, left, and right. The motors can be made to spin either forward or backward, depending on the polarity of the power supply, using an H-bridge circuit.

The L293D motor driver IC powers and controls the motors connected to the wheels. The L293D takes its commands from the Arduino. The rest of the video is spent going over the software for controlling the wheels.

When you’re ready to go to the next level, you might enjoy this robot dog.

Continue reading “Two-Wheeled Arduino Robot Project For Beginners”

A man's hands are holding an assembly of 3D-printed parts. There is a white backplate, with a yellow circular piece running through the middle. The yellow piece is surrounded by metal rods. Another blue shaft runs through the left side of the assembly. A rougly-diamond shaped plate encompasses both of these shafts.

Designing A Simpler Cycloidal Drive

Cycloidal drives have an entrancing motion, as well as a few other advantages – high torque and efficiency, low backlash, and compactness among them. However, much as [Sergei Mishin] likes them, it can be difficult to 3D-print high-torque drives, and it’s sometimes inconvenient to have the input and output shafts in-line. When, therefore, he came across a video of an industrial three-ring reducing drive, which works on a similar principle, he naturally designed his own 3D-printable drive.

The main issue with 3D-printing a normal cycloidal drive is with the eccentrically-mounted cycloidal plate, since the pins which run through its holes need bearings to keep them from quickly wearing out the plastic plate at high torque. This puts some unfortunate constraints on the size of the drive. A three-ring drive also uses an eccentric drive shaft to cause cycloidal plates to oscillate around a set of pins, but the input and output shafts are offset so that the plates encompass both the pins and the eccentric driveshaft. This simplifies construction significantly, and also makes it possible to add more than one input or output shaft.

As the name indicates, these drives use three plates 120 degrees out of phase with each other; [Sergei] tried a design with only two plates 180 degrees out of phase, but since there was a point at which the plates could rotate just as easily in either direction, it jammed easily. Unlike standard cycloidal gears, these plates use epicycloidal rather than hypocycloidal profiles, since they move around the outside of the pins. [Sergei] helpfully wrote a Python script that can generate profiles, animate them, and export to DXF. The final performance of these drives will depend on their design parameters and printing material, but [Sergei] tested a 20:1 drive and reached a respectable 9.8 Newton-meters before it started skipping.

Even without this design’s advantages, it’s still possible to 3D-print a cycloidal drive, its cousin the harmonic drive, or even more exotic drive configurations. Continue reading “Designing A Simpler Cycloidal Drive”

Sudo Clean Up My Workbench

[Engineezy] might have been watching a 3D printer move when inspiration struck: Why not build a robot arm to clean up his workbench? Why not, indeed? Well, all you need is a 17-foot-long X-axis and a gripper mechanism that can pick up any strange thing that happens to be on the bench.

Like any good project, he did it step by step. Mounting a 17-foot linear rail on an accurately machined backplate required professional CNC assistance. He was shooting for a 1mm accuracy, but decided to settle for 10mm.

Continue reading “Sudo Clean Up My Workbench”

TARS-Like Robot Both Rolls, And Walks

[Aditya Sripada] and [Abhishek Warrier]’s TARS3D robot came from asking what it would take to make a robot with the capabilities of TARS, the robotic character from Interstellar. We couldn’t find a repository of CAD files or code but the research paper for TARS3D explains the principles, which should be enough to inspire a motivated hacker.

What makes TARS so intriguing is the simple-looking structure combined with distinct and effective gaits. TARS is not a biologically-inspired design, yet it can walk and perform a high-speed roll. Making real-world version required not only some inspired mechanical design, but also clever software with machine learning.

[Aditya] and [Abhishek] created TARS3D as a proof of concept not only of how such locomotion can be made to work, but also as a way to demonstrate that unconventional body and limb designs (many of which are sci-fi inspired) can permit gaits that are as effective as they are unusual.

TARS3D is made up of four side-by-side columns that can rotate around a shared central ‘hip’ joint as well as shift in length. In the movie, TARS is notably flat-footed but [Aditya] found that this was unsuitable for rolling, so TARS3D has curved foot plates.

The rolling gait is pretty sensitive to terrain variations, but the walking gait proved to be quite robust. All in all it’s a pretty interesting platform that does more than just show a TARS-like dual gait robot can be made to actually work. It also demonstrates the value of reinforcement learning for robot gaits.

A brief video is below in which you can see the bipedal walk in action. Not that long ago, walking robots were a real challenge but with the tools available nowadays, even a robot running a 5k isn’t crazy.

Continue reading “TARS-Like Robot Both Rolls, And Walks”