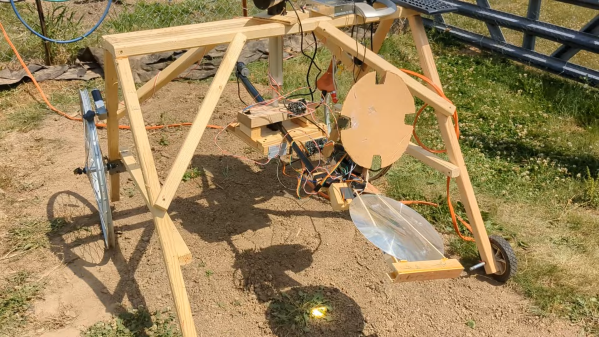
Removing weeds is a chore few gardeners enjoy, as it typically involves long sessions of kneeling in the dirt and digging around for anything you don’t remember planting. Herbicides also work, but spraying poison all over your garden comes with its own problems. Luckily, there’s now a third option: [NathanBuildsDIY] designed and built a robot to help him get rid of unwanted plants without getting his hands dirty.
Constructed mostly from scrap pieces of wood and riding on a pair of old bicycle wheels, the robot has a pretty low-tech look to it. But it is in fact a very advanced piece of engineering that uses multiple sensors and actuators while running on a sophisticated software platform. The heart of the system is a Raspberry Pi, which drives a pair of DC motors to move the whole system along [Nathan]’s garden while scanning the ground below through a camera.
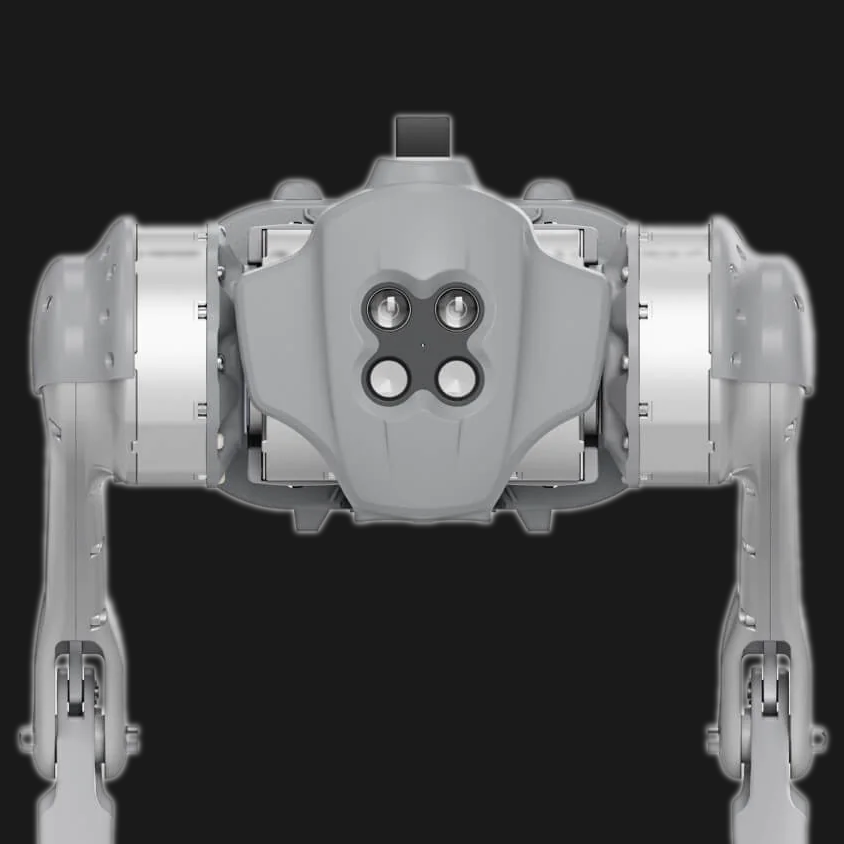
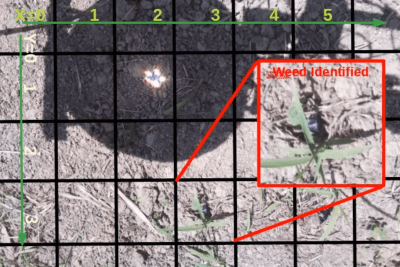 The Pi runs the camera’s pictures through a TensorFlow Lite model that can identify weeds. [Nathan] built this model himself by taking hundreds of pictures of his garden and manually sorting them into categories like “soil”, “plant” and “weed”. Once a weed has been detected, the robot proceeds to destroy it by concentrating sunlight onto it through a large Fresnel lens. The lens is mounted in a frame that can be moved in three dimensions through a set of servos. A movable lens cover turns the incinerator beam on or off.
Sunlight is focused onto the weed through a simple but clever two-step procedure. First, the rough position of the lens relative to the sun is adjusted with the help of a sun tracker made from four light sensors arranged around a cross-shaped cardboard structure. Then, the shadow cast by the lens cover onto the ground is observed by the Pi’s camera and the lens is focused by adjusting its position in such a way that the image formed by four holes in the lens cover ends up right on top of the target.
Once the focus is correct, the lens cover is removed and the weed is burned to a crisp by the concentrated sunlight. It’s pretty neat to see how well this works, although [Nathan] recommends you keep an eye on the robot while it’s working and don’t let it near any flammable materials. He describes the build process in full detail in his video (embedded below), hopefully enabling other gardeners to make their own, improved weed burner robots. Agricultural engineers have long been working on automatic weed removal, often using similar machine vision systems with various extermination methods like lasers or flamethrowers.
Continue reading “Gardening Robot Uses Sunlight To Incinerate Weeds” →