A Pi Pico plugged into a breadboard, with jumpre wires going away from its pins to an SPI flashing clip, that's in turn clipped onto an SPI flash chip on a BeagleBone board

Programming SPI Flash Chips? Use Your Pico!

At this point, a Pi Pico is equivalent to a bag full of programmers and debugging accessories. For instance, when you want to program an SPI flash chip, do you use one of those wonky CH341 dongles, or perhaps, even a full-on Raspberry Pi with a Linux OS? If so, it might be time to set those two aside – any RP2040 board can do this now. This is thanks to work of [stacksmashing] who implemented serprog protocol for the RP2040, letting us use a Pi Pico with stock flashrom for all our SPI flash chip needs.

After flashing the code to your RP2040 board, all you need to do is to wire your flash chip to the right pins, and then use the serprog programmer type in your flashrom commandline – instructions are available on GitHub along with the code, as you’d expect. Don’t feel like installing flashrom, or perhaps you happen to run Windows and need a flasher in a pinch? [stacksmashing] has a WebSerial-based SPI flasher tool for you, too, and shows it off with a fancy all-the-pinouts board of his own making.

This kind of tool is indispensable – you don’t need to mod one of these CH341 programmers to fix the bonkers 5 V default IO, or keep an entire Linux computer handy when you likely already have one at your fingertips. All in all, yay for one more RP2040 trick up our sleeve – this SPI flashing helper joins an assortment of applets for SWD, JTAG, UART, I2C and CAN, and in a pinch, your Pi Pico will also work as a digital and analog logic analyzer or an FPGA playground.


Yesterday’s Drill Press Packed With Tomorrow’s Upgrades

Those who hibernate in their workshops have a habit of re-imagining their relationship to tools. And [Marius Hornberger] is no exception, but the nine upgrades he’s added to his grandfather’s old drill press puts this machine on a whole other level.

In proper storytime fashion, [Marius] steps us through each upgrade, the rationale, and the time and effort that went into crafting the solution. Some of these upgrades, like a digital readout (DRO), add modern features to an old-school device. Others, like an oil mist cooling system and a compressed air chip blower, borrow from other machines with similar setups. Some, like the chip guard, are nice personal touches. And a few, like the motorized table with automatic clamp, transform the entire operator experience. On the whole, these upgrades follow a gentle theme of personalizing the machine to [Marius’] tastes, giving him a delightful, more personal operator experience that’s tuned through his everyday use. Amid the sheer volume of tweaks though, we’re convinced that you’ll find something that tickles your tinkering fancy.

It’s worth mentioning that the pneumatic table clamp alone (at 4:28) makes the entire video worth the watch. If you’ve ever had the mishap of pinching your finger or struggling to hold the table steady while clamping it in place, this little upgrade takes all of that away, replacing the swivel handle with a homebrew pneumatic cylinder made in the shop. With a single button press, a swoosh of compressed air either clamps or releases the table. Best of all, the setup still sports a hand clamp if [Marius] is operating without a compressed air source.

It’s also worth mentioning that a couple of [Marius’] upgrades completely skip the CAD step altogether. Instead, [Marius] creates templates directly off the drill press with tracing paper and then immediately transfers them onto stock materials. It’s a nice reminder that not every small project needs to start with a 3D model.

If all these upgrades are getting you ready to modify your machine, look no further than the video description where he’s courteously posted inks to key components behind these upgrades.

The story of many-a-workshop often involves reinventing your machine tools. If you’re looking for more tales of tool upgrades, have a look at resurrecting a machine from literal ashes or a machine that improves itself.

Continue reading “Yesterday’s Drill Press Packed With Tomorrow’s Upgrades”

A closeup of the faulty section of the dial - you can spot the plastic rivets that broke off

The Tale Of Two Broken Flukes

Some repairs happen as if by pure luck, and [Sebastian] shows us one such repair on Hackaday.io. He found two Fluke 175 meters being sold on eBay, with one having a mere beeper issue, and another having a “strange error”. Now, theoretically, swapping beepers around would give you one working meter and a kit of spare parts – but this is Fluke we’re talking about, and [Sebastian] wasn’t satisfied leaving it there.

First, he deduced that the beeper issue could be fixed by repositioning the piezo disk – and indeed, that brought the meter number one to working order. This left the mysterious error – the meter would only power up in certain rotations of the dial, and would misbehave, at that. Disassembly cleared things up – the dial mechanics failed, in that a half of the metal contacts came detached after all the plastic rivets holding the metal piece in place mysteriously vanished. The mechanics were indeed a bit intricate, and our hacker hoped to buy a replacement, but seeing the replacement switch prices in three-digit range, out came the epoxy tube.

An epoxy fix left overnight netted him two perfectly working Fluke meters, and while we don’t know what the listing price was for these, such a story might make you feel like taking your chances with a broken Fluke, too. The tale does end with a word of caution from [Sebastian], though – apparently, cleaning the meters took longer than the repairs themselves. Nevertheless, this kind of repair is a hobbyist’s dream – sometimes, you have to design a whole new case for your meter if as much as a wire breaks, or painstakingly replace a COB with a TQFP chip.

The completed oscilloscope in parts, with the screen in the front connected with prototyping wires, protoboarded buttons on the right, and the BlackPill board somewhere behind

DIY STM32 Scope Is Simple, Cheap, And Featureful

Would you like to have a small digital oscilloscope? Do you have a spare BlackPill (STM32F401) board and a TFT display laying around? [tvvlad1234] presents us with a simple and educational digital storage oscilloscope design that barely needs any components for you to build one, and it’s packed with features just like you would expect from a self-respecting open-source project. Not just that — it can even stream data to your computer, in a format compatible with the TekScope software!

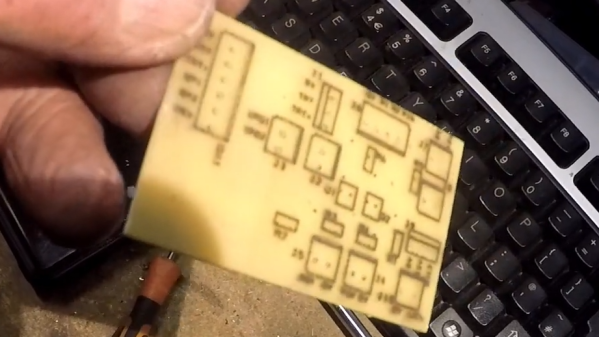
The same scope design, but now on a self-etched boardIt’s hard to overshadow just how easy this scope is to build, use, and hack on. You really don’t need much in the way of parts, a protoboard will do, though you can also etch or order your own PCBs. The front-end is super straightforward to find components for and assemble, a few opamps and resistors is all you need. So after jumper-wiring the LCD and three push buttons to your BlackPill, you’re golden.

Of course, the simple frontend results in the input range being from -3.3 V to 3.3 V, but as you could guess, this is exactly the kind of project where you could tweak the resistors and even upgrade it later on. Are you a bit lost in how oscilloscopes work? [tvvlad1234] has an explainer for you, too!

This build could easily take up a honorary “temporary turned permanent” place on your bench, thanks to its McGyver-esque qualities. It’s also, quite possibly, a better scope than the red “soldering kit” ones we’ve seen online. All in all, it’s a strong contender in the “simple and powerful DIY scope” arena, before this, we’ve seen one built with an Arduino Nano, and one with a Pi Pico.

A person holds a bundle of white, black, and blue wires. The left hand side of the wires are wrapped with black tape. The wires are inside a wire wrapping machine with a grey plastic "C" which rotates inside seven small pulleys. A large pulley in the background drives three of the pulleys to rotate the "C" around and wrap the wires with tape from the spool attached to the "C."

DIY Tool Makes Wrapping Wiring Harnesses A Breeze

If you’re making a lot of wiring harnesses, wrapping them can become a bit of a drag. [Well Done Tips] wanted to make this process easier and built a wiring harness wrapping machine.

The “C” shape of this wrapping machine means that you can wrap wires that are still attached at one or both ends, as you don’t have to pull the wires all the way through the machine. The plastic “C” rotates inside a series of pulleys with three of them driven by a belt attached to an electric motor. A foot pedal actuates the motor and speed is controlled by a rotary dial on the motor controller board.

Since this is battery powered, you could wrap wires virtually anywhere without needing to be near a wall outlet. This little machine seems like it would be really great if you need to wrap a ton of wire and shouldn’t be too complicated to build. Those are some of our favorite hacks.

If you’re wanting more wire harness fun, try this simple online wiring harness tool or see how the automotive industry handles harnesses.

Continue reading “DIY Tool Makes Wrapping Wiring Harnesses A Breeze”

Two pairs of steel parallel pliers sit on a rough wooden benchtop. The pair on the left is open and the pair on the right is closed, demonstrating the parallel nature of the pliers' jaws over their entire range of motion. There are three brass pins flush with the steel surface of the handles and you can just barely make out the brass and copper filler material between the steel outer surfaces of the handles.

Producing A Pair Of Parallel Pliers

A regular pair of pliers is fine most of the time, but for delicate work with squarish objects you can’t go wrong with a pair of parallel pliers. [Neil Paskin] decided to make his own pair from scratch. (YouTube)

The jaws were machined down from round stock in [Paskin]’s mill before heat treating and tempering. The steel portions of the handles were cut from 16 gauge plate steel and half of them were stamped on a fly press to make the bridging section around the pivot bolt. The filler for the handles is copper on one side and brass on the other as [Paskin] didn’t have enough brass of the correct size to do both.

The steel and filler were joined with epoxy and copper pins before beveling the edges and sanding to give a comfortable contour to the handles. The bolts for the pliers started as ordinary hex bolts before being machined down on the lathe to a more aesthetically-pleasing shape and size. The final touches included electrolytically etching a logo into the bridge and then spraying down the pliers with a combination lubricant and corrosion preventative spray. This is surely a pair of pliers worth handing down through the generations.

For more mesmerizing machining, checkout this pocket safe or this tiny adjustable wrench.

Continue reading “Producing A Pair Of Parallel Pliers”

Testing The Raspberry Pi Debug Probe

We mentioned the Raspberry Pi Debug Probe when it was launched, a little RP2040-based board that provides both a USB-to-UART and an ARM SWD debug interface. [Jeff Geerling] was lucky enough to snag one, and he’s put it through its paces in a handy blog post.

The first question he poses is: why buy the Pi offering when cheaper boards can be found on AliExpress and the like? It’s easily answered by pointing to the ease of setting up, good documentation and support, as well as the device’s reasonable price compared to other commercial probes. It also answered a personal question here as he hooked it up to a Pico, why it has three jumpers and not the more usual multi-way header we’ve seen on other ARM platforms. We should have looked at a Pico more closely of course, because it matched neatly to the Pi product. On the Pico they’re at the edge, while on the Pico W they’re in the center.

No doubt if the latest addition to the Pi stable has any further revelations we’ll bring them to you. But it’s worth a quick look at this piece to see a real experience with their latest. Meanwhile, take a quick look at our launch coverage.