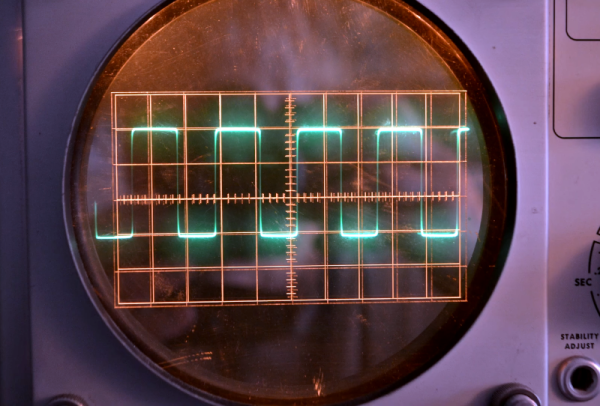
Self-Propelled Chainsaw Reduces Injuries

[Advoko] is an expert at milling logs into various sizes of boards. He typically uses nothing but a chainsaw to enable him to mill on-site without needing to bring any large or expensive equipment. The only problem is that sometimes he gets a little carried away running his mill non-stop until he has enough lumber for whatever project he is building, which has led to some repetitive strain injuries. To enable him to continue to run his mill, he’s created this self-propelled chainsaw jig.

The creation of the self-propelled chainsaw was a little serendipitous. [Advoko] needed to mill a tree which had fallen on a slope, and he couldn’t move the large trunk before starting to mill. To avoid fatigue while pulling his chainsaw upwards, he devised a system of rubber belts that would help pull the weight of the chainsaw up the hill. Noticing that if the chainsaw could have been operated downhill, it would essentially pull itself along the cut, he set about building a carriage for the mill to hold the chainsaw in place while it semi-autonomously milled lumber for him.

The chainsaw jig isn’t fully autonomous; [Advoko] still needs to start and stop the chainsaw and set up the jig. It does have a number of safety features to prevent damage to the jig, the chainsaw, and himself too, and over a number of iterations of this device he has perfected it to the point where he can start it on a cut and then do other tasks such as move boards or set up other logs for cutting while it is running, saving him both time and reducing his risk of other repetitive strain injuries. If you don’t fully trust the automatic chainsaw jig, take a look at this one which requires a little more human effort but still significantly reduces the strain of milling a large log.

Continue reading “Self-Propelled Chainsaw Reduces Injuries”

Laser Scanning Microscope Built With Blu-ray Parts

Laser scanning microscopes are useful for all kinds of tiny investigations. As it turns out, you can build one using parts salvaged from a Blu-ray player, as demonstrated by [Doctor Volt].

The trick is repurposing the optical pickup unit that is typically used to read optical discs. In particular, the build relies on the photodiodes that are usually used to compute focus error when tracking a disc. To turn this into a laser scanning microscope, the optical pickup is fitted to a 3D printed assembly that can slew it linearly for imaging purposes.

Meanwhile, the Blu-ray player’s hardware is repurposed to create a sample tray that slews on the orthogonal axis for full X-Y control. An ESP32 is then charged with running motion control and the laser. It also captures signals from the photodiodes and sends them to a computer for collation and display.

[Doctor Volt] demonstrates the microscope by imaging a small fabric fragment. The scanned area covers less than 1 mm x 1 mm, with a resolution of 127 x 127, though this could be improved with finer pitch on the slew mechanisms.

While it’s hardly what we’d call a beginner’s project, this technique still looks a lot more approachable than building your own scanning electron microscope.

Continue reading “Laser Scanning Microscope Built With Blu-ray Parts”

A Modern Tribute To The Classic HP-16C Calculator

The HP-16C Computer Scientist is much beloved as the only dedicated programmer’s calculator that Hewlett-Packard ever made. Most surviving examples in the world are well-used, and you haven’t been able to order one from HP since 1989. Thus, [K Johansen] set about building a tribute to the HP-16C using modern hardware.

The build relies on a Raspberry Pi Pico as the brains of the operation. As with so many classic HP calculators, it operates in Reverse Polish Notation, and includes the customary stack operations. To serve a programmer well, it’s set up to accept entry in hexadecimal, octal, decimal, and binary formats, and can readily convert between them. Beyond that, it’s equipped with the usual arithmetic operators, as well as bitwise operations like NOT, AND, and so on.

Perhaps what we love most, though, is the keypad. It was all put together with a combination of cheap AliExpress keypads, a label maker, and a laser printer. It’s a wholly DIY job, and a little rough around the edges, but it makes the calculator far easier to use.

It’s not an exact replica of the HP-16C, but the differences in operation are minor.Those wishing to build their own can grab the required files from the project’s Github page. We’ve seen replicas of other classic HP calculators before, too. If you’ve got your own mathematical projects brewing up in the lab, don’t hesitate to send them in to the tipsline!


Sliding Wrench Leaves A Little To Be Desired

[Ben Conrad] received an interesting tool as a gift that purported to be a better mousetrap. It was a crescent wrench (made by the Crescent company, even) that didn’t have a tiny adjusting wheel like a traditional wrench. Instead, it had a slide running down the length of the handle. The idea is that you would push the slide to snug the wrench jaws against the bolt or nut, and that would be fast and easy compared to a conventional wrench. As [Ben] notes, though, it doesn’t work very well. Most of us would have just dumped it in the back of the tool chest or regifted it. [Ben] tore his apart to find out what was wrong with it.

A typical adjustable wrench has four parts. This one has 19 parts and looks like a conventional wrench with an extra slide and screw running down the length of the handle. [Ben] found the parts were poorly made, but that wasn’t the main problem.

Continue reading “Sliding Wrench Leaves A Little To Be Desired”

3D Printed Gadgets Make Lab Work Easier

If you’ve worked in a bio or chem lab, you’ve probably found yourself handling all manner of plastic. Test tubes, fixtures, clamps — there’s a cavalcade of this stuff that fattens up the order books of lab suppliers every quarter. Sometimes, though, the commercial solutions aren’t quite what you need. For [AtomicVirology], the solution was to 3D print custom lab accessories to make work easier.

The tube adapter allows the collection of 60 small samples without having to unload the fraction collector halfway through. That’s a big quality-of-life improvement for staffers using the equipment.

Some of the devices are straightforward, like simple holders for upright storage of centrifuge tubes. Others are fun twists on the theme, like the Millennium Falcon tube holder or one shaped like the Imperial Star Destroyer. Meanwhile, a resuable plastic tube cover serves as a way to protect tubes from light without the fuss of covering them in aluminium foil. It’s less wasteful, too!

Our favorite, though, is a simple adapter for holding fraction tubes in a AKTA fraction collection device. Stock, the AKTA device will hold 30 small tubes in the inside ring, and 30 larger tubes in the outside ring. Thanks to a simple printed part, though, it can be modified to hold 60 tubes of the smaller size. This allows the collection of 60 small fractions in a shorter period of time simply by moving the delivery head from the inner to the outer ring, without having to swap out 30 tubes halfway through a chromatography column, for example.

It goes to show that a 3D printer is good for more than just churning out Pikachus. It’s a Swiss Army knife for solving fiddly little problems without having to rely on some company to injection-mold you 10,000 examples of whatever it is you want. Of course, if you do want to injection mold something, we’ve covered how to do that before, as well.

See What You’re In For When Buying And Moving A Lathe

Sometimes, with patience and luck, one can score a sweet deal on machinery. But for tools that weigh many hundreds of pounds? Buying it is only the beginning of the story. [Ben Katz] recently got a lathe and shared a peek at what was involved in moving a small (but still roughly 800 pound) Clausing 4901 lathe into its new home and getting it operational.

The lathe had sat unused in a basement, but was ready for a new home.

Moving such a stout piece of equipment cannot simply be done by recruiting a few friends and remembering to lift with the legs. This kind of machinery cannot be moved and handled except with the help of other machines, so [Ben] and friends used an engine hoist with a heavy-duty dolly to get it out of the basement it was in, and into the bed of a pickup truck. Separating the lathe from its base helped, as did the fact that the basement had a ground-level egress door which meant no stairs needed to be involved.

One also has to consider the machine’s ultimate destination, because not all floors or locations can handle nearly a thousand pounds of lathe sitting on them. In [Ben]’s case, that also meant avoiding a section of floor with a maintenance trapdoor when moving the lathe into the house. Scouting and knowing these things ahead of time can be the difference between celebratory pizza and deep dish disaster. Pre-move preparation also includes ensuring everything can physically fit through the necessary doorways ahead of time; a task that, if ignored, will eventually explain itself.

With that all sorted out, [Ben] dives into cleaning things up, doing function checks, and in general getting the lathe up and running. He provides some fantastic photos and details of this process, including shots of the 70s-era documentation and part diagrams.

Watch the first chips fly in the short video embedded below. And should you be looking at getting a lathe of your own? Check out our very own buyer’s guide to lathe options.

Continue reading “See What You’re In For When Buying And Moving A Lathe”

DIY Comparatron Helps Trace Tiny, Complex Objects

Hackers frequently find themselves reverse-engineering or interfacing to existing hardware and devices, and when that interface needs to be a physical one, it really pays to be able to take accurate measurements.

This is easy to do when an object is big enough to fit inside calipers, or at least straight enough to be laid against a ruler. But what does one do when things are complex shapes, or especially small? That’s where [Cameron]’s DIY digital optical comparator comes in, and unlike commercial units it’s entirely within the reach (and budget) of a clever hacker.

The Comparatron is based off a CNC pen plotter, but instead of a pen, it has a USB microscope attached with the help of a 3D-printed fixture. Serving as a background is an LED-illuminated panel, the kind useful for tracing. The physical build instructions are here, but the image should give most mechanically-minded folks a pretty clear idea of how it fits together.

Continue reading “DIY Comparatron Helps Trace Tiny, Complex Objects”