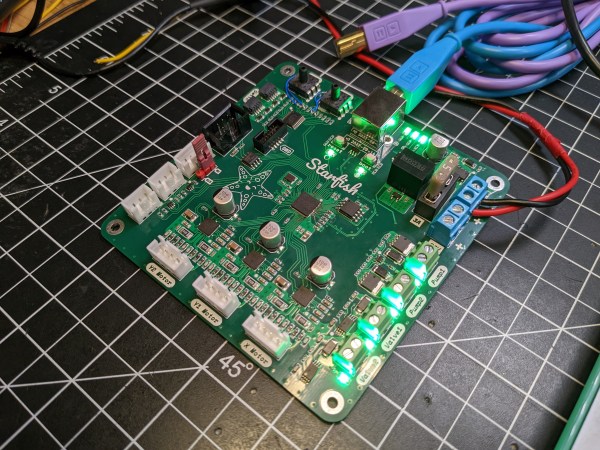
Jet tools air scrubber

It’s A Hack: Air Scrubber Controlled Using The Room Lighting

Some products just seem to be designed to be annoying. [hardmar] discovered the air filtration system installed in his son’s basement woodshop was orientated for the best airflow, but rather poorly positioned to actually turning the thing on and off. For some reason the unit has its single line-of-sight IR receiver on one side, which when mounted in some positions, forces the user to be the completely wrong position to use the supplied remote.

We find it a little unhelpful sometimes that devices specifically designed to be mounted with varying orientations don’t come fitted with IR receivers in different locations to ensure good controllability. It would get annoying really fast to have to contort oneself into some specific position just to turn something on, and some people just might not bother at all.

Proper control of dust is paramount for continued good health, and essential in any workspace or shared area. When you work wood, it produces a lot of dust. It cannot be avoided and gets into everything, your lungs included. PPE is not enough.  Even in your own shop you still really should manage dust production as best you can. Options are varied from centralised extraction, per machine solutions, and often augmented with air scrubbers mounted on the ceiling to grab those fine particulates.

Instead of solving the IR placement issue, [hardmar] wanted to have the unit tied to the lighting system so that it would power on as soon as someone turned on the appropriate light and would then stay on for a fixed amount of time after the user left in order to continue scrubbing the air some more. His simple hack was to first record and analyse the IR protocol used by the remote, and program an Arduino to be able to send it on/off commands. Next, he hooked up a phototransistor aimed at the light, in order to provide the necessary ‘user present’ trigger to tell the Arduino when to activate the scrubber. Super simple and effective. We love this non-invasive approach of adapting off-the-shelf equipment to our specific requirements, without even showing it a screwdriver.

As [hardmar] admits, the hack is not elegantly implemented, it’s just enough to make it work, and that’s just fine, sometimes you just have a job to do and no more.

IBM Cheese Cutter Restoration

For a while now, Mac Pro towers have had the nickname “cheese grater” because of their superficial resemblance to this kitchen appliance. Apple has only been a company since the 70s, though, and is much newer than one of its historic rivals, IBM. In fact, IBM is old enough to have made actual cheese-related computers as far back as the 1910s, and [Hand Tool Rescue] recently obtained one of these antique machines for a complete restoration.

The tool arrived to the restoration workshop in a state so poor that it was difficult to tell what many of the parts on the machine did except for the large cleaver at the top. The build starts with a teardown to its individual parts, cleaning and restoring them to their original luster, machining new ones where needed, and then putting it all back together. The real mystery of this build was what the levers on the underside of the machine were supposed to do, but after the refurbishment it was discovered that these are the way that portions the cheese wheel would be accurately sized and priced before a cut was made.

By placing a section of a wheel of cheese on the machine and inputting its original weight with one of the levers, the second lever is adjusted to the weight of cheese that the customer requested, which rotates the wheel of cheese to the correct position before a cut is made. To us who are spoiled with a world full of electronic devices, a mechanical computer like this seems almost magical, especially with how accurate it is, but if your business in the 1910s involved cheese, this would have been quite normal. In fact, it would be 50 more years before IBM created the machines that they’re more commonly known for.

Thanks to [Jasper Jans] for the tip!

Continue reading “IBM Cheese Cutter Restoration”

Handheld Bandsaw Gets Standup Conversion With Scrap Lumber

Handheld band saws exist, and can be highly useful tools. However, they lack some of the finesse and precision of the more traditional upright units, particularly for with smaller workpieces. [Honus] set about rectifying this, building a stand for their DeWalt handheld bandsaw out of scrap lumber.

The stand consists of some hefty wooden beams sawn to length and screwed together to make a support for the bandsaw. A nice 1/4″ thick aluminium plate is installed as a baseplate for cutting.

Then, the handheld bandsaw itself is attached to the rig, held in place with a bolt and a large zip tie. The zip tie is fastened around the trigger, holding it down all the time. Then, a switched powerboard is used to turn the saw on and off as needed. Importantly, simply cutting a ziptie and removing a bolt is enough to restore the handheld saw to its original purpose.

It’s a tidy build and one that makes an existing tool more useful for minimal extra cost. We’ve actually seen bandsaws built from scratch, too. If you’re cooking up your own great hacks in the home shop, be sure to let us know!

Borehole Camera Rig Makes Life Easier In Mining

Much of mining involves digging and drilling holes in the ground. Often, these holes need inspecting, but [Dean Harty] found that existing borehole inspection solutions weren’t up to snuff. Resolution was poor, and often live-view devices made recording footage a pain. Instead, he set about the development of the Sneaky Peaky, going through several revisions in the process.

The first revision was nothing more than a GoPro strapped to a small penny board, paired with a bright flashlight. The 4K resolution of the GoPro provided useful footage, and the assembly could be lowered into boreholes on a rope and retrieved easily. Rugged and water resistant, the gear worked well, and was remarkably cheap compared to more obscure mining industry hardware.

An early version of the Sneaky Peaky

Later revisions ditched the skateboard, replacing it with a pipe-style housing instead. Key to the design was that the device could readily be destroyed and flushed out of a borehole with an air blast in the event it got stuck.

Eventually, mining outfit Metrologi got involved, having worked with [Dean] on several borehole backfill operations. A 3D-printed chassis was developed to hold an action camera and twin torches, held together with plastic zip ties. These are attached to the pull rope, and if the camera becomes jammed, a sharp pull will snap the ties and cause the device to fall apart. Steel cable ties are then used to create flexible guides to center the assembly in a variety of pipe diameters.

It’s a great example of people on the ground hacking together the tools they need, combined with iterative design to integrate improvements over time. We don’t talk about boreholes much around here, but they can be musical if properly employed, as it turns out. If you’ve got your own great mining hacks, however, do drop us a line!

Building Your Own Filing Machine From A Kit

Files are a very useful important tool if you’re machining your own parts. They can do plenty of shaping themselves on smaller parts in particular. Powering such a tool just makes sense, and a die filer or filing machine is essentially just that, reciprocating a file up and down for you. They’re highly prized amongst clockmakers and model builders, and [jeanluc83] decided to build one at home.

The design chosen was the MLA-18 filing machine, for which castings and parts can be purchased from a company called Metal Lathe Accessories. However, it’s far from a simple screw-together kit. [jeanluc83] goes through the full process of painting, machining, and assembling the kit, which takes quite a bit of work to do properly.

Notably, the design is quite old fashioned in that it does not include its own power source. Instead, the MLA-18 filing machine is fitted with a pulley, such that it can be driven from a motor on a bench. A 1/4 horsepower motor running at roughly 1725 RPM is recommended for best results.

Filing machines aren’t exactly something you’ll find at every hardware store or Harbor Freight, so you might find building your own is the right way to go. Hackaday is, after all, full of examples of hackers building their own tools!

Upside-down c-clamp held in a frame, forming a crude press

C-Clamp Becomes Light-Duty Arbor Press

[ThingaUser] made a tool to solve a specific problem of theirs, but the design also happens to be a pretty good way to turn a c-clamp into a poor man’s light duty arbor press.

The frame is made for a common 4-inch c-clamp.

The problem they had was a frequent need to press nuts and occasionally bearings into other parts. Some kind of press is really the best tool for the job, but rather than buy a press, they opted to make their own solution. By designing and 3D printing an adapter for a common 4-inch c-clamp, a simple kind of light duty press was born.

Sure, one has to turn the handle on the clamp to raise and lower the moveable jaw, and that’s not the fastest operation. But the real value in the design is that the clamp can now stand by itself on a tabletop, leaving the operator to dedicate one hand to manipulating the part to be pressed, while twisting the clamp’s handle with the other hand. There’s no need for a third hand to keep the clamp itself stable in the process. As a bonus, it can print without supports and the clamp secures with zip ties; no other fasteners or glue needed.

Not all c-clamps are the same, so there is a risk that this frame that fits [ThingaUser]’s clamp might not fit someone else’s. In those cases, it’s best to have access to not just the STL file, but also to a version in a portable CAD format like STEP to make it easy to modify. But there are still ways to make changes to an STL that isn’t quite right.

an up-close of the PCB hotplate

Using A PCB To Reflow PCBs – Take 2!

It’s not too hard to make your electronics project get warm. Design your traces too small, accidentally short the battery inputs together, maybe reverse the voltage going to your MCU. We’ve all cooked a part or two over the years. But what about making a PCB that gets hot on purpose? That’s exactly what [Carl Bugeja] did in his second revision of a PCB hot plate, designed to reflow other PCBs.

[Carl’s] first attempt at making a hot plate yielded lukewarm results. The board, which was a single snaking trace on the top of an aluminum substrate, did heat up as it was supposed to. However, the thin substrate led to the hot plate massively warping as it heated up, reducing the contact against the boards being soldered. On top of that, the resistance was much greater than expected, resulting in much lower heat output.

The new revision of the board is on a thicker substrate with much thicker traces, reducing the resistance from 36 ohms on the previous design to just 1 ohm. The thicker substrate, paired with a newer design with fewer slots, made for a much sturdier surface that did not bend as it was heated.

Continue reading “Using A PCB To Reflow PCBs – Take 2!”