DIY Automated Printer Kerchunks Out Classic Embossed Labels

For our money, the best label for pretty much any purpose is one of those embossed Dymo-style stick-on labels, the kind with the raised white letters. There’s just something about them — the raised letters just beg to be touched, their legibility is outstanding, they lend an unmatched retro feel to a project, and the experience of creating one with one of those manual kerchunkers is oddly satisfying.

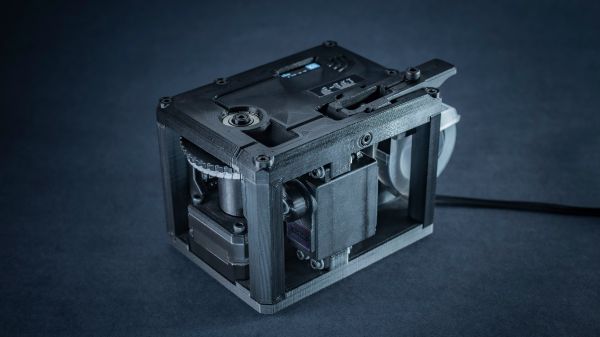
But alas, those manual label makers aren’t what they used to be, as [Andrei Speridião] discovered when his fell apart in his hands. Rather than complain, he automated his label maker and turned it into a computer peripheral.  Dubbed “E-TKT”, the DIY label printer takes the daisy-wheel embossing die from his defunct labeler and puts it under computer control. Rather than the ratchet mechanism of the original, a stepper motor advances the tape, another stepper rotates the wheel to the correct position, and a servo does the kerchunking duty. The process repeats until the label is complete and neatly cut off, ready to apply. An ESP32 runs the mechanism and serves up a web application to compose labels and control the printer. There’s also an OLED display and, of course, an embossed label. Video demo below.

We don’t care what [Bart Simpson] thinks, embossed labels are cool, and this makes them even cooler. And as [Andrei] points out, this is also a neat way around the nasty DRM trick that some companies are foisting on the label-making public. That alone is reason to cheer this project on — but we won’t complain about the beautiful photography and excellent documentation, either.

Continue reading “DIY Automated Printer Kerchunks Out Classic Embossed Labels”

PVC Pipe Transformed Into Handy Tool Box

Would you believe the multi-tiered toolbox pictured here started its life as a piece of bog standard PVC pipe? It certainly wouldn’t be our first choice of building material, but as shown in the video after the break, it only takes a heat source and something suitably flat to convert a piece of PVC pipe into a versatile sheet material.

Flattening the heated PVC.

Unrolling the PVC pipe and getting it flat is covered in the first minute of the video, while the rest of the run time is dedicated to building the tool box. Each and every piece you see here, except for the screws and lid hinges, is carefully cut from the PVC sheet. Though we suspect a few more chunks of pipe went into this build than the video would have you believe.

Would we build such an elaborate box if we had to cut each piece of the thing out by hand? Probably not. But then, we can’t deny the final results here are pretty impressive. Incidentally, if you thought those hinges on the top looked a lot like links removed from a watch band…you’d be correct.

Admittedly we’re a bit late covering this one, and under normal circumstances we might have let it slip by given the several million views it’s amassed over the last year. But the central theme of reusing a common material to build something unexpected is solid Hackaday territory, and aligns closely with this year’s Hackaday Prize challenges.

Continue reading “PVC Pipe Transformed Into Handy Tool Box”

Volvo C30 Custom Gauge And CAN Bus Reverse Engineering

With cars being essentially CAN buses on wheels, it’s no wonder that there’s a lot of juicy information about the car’s status zipping about on these buses. The main question is usually how to get access to this information, both in terms of wiring into the relevant CAN bus, and decoding the used (proprietary) protocol. Fortunately for [Alex], decoding the Volvo VIDA protocol used with his Volvo C30 was relatively straightforward, enabling the creation of a custom gauge that displays information like boost pressure and coolant temperature.

The physical interfacing is accomplished via the car’s OBD port, which conveniently provides access to the car’s two (high-speed and low-speed) CAN buses. Hardware of choice is an M2 UTH (Under the Hood) board, sporting a SAM3X Cortex-M3-based MCU, designed for permanent automotive installations. On [Alex]’s GitHub project page it is explained how the protocol works, and which bytes to look for when replicating the project.

Rounding off the project is a round LCD display from 4D Systems that cycles through the status update screens. As a bonus, the dashboard illumination level is also read out in real-time, so the brightness of the display is adjusted to fit this level. All in all a well-rounded project, with interesting prospects for a more permanent integration of the gauge into the dashboard proper.

Continue reading “Volvo C30 Custom Gauge And CAN Bus Reverse Engineering”

Taking Another Swing At A 3D Printed Eye Of Agamotto

Three years ago, [Enza3D] put together a 3D printed version of the Eye of Agamotto as seen in Marvel’s Doctor Strange. It was a good looking prop, but there was definitely some room for improvement in terms of screen accuracy and scale. With a new Strange film now in theaters, it seemed a good a time as any to revisit the design and tighten up some loose ends.

As you might expect for something that’s supposed to be magic, the internal mechanism required to get all of the moving parts going is quite complex. Not only does the iris need to open and close, but the rings need to spin at different speeds to recreate the effect seen in the film. Impressively, there’s not a single line of code or a microcontroller to be seen here — everything is done with a carefully designed set of a gears and a single N20 motor.

Magical relic, some assembly required.

[Enza3D] tried to simplify the construction of the clockwork-like mechanism as much as possible compared to the earlier version, and made some nice improvements like unifying the size of the screws and shafts used in the assembly so there’s no danger of using the wrong part. Despite their size and fine pitch, all of the gears can be printed on a standard FDM desktop printer, in this case a Prusa Mini.

That said, [Enza3D] did switch over to resin prints for the outside of the prop. Incidentally, in another clever design decision, the outer ornamental case is completely separate from the internal powered mechanism. That lets you easily take the unit apart for maintenance or repairs without risking damage to your finish work. Check out the video after the break for a breakdown of how the device is assembled, as well as some tips on how to make shiny pieces of plastic look like aged metal.

Truth be told, if we were working on our own Doctor Strange cosplay, our first pick would still be the ridiculously awesome POV spellcasting gun we covered back in 2018 — but this beauty comes in at a close second for sure.

Continue reading “Taking Another Swing At A 3D Printed Eye Of Agamotto”

Odd Inputs And Peculiar Peripherals: A Joystick Like They Used To Make

With the rise of the gamepad courtesy of several generations of game consoles, the joystick has become an almost forgotten peripheral, sidelined into the world of flight simulators with its design tending towards copying that of aircraft joysticks. Classic joysticks from the 8- and 16-bit eras were far more workaday devices, more suitable for Space Invaders than Microsoft Flight Simulator, and it’s one of these that [Rob Smith] has recreated in 3D printed form.

The design he’s come up with bears a strong resemblance to the Zipstik, a classic stick that he already owned. It’s a fairly simple device that uses microswitches for all contacts, and is thus very tough. He’s produced a 3D-printed shaft but didn’t trust its strength, so copied the original by using a metal shaft with a pair of circlips. We remember our Zipstik as having a steel shaft; he replaces that with aluminium. A handy jig and a hacksaw allows him to create grooves for circlips, resulting in a sturdy ZipStik clone that should satisfy any retro gamer.

The stick is wired for an Amiga and includes a 555-based rapid-fire circuit, but that’s not the end of the electronics as he’s also created a USB interface for Amiga joysticks to go with it. Not everyone has a classic machine, so now everyone can enjoy the retro peripheral experience! Both builds can be seen in the videos below the break.

This isn’t the first Amiga joystick we’ve brought you, but it’s more sophisticated than some previous designs.

Continue reading “Odd Inputs And Peculiar Peripherals: A Joystick Like They Used To Make”

Mining And Refining: Helium

With a seemingly endless list of shortages of basic items trotted across newsfeeds on a daily basis, you’d be pardoned for not noticing any one shortage in particular. But in among the shortages of everything from eggs to fertilizers to sriracha sauce has been a growing realization that we may actually be running out of something so fundamental that it could have repercussions that will be felt across all aspects of our technological society: helium.

The degree to which helium is central to almost every aspect of daily life is hard to overstate. Helium’s unique properties, like the fact that it remains liquid at just a few degrees above absolute zero, contribute to its use in countless industrial processes. From leak detection and welding to silicon wafer production and cooling the superconducting magnets that make magnetic resonance imaging possible, helium has become entrenched in technology in a way that belies its relative scarcity.

But where does helium come from? As we’ll see, the second lightest element on the periodic table is not easy to come by, and considerable effort goes into extracting and purifying it enough for industrial use. While great strides are being made toward improved methods of extraction and the discovery of new deposits, for all practical purposes helium is a non-renewable resource for which there are no substitutes. So it pays to know a thing or two about how we get our hands on it.

Continue reading “Mining And Refining: Helium”

A Handy Breakout Board For E-Paper Hacking

If you follow the exploits of [Aaron Christophel] (and trust us, you should), you’ll know that for some time now he’s been rather obsessed with electronic price tags, specifically those with e-paper displays. It’s certainly not hard to see why — these low-power devices are perfect for ambient displays, and their integrated wireless capabilities mean you can put one in every room and update them from a central transmitter.

But with such a wide array of products on the market, [Aaron] has found himself doing a lot of e-paper reverse engineering. This involves sticking a logic analyzer between the display and the tag’s microcontroller, which he found to be a rather finicky task. That’s why he created the Universal E-Paper Sniffer: a breakout PCB that lets you snoop on display communication without having to resort to unpleasant methods like scratching off the solder mask to tap into the traces by hand.

It’s a pretty simple gadget: on either side, you’ve got a connector for 24 pin 0.5 mm pitch flat flex cable, which [Aaron] has identified as the most common interface for these displays, and in the middle you’ve got a standard 2.54 mm pitch header. There are no other components on the board, and all the traces go right through to the other side.

Add a few jumpers and a cheap logic analyzer, and you’re ready to sniff some SPI commands. Check out the video after the break for a general walk-through of what it looks like to start sniffing around a new display.

The Gerber files for the breakout are available for free, or you can chose to buy a fabricated board through PCBWay to kick [Aaron] a portion of the sale price. However you get one, we think this will be a handy little tool to have around if you find yourself bitten by the price tag hacking bug.

Continue reading “A Handy Breakout Board For E-Paper Hacking”