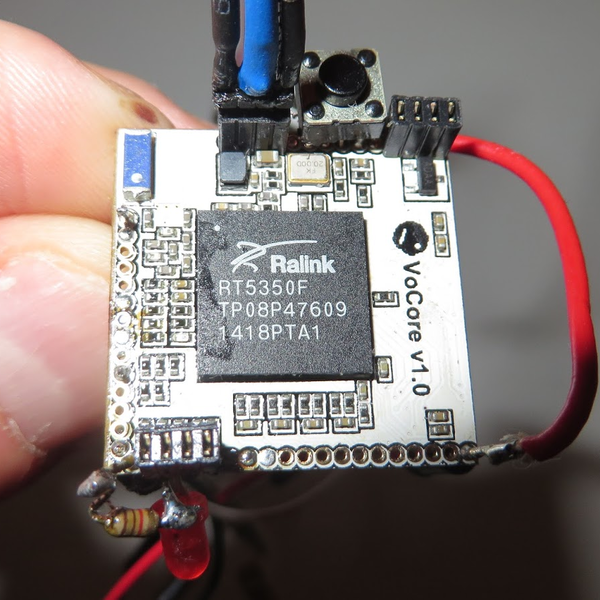
Build A Sensor Network Around A Weather Station

[Yveaux] had a problem. The transmitter on his outdoor weather station had broken, rendering the inside display useless. He didn’t want to buy a new one, so, like the freelance embedded software designer that he is, he decided to reverse engineer the protocol that the transmitter uses and build his own. He didn’t just replace the transmitter module, though, he decided to create an entire system that integrated the weather system into a sensor network controlled by a Raspberry Pi. That’s a far more substantial project, but it gave him the ability to customize the display and add more features, such as synching the timer in the display with a network clock and storing the data in an online database.

Fortunately for [Yveaux], the transmitter itself was fairly easy to replace. The weather station he had, like most, transmitted on the 868MHz frequency, which is a license-free ISM (Industrial, Scientific and Monitoring) spot on the spectrum. After some poking around, he was able to figure out the protocol and teach the Pi to speak it. He then added a Moteino and an nRF2401+ transmitter to the weather station, so it can send data to the Pi, which then sends it to the display. It is a more complicated setup, but it is also much more flexible. He’s had it running for a couple of years now and has collected more than a million sensor readings.

Hello RAMPS, Meet ESP8266

The proliferation of  DIY 3D printers has been helped in large measure by the awesome open-source RepRap project. A major part of this project is the RAMPS board – a single control board / shield to which all of the other parts of the printer can be easily hooked up. A USB connection to a computer is the usual link of choice, unless the RAMPS board has the SD-Card option to allow the 3D printer to operate untethered. [Chetan Patil] from CreatorBot built a breakout board to help attach either the ESP8266 WiFi or the HC-05 Bluetooth module to the Aux-1 header on the RAMPS board. This lets him stream G-code to the printer and allow remote control and monitoring.

While the cheap ESP8266 modules are the current flavor of the season with Hackers, getting them to work can be quite a hair tearing exercise. So [Chetan] did some hacking to figure out the tool chain for developing on the ESP module and found that LUA API from NodeMcu would be a good start. The breakout board is nothing more than a few headers for the ESP8266, the HC-05 and the Aux-1 connections, with a few resistors, a switch to set boot loader mode and a 3.3V regulator. If you’re new to the ESP8266, use this quick, handy, guide by [Peter Jennings] to get started with the NodeMCU and Lualoader. [Chetan]’s code for flashing on the ESP8266, along with the Eagle board design files are available via his Github repo. Just flash the code to the ESP8266 and you’re ready to go.

One gotcha to be aware of is to plug in the ESP module after the printer has booted up. Otherwise the initial communication from the ESP module causes the printer to lock up. We are sure this is something that can be taken care of with an improved breakout board design. Maybe use a digital signal from the Arduino Mega on the RAMPS board to keep the ESP module disabled for a while during start up, perhaps? The video after the break gives a short overview of the hack.

Continue reading “Hello RAMPS, Meet ESP8266”

Google’s OnHub Goes Toe To Toe With Amazon Echo

Yesterday Google announced preorders for a new device called OnHub. Their marketing, and most of the coverage I’ve seen so far, touts OnHub as a better WiFi router than you are used to including improved signal, ease of setup, and a better system to get your friends onto your AP (using the ultrasonic communication technique we’ve also seen on the Amazon Dash buttons). Why would Google care about this? I don’t think they do, at least not enough to develop and manufacture a $199.99 cylindrical monolith. Nope, this is all about the Internet of Things, as much as it pains me to use the term.

google-onhub-iot-router-thumbOnHub boasts an array of “smart antennas” connected to its various radios. It has the 2.4 and 5 Gigahertz WiFi bands in all the flavors you would expect. The specs also show an AUX Wireless for 802.11 whose purpose is not entirely clear to me but may be the network congestion sensing built into the system (leave a comment if you think otherwise). Rounding out the communications array is support for ZigBee and Bluetooth 4.0.

I have long looked at Google’s acquisition of Nest and assumed that at some point Nest would become the Router for your Internet of Things, collecting data from your exercise equipment and bathroom scale which would then be sold to your health insurance provider so they may adjust your rates. I know, that’s a juicy piece of Orwellian hyperbole but it gets the point across rather quickly. The OnHub is a much more eloquent attempt at the same thing. Some people were turned off by the Nest because it “watches” you to learn your heating preferences. The same issue has arisen with the Amazon Echo which is “always listening”.

Google has foregone those built-in futuristic features and chosen a device to which almost  everyone has already grown accustom: the WiFi router. They promise better WiFi and I’m sure it will deliver. What’s the average age of a home WiFi AP at this point anyway? Any new hardware would be an improvement. Oh, and when you start buying those smart bulbs, fridges, bathroom scales, egg trays, and whatever else it’ll work for them as well.

As far as hacking and home automation, it’s hard to beat the voice-activated commands we’ve seen with Echo lately, like forcing it to control Nest or operate your Roku. Who wants to bet that we’ll see a Google-Now based IoT standalone device quickly following the shipment of OnHub?

Continue reading “Google’s OnHub Goes Toe To Toe With Amazon Echo”

Hacking An SD Slot For WiFi

Back in the 1990’s moving files via a floppy disk was known as “sneaker net.” While floppies are a thing of the past, SD Cards are the modern equivalent and they still lend themselves to sneaker net operations.

But why? WiFi is everywhere now. Wouldn’t it be great if you could hack those devices with SD slots to use WiFi? Apparently 3D printer [extrud3d] thought the same thing and found a way to reconfigure a Toshiba FlashAir card to put his 3D printer on the network.

The card is aimed at consumers, so by default it creates a hotspot and waits for a connection, a rudimentary web app allows you to move files back and forth over the network to the SD card which is then read by the host device. However, [extrud3d] shows how to modify a file on the SD card’s file system to allow the device to hook up to an existing wireless network and also provides a Python script to make the file transfer easier.

Although this hack is for a 3D printer, it ought to work with most devices that have a full sized SD slot (or can be adapted to take a full sized card). Since the hack is nothing more than changing a text file, it is a lot easier than some other SD hacks we’ve covered. Over on hackaday.io, [Chris Jones] has recently done some hacking on the FlashAir and has a list of its shell commands if you want to go beyond the text file hacks.

Continue reading “Hacking An SD Slot For WiFi”

Hacking A NRF24L01 Radio For Longer Range

[RonM9] wasn’t happy with his 50 foot range on his NRF24L01 project. The RF had to cut through four walls, but with the stock modules, the signal was petering out after two or three walls.  A reasonably simple external dipole antenna managed to increase the range enough to do the job.

[RonM9’s] instructions show where to cut away the existing PCB antenna and empirically tune the 24 gauge wire for best performance. He even includes an Arduino-based test rig so you can perform your own testing if you want.

Continue reading “Hacking A NRF24L01 Radio For Longer Range”

Fisher Price Bluetooth Speaker Hack

A good hacker hates to throw away electronics. We think [Matt Gruskin] must be a good hacker because where a regular guy would see a junky old 1980’s vintage Fisher Price cassette player, [Matt] saw a retro stylish Bluetooth speaker. His hack took equal parts of electronics and mechanics. It even required some custom 3D printing.

You might think converting a piece of old tech to Bluetooth would be a major technical challenge, but thanks to the availability of highly integrated modules, the electronics worked out to be fairly straightforward. [Matt] selected an off the shelf Bluetooth module and another ready-to-go audio amplifier board. He built a custom board to convert the stereo output to mono and hold the rotary encoder he used for the volume control. An Arduino (what else?) reads the encoder and also provides 3.3V to some of the other electronics.

The really interesting part of the hack is the mechanics. [Matt] managed to modify the existing mechanical buttons to drive the electronics using wire and hot glue. He also added a hidden power switch that doesn’t change the device’s vintage look. Speaking of mechanics, there’s also a custom 3D printed PCB holder allowing for the new board to fit in the original holder. This allows [Matt] to keep the volume control in its original location

Continue reading “Fisher Price Bluetooth Speaker Hack”

LightBlue Bean+ Adds Battery, Connectors, Price

PunchThrough, creators of the LightBlue Bean, have just launch a Kickstarter for a new version called LightBlue Bean+. The tagline for the hardware is “A Bluetooth Arduino for the Mobile Age” which confirms that the hardware is targeted at a no-hassle, get it connected right now sort of application.

lightblue-bean-plus-thumbFor those unfamiliar, the original LightBlue Bean is a single board offering meant to marry Bluetooth connectivity (think Cellphones with BTLE) to the capabilities of a microcontroller-based hardware interface. The Bean+ augments this hardware with a 300m+ range increase, an integrated LiPo (600mAh or more), and headers/connectors where there were only solder pads before.

On the software side of things the Bean+ has four firmware options that make it speak MIDI, ANCS, HID, or Peer-to-Peer, only not all at the same time. The good news is that these are ecosystem upgrades and will work for existing Bean hardware too. The entire thing comes with online-platform integration and easy to use Smartphone tools to guide you through connecting and making something useful.

The board includes a battery tending circuit that allows it to be charged via the USB port but can run over a year between recharges if you use it judiciously. There is a slider switch near the pin sockets marked “A3, A4, A5” which toggles between 3.3v and 5v so that no level shifters are needed for sensors and other hardware you might use with it. The white connectors seen near the bottom of this image are Grove connectors. These provide I2C and Analog support to that ecosystem of add-on boards.

All in all this is a pretty sweet upgrade. The MSRP will be $45 but early backers can get in around 10-25% less than that. The price doesn’t mean it’s a no-brainer to pick one up, but the header options make this much more versatile and reusable than the original Bean and we like the idea of a rechargeable battery of the coin cells used by Bean+’s predecessor. It is an each choice for drop-in no hassle connectivity when bottom line isn’t your top concern.

Original LightBlue Bean is available in the Hackaday Store.