NASA is going back to the Moon! We’ll follow the crew of Artemis II every step of the way.
Continue reading “Following Artemis II’s Journey Around The Moon”

NASA is going back to the Moon! We’ll follow the crew of Artemis II every step of the way.
Continue reading “Following Artemis II’s Journey Around The Moon”

A fun part of retro computing is saving ‘e-waste’ that was headed for certain destruction. These boards can have any number of defects, modifications and more that have to be remedied prior to using them. In the case of the Asus P5A-B Socket 7 mainboard that [Bits und Bolts] rescued from the scrapheap at least one issue was obvious: someone had ripped off the plastic part of the ZIF socket, leaving only the metal pins poking out like an awkward kind of LGA socket.
In addition to the busted PGA ZIF socket there was additional damage, including a broken SMT capacitor and missing resistor. Interestingly, someone had apparently modded the ATX power connector to permanently power on the system by removing a pin and bridging to the power-on signal. Obviously this mod had to be undone by removing the bridge and installing a new pin. After this cracked solder joints had to be addressed, before the tedious task of removing the stray PGA socket pins one by one started.
Exactly what was done to this mainboard and why will likely forever remain a mystery, but at least there didn’t seem to be any serious damage. After installing a CPU it was possible to boot and access the BIOS as well as run a couple of tools, confirming that one more Socket 7 board has been saved from the scrapper.
Continue reading “Fixing An E-Waste ASUS P5A-B Socket 7 Mainboard”
Although generative language models have found little widespread, profitable adoption outside of putting artists out of work and giving tech companies an easy scapegoat for cutting staff, their their underlying technology remains a fascinating area of study. Stepping back to the more innocent time of the late 2010s, before the cultural backlash, we could examine these models in their early stages. Or, we could see how even older technology processes these types of machine learning algorithms in order to understand more about their fundamentals. [Damien Boureille] has put a 60s-era IBM as well as a PDP-11 to work training a transformer algorithm in order to take a closer look at it.
For such old hardware, the task [Damien Boureille] is training his transformer to do is to reverse a list of digits. This is a trivial problem for something like a Python program but much more difficult for a transformer. The model relies solely on self-attention and a residual connection. To fit within the 32KB memory limit of the PDP-11, it employs fixed-point arithmetic and lookup tables to replace computationally expensive functions. Training is optimized with hand-tuned learning rates and stochastic gradient descent, achieving 100% accuracy in 350 steps. In the real world, this means that he was able to get the training time down from hours or days to around five minutes.
Not only does a project like this help understand these tools, but it also goes a long way towards demonstrating that not every task needs a gigawatt datacenter to be useful. In fact, we’ve seen plenty of large language models and other generative AI running on computers no more powerful than an ESP32 or, if you need slightly more computing power, on consumer-grade PCs with or without GPUs.

This week Jonathan chats with Milo Schwartz about Pangolin, the Open Source tunneling solution. Why do we need something other than Wireguard, and how does Pangolin fix IoT and IT problems? And most importantly, how do you run your own self-hosted Pangolin install? Watch to find out!
Continue reading “FLOSS Weekly Episode 867: Pangolin: People Can Lie”

Until now, if you were seated at your Sega Genesis and wanted to check your stock portfolio, you were out of luck. You had to get a smartphone, or a computer, or maybe even a television to look up stock prices and understand your financial position. Thankfully, though, Sega’s neglect of its hero platform has finally been corrected. [Mike Wolak] has given the 16-bit console the real-time stock ticker it so desperately needed.
The build runs on a MegaWiFi cartridge, which uses an ESP8266 or ESP32 microcontroller to add WiFi communication to the Sega Genesis (or Mega Drive). [Mike] wrote a custom program for the platform that would query the Finnhub HTTPS API and display live stock prices via the Genesis’s Video Display Processor. It does so via a clean console-like interface that would be familiar to users of other 16-bit machines from this era, though seeing so much textual output would have been uncommon.
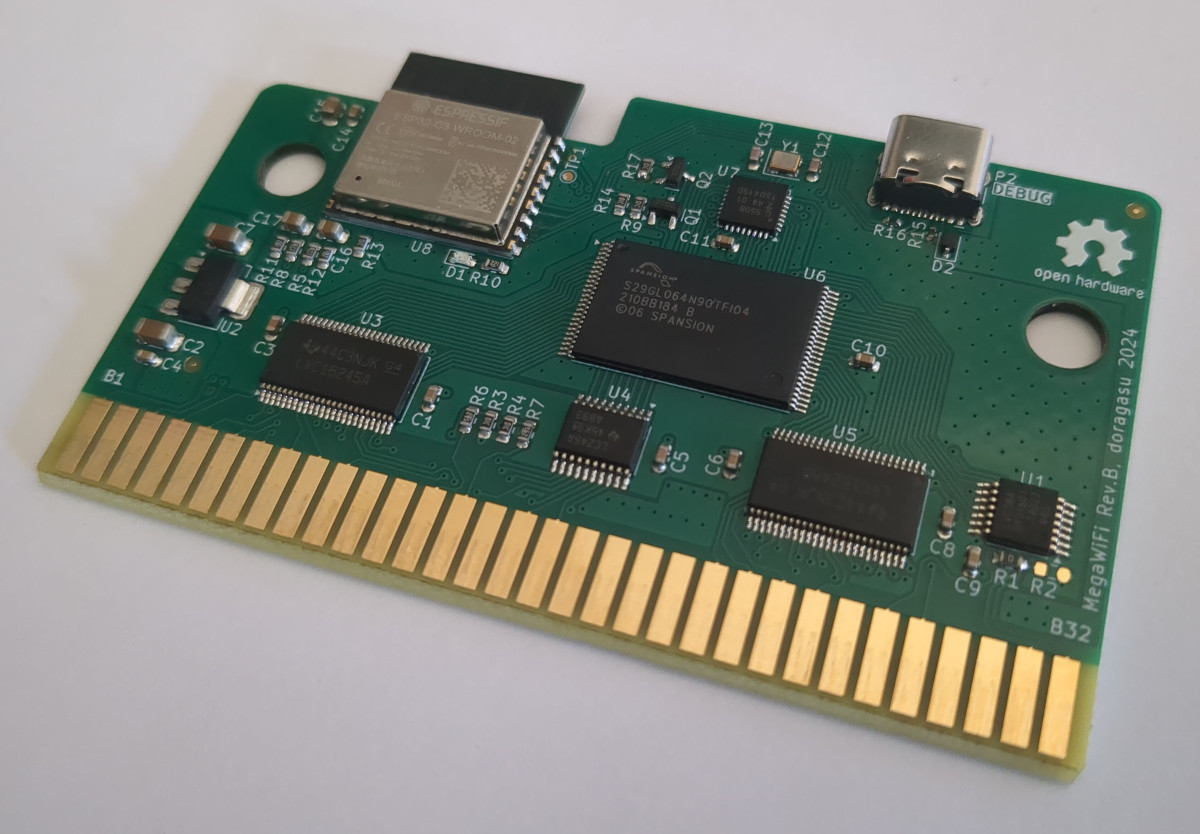 By default, the stock ticker is set to show prices for major tech stocks, but you can set it up to display any major symbol available in the Finnhub data stream. You can configure up to eight custom stocks and input your holdings, and the software will calculate and display your net worth in real time.
All the files are available for those eager to monitor their portfolios on a Sega, as the financial gods intended. [Mike] notes it took a little work to get this project over the line, particularly as the ESP32-C3 doesn’t support HTTPs with stock firmware. A few other hacks were needed to keep the Genesis updating the screen during HTTP queries, too.
If you have a concentrated portfolio and a spare Sega Genesis, this could be a fun retro way to keep an eye on your holdings. Alternatively, you might prefer to go the classic paper tape route.
Continue reading “Sega Genesis Finally Gets Long-Awaited Stock Ticker App 37 Years After Launch”

[Michel Jean] asked a question few others might: what exactly is going on under the hood of a classic HP scientific calculator when one presses the ∫ key? A numerical integration, sure, but how exactly? There are a number of useful algorithms that could be firing up when the integral button is pressed, and like any curious hacker [Michel] decided to personally verify what was happening.
[Michel] implemented different integration algorithms in C++ and experimentally compared them against HP calculator results. By setting up rigorous tests, [Michel] was able to conclude that the calculators definitely use Romberg-Kahan, developed by HP Mathematician William Kahan.
Selected by HP in 1979 for use in their scientific calculators, the Romberg-Kahan algorithm was kept in service for nearly a decade. Was it because the algorithm was fast and efficient? Not really. The reason it was chosen over others was on account of its robustness. Some methods are ridiculously fast and tremendously elegant at certain types of problem, but fall apart when applied to others. The Romberg-Kahan algorithm is the only one that never throws up its hands in failure; ideal for a general-purpose scientific calculator that knows only what its operator keys in, and not a lick more.
It’s a pretty neat fact about classic HP calculators, and an interesting bit of historical context for these machines. Should you wish for something a bit more tactile and don’t mind some DIY, it’s entirely possible to re-create old HP calculators as handhelds driven by modern microcontrollers, complete with 3D-printed cases.
Thanks to [Stephen Walters] for the tip!
![The LEGO-lookalike displaying [Paul]'s dashboard](https://hackaday.com/wp-content/uploads/2026/03/Screenshot-2026-03-04-at-14-08-38-Watt-IV-–-the-M2x2.png?w=600&h=450)
There’s just something delightful about scaled items. Big things shrunk down, like LEGO’s teeny tiny terminal brick? Delightful. Taking that terminal brick and scaling it back to a full-sized computer? Even better. That’s what designer [Paul Staal] has done with his M2x2 project.
In spite of the name, it actually has a Mac Mini M4 as its powerful beating heart. An M2 might have been more on-brand, but it’s probably a case of wanting the most horsepower possible in what [Paul] apparently uses as his main workstation these days. The build itself is simple, but has some great design details. As you probably expected, the case is 3D printed. You may not have expected that he can use the left stud as a volume control, thanks to an IKEA Symfonisk remote hidden beneath. The right stud comes off to allow access to a wireless charger.
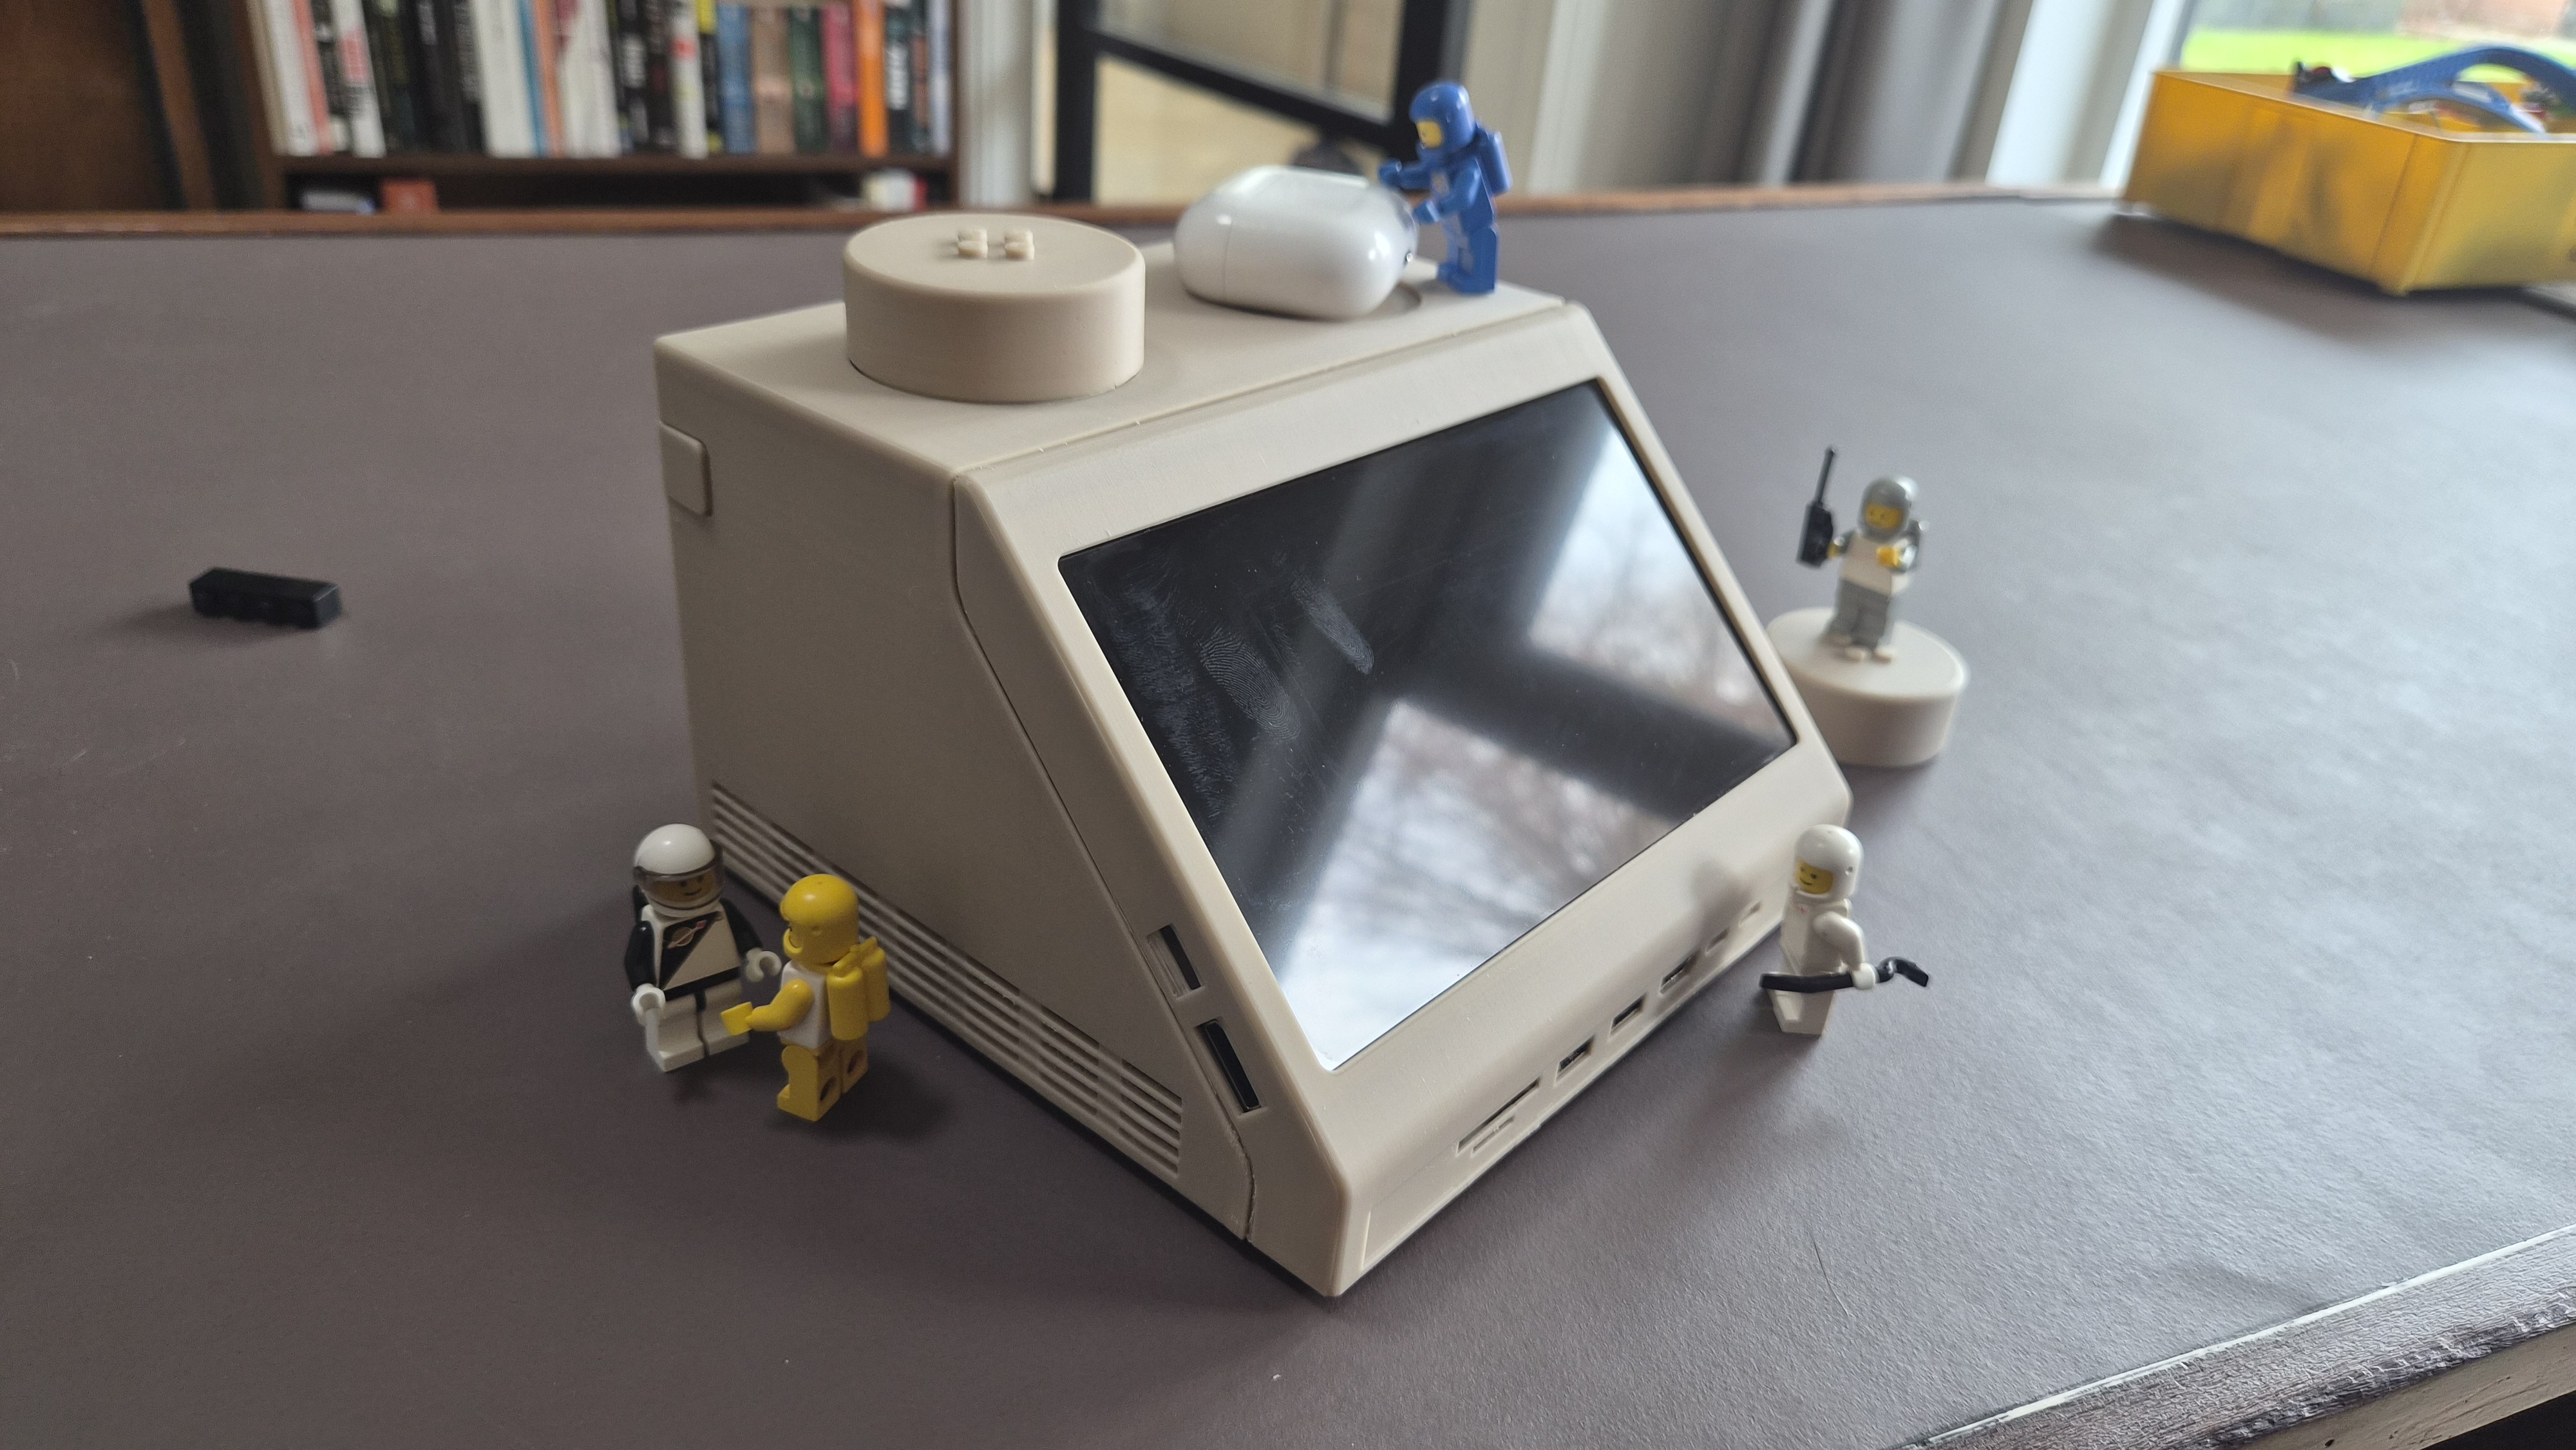
The 7″ screen can display anything, but [Paul] mostly uses it either for a custom home assistant dashboard, or to display an equalizer, both loosely styled after ‘screen’ on the original brick. We have to admit, as cool as it looked with the minifigs back in the day, that sharp angle to the screen isn’t exactly ergonomic for humans.
Perhaps the best detail was putting LEGO-compatible studs on top of the 10:1 scaled up studs, so the brick that inspired the project can sit securely atop its scion. [Paul] has provided a detailed build guide and the STLs necessary to print off a brick, should anyone want to put one of these nostalgic machines on their own desk.
We’ve covered the LEGO computer brick before, but going the other way–putting a microcontroller and display in the brick it to run DOOM. We’ve also seen it scaled up before, but that project was a bit more modest in size and computing power.

Not so long ago, most computer users didn’t own their own machines. Instead, they shared time on mainframes or servers, interacting with this new technology through remote terminals. While the rise of cloud computing and AI might feel like a modern, more dystopian echo of that era, some look back on those early days with genuine fondness. If you agree, check out this 70s-era terminal replica from [David Green].
The inspiration for this build was a Lear Siegler ADM-3A terminal seen at a local computer festival. These machines had no local computing resources and were only connected to their host computer via a serial connection. The new enclosure, modeled on this design, was 3D-printed and then assembled and finished for the classic 70s look. There are a few deviations from a 70s terminal, though: notably, a flat LCD panel and a Raspberry Pi 3, which, despite being a bit limited by today’s standards, still offers orders of magnitude more computing power than the average user in the 70s would have had access to.
Continue reading “Computer Terminal Replica Inspired By 70s Hardware”


