Simulating The Enigma’s Oddball Cousin

Even if you wouldn’t describe yourself as a history buff, you’re likely familiar with the Enigma machine from World War II. This early electromechanical encryption device was used extensively by Nazi Germany to confound Allied attempts to eavesdrop on their communications, and the incredible effort put in by cryptologists such as Alan Turing to crack the coded messages it created before the end of the War has been the inspiration for several books and movies. But did you know that there were actually several offshoots of the “standard” Enigma?

For their entry into the 2019 Hackaday Prize, [Arduino Enigma] is looking to shine a little light on one of these unusual variants, the Enigma Z30. This “Baby Enigma” was intended for situations where only numerical data needed to be encoded. Looking a bit like a mechanical calculator, it dropped the German QWERTZ keyboard, and instead had ten buttons and ten lights numbered 0 through 9. If all you needed to do was send off numerical codes, the Z30 was a (relatively) small and lightweight alternative for the full Enigma machine.

Creating an open source hardware simulator of the Z30 posses a rather unique challenge. While you can’t exactly order the standard Enigma from Digi-Key, there are at least enough surviving examples that they’ve been thoroughly documented. But nobody even knew the Z30 existed until 2004, and even then, it wasn’t until 2015 that a surviving unit was actually discovered in Stockholm.

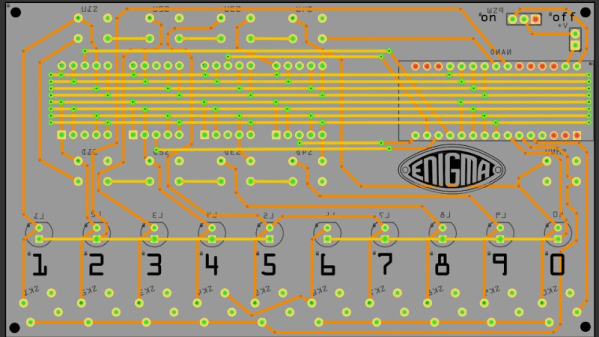
Of course, [Arduino Enigma] does have some experience with such matters. By modifying the work that was already done for full-scale Enigma simulation on the Arduino, it only took a few hours to design a custom PCB to hold an Arduino Nano, ten buttons with matching LEDs, and of course the hardware necessary for the iconic rotors along the top.

The Z30 simulator looks like it will make a fantastic desk toy and a great way to help visualize how the full-scale Enigma machine worked. With parts for the first prototypes already on order, it shouldn’t be too long before we get our first good look at this very unique historical recreation.

Meet The Bootstrap Winners Of The 2019 Hackaday Prize

The twenty projects that won this year’s Hackaday Prize bootstrap competition have just been certified. The purpose of this is to help great examples of early entries offset the cost that goes into prototyping as they work on their projects throughout the summer.

We know this has had a big impact on entries in the past. When working on hard projects it’s easy to doubt yourself, but you can usually get over that with just a bit of outside validation. Alex Williams encountered this when he first entered his Open Source Under Water Glider into the 2017 Hackaday Prize. He wanted to show off his work but didn’t think there’d be much interest and wasn’t sure if he’d continue development. He was shocked by the number of people who were excited about it, continued working feverishly on it, and went on to win the grand prize.

You’ll find all 20 bootstrap winners listed below, but we wanted to feature a couple of examples to show the kind of work that is happening during the Hackady Prize. The results of the bootstrap competition have no bearing on the top prizes: they are all still up for grabs, so enter your project today!

Continue reading “Meet The Bootstrap Winners Of The 2019 Hackaday Prize”

Well-Built Sentry Gun Addresses The Menace Of Indoor Micro-UAVs

What is this world coming to when you can’t even enjoy sitting in your living room without some jamoke flying a drone in through the window? Is nothing sacred? Won’t someone think of the children?

Apparently [Drew Pilcher] did, and the result is this anti-drone sentry gun.  It’s a sturdily built machine – one might even say it’s overbuilt. The gimbal is made from machined steel pieces, and the swivels are a pair of Sherline stepper-controlled rotary tables with 1/40 of a degree accuracy selling for $400 each. Riding atop that is a Nerf rifle, which is cocked by a stepper-actuated linear slide, as well as a Kinect for object tracking. The tracking app is a little rough – just OpenCV hacked onto the Kinect SDK – but good enough for testing. The gun tracks as smoothly as one would expect given the expensive hardware, and the auto-cocking feature works well if a bit slowly. Based as it is on Nerf technology, this sentry is only indicated for the control of the micro-drones seen in the snuff video below, but really, anyone afflicted by indoor infestations of Phantoms or Mavics has bigger problems to worry about.

Over-engineered? Perhaps, but it’s better than letting the menace of indoor drones go unanswered. And it’s far from the first sentry gun we’ve seen, targeting everything from cats to squirrels using lasers, paintballs, and even plain water.

Continue reading “Well-Built Sentry Gun Addresses The Menace Of Indoor Micro-UAVs”

The Pianist Octopus

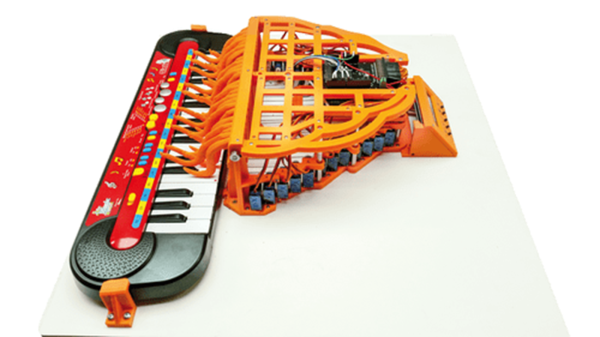
MIDI has been around for nearly forty years, but what do you do if you have an old ‘toy’ keyboard without MIDI? Or really any way to make it sound good? You could turn it into a player piano, and that’s exactly what [Alessandro] did with an old toy keyboard. It’s The Pianist Octopus, and it is perhaps the coolest, neatest pianist you’ve ever seen.

This build uses 24 individual 9 gram hobby servos, which of course means you need to drive those servos somehow. There are plenty of ways to attach a few servos to an Arduino board, but when you need to drive 24 servos, your options become somewhat limited. The electronics consist mostly of a Fishino Octopus, an Arduino shield that can drive sixteen individual servos. Slap two of these shields on an Arduino and you have something that will drive twenty four servos.

The mechanical part of the build consists of a 3D printed frame that allows the servos to be mounted across an arc, something like a harp. Metal rods connect the servos to tentacle-shaped actuators. These were designed in Google SketchUp and printed in PLA.

Attached to these servos and Arduino is a character LCD and a few buttons that allow the user to cycle through a few functions. The play button plays the current melody (based on old Nokia ringtones, by the way), a few more buttons adjust the position of the individual servos, and there’s another button to stop playing. Since this is a complete electronic-to-mechanical interface for a toy piano, a MIDI-in port isn’t out of the question; all a MIDI implementation would need to do is move a servo down on a note on event and move it back up on the note off event.

HestiaPi: A Stylish Open Hardware Thermostat

A common complaint about open hardware and software is that the aesthetic aspects of the projects often leave something to be desired. This isn’t wholly surprising, as the type of hackers who are building these things tend to be more concerned with how well they work than what they look like. But there’s certainly nothing wrong with putting a little polish on a well designed system, especially if you want “normal” people to get excited about it.

For a perfect example, look no further than the HestiaPi Touch. This entry into the 2019 Hackaday Prize promises to deliver all the home automation advantages of something like Google’s Nest “smart” thermostat without running the risk of your data being sold to the highest bidder. But even if we take our tinfoil hat out of the equation, it’s a very slick piece of hardware from a functional and visual standpoint.

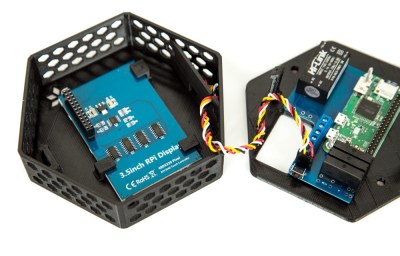
As you probably guessed from the name, the thermostat is powered by the Raspberry Pi Zero, which is connected to a custom PCB that includes a couple of relays and a connector for a BME280 environmental sensor. The clever design of the 3D printed case means that the 3.5 inch touch screen LCD on the front can connect directly to the Pi’s GPIO header when everything is buttoned up.

Of course, the hardware is only half the equation. To get the HestiaPi Touch talking to all the other smart gadgets in your life, it leverages the wildly popular OpenHAB platform. As demonstrated in the video after the break, this allows you to use the HestiaPi and its mobile companion application to not only control your home’s heating and air conditioning systems, but pretty much anything else you can think of.

The HestiaPi Touch has already blown past its funding goal on Crowd Supply, and the team is hard at work refining the hardware and software elements of the product; including looking at ways to utilize the unique honeycomb shape of the 3D printed enclosure to link it to other add-on modules.

Continue reading “HestiaPi: A Stylish Open Hardware Thermostat”

BikeOn Makes Electric Conversion A Snap

If you’re in a relatively urban area and your destination is within a reasonable distance, it’s hard to argue against riding your bike rather than taking a car. It’s a positive for the environment, and great way to exercise and keep active. But some of us, say folks who write for the Internet full-time, might appreciate a little electromechanical advantage when the going gets tough.

In an effort to make electrifying your bike as easy as possible, [Shushanik] and [Aram] are working on a product they call BikeOn which they’ve recently entered into the 2019 Hackaday Prize. Thanks to some very clever engineering, this small unit can clamp onto the frame of a standard bicycle and transfer the energy from its 350 watt motor directly into the rear wheel; all without any tools or permanent modifications.

In the video after the break, [Aram] demonstrates how the user can install the BikeOn motor assembly in literally just a few seconds. Naturally there’s a beefy battery that needs to get attached to the frame as well, but even that has been made modular enough that it can attach where many bikes have their water bottle holder.

The attentive reader will likely notice that there’s no obvious control mechanism for BikeOn. Instead of having to fumble around with it manually, BikeOn uses a combination of torque sensor, accelerometer, and gyroscope to intelligently determine when the rider could use a boost.

BikeOn nabbed Editor’s Choice award at Maker Faire 2019, and now that it’s in the running for the Hackaday Prize, we’re excited to see more information on the product as it moves towards commercial release.

Continue reading “BikeOn Makes Electric Conversion A Snap”

The Finest Linux Tablet You Can Build

For the last few years now, we’ve all had access to tiny, affordable Systems on a Module. These wunderchips are complete Linux systems with WiFi, a halfway decent GPU, and enough memory to run a real system. This is the perfect platform to base a tablet build on, the only problem is that someone has to actually do it. The DLT One is the ‘Damn Linux Tablet’ from [Prof. Fartsparkle]. It’s the answer to the question of when someone is going to build a tablet computer around one of these cheap Systems on a Chip that are floating around.

With many modules to choose from, the first task is actually choosing one of these Linux modules. [Fartsparkle] ended up with the Nvidia Jetson Nano, an impressive little board that has one distinct advantage: it’s drop-in compatable with the Raspberry Pi Compute Module, the Raspberry Pi-on-an-SODIMM. Given a single chassis, [Prof. Fartsparkle] can simply upgrade his tablet by getting a newer version of the Jetson Nano (or the Compute Module).

The current state of the board is basically an SODIMM socket on a board, with breakouts for Ethernet, a power jack, USB, and HDMI. That’s all there is to it, and design on the tablet chassis is ongoing.

Future updates for this tablet build will include USB-C PD, an mPCI-E connector that would allow for M.2 storage, LTE in some form or another and a dock that would allow you to turn this into a Surface-like laptop. It’s an amazing build, and one of the best entries we’ve seen in this year’s Hackaday Prize.