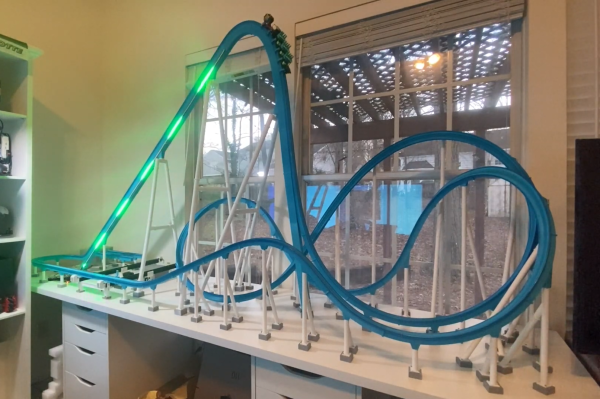
AvoRipe Takes A Firm Grip On The Ultimate First World Food Problem

You don’t have to be an extinct mammal or a Millennial to enjoy the smooth, buttery taste of an avocado. Being psychic on the other hand is definitely an advantage to catch that small, perfect window between raw and rotten of this divaesque fruit. But don’t worry, as modern problems require modern solutions, [Eden Bar-Tov] and [Elad Goldberg] built the AvoRipe, a device to notify you when your next avocado has reached that window.

Taking both the firmness and color of an avocado as indicators of its ripeness into account, the team built a dome holding a TCS3200 color sensor as stand for the avocado itself, and 3D printed a servo-controlled gripper with a force sensor attached to it. Closing the gripper’s arms step by step and reading the force sensor’s value will determine the softness the avocado has reached. Using an ESP8266 as centerpiece, the AvoRipe is turned into a full-blown IoT device, reporting the sensor readings to a smartphone app, and collecting the avocado’s data history on an Adafruit.IO dashboard.

There is unfortunately one big drawback: to calibrate the sensors, a set of nicely, ripe avocados are required, turning the device into somewhat of a chicken and egg situation. Nevertheless, it’s a nice showcase of tying together different platforms available for widescale hobbyist projects. Sure, it doesn’t hurt to know how to do each part from scratch on your own, but on the other hand, why not use the shortcuts that are at our disposal to remove some obstacles — which sometimes might include programming itself.

Continue reading “AvoRipe Takes A Firm Grip On The Ultimate First World Food Problem”

Used Soda Stream Cylinder Becomes DIY Canned Air

Soda Stream machines use a cylinder of compressed CO2 to carbonate beverages, and cylinders that are “empty” for the machine’s purposes in fact still have a small amount of gas left in them. User [Graldur] shared a clever design for using up those last gasps from a cylinder by turning it into a makeshift compressed air gun, the kind that can blow crumbs or dust out of inconvenient spots like the inside of a keyboard. It’s 3D printed in PETG with a single seal printed in Ninjaflex.

[Graldur]’s 3D printed assembly screws onto the top of an “empty” cylinder and when the bottom ring is depressed like a trigger, the valve is opened slightly and the escaping gas is diverted through a narrow hole in the front. As a result, it can be used just as you would a can of compressed air. The gas outlet even accommodates the narrow plastic tubes from WD-40 cans (or disposable compressed air cans, for that matter) if more precision is required.

The design is intended for use with nearly-empty cylinders, but even so, [Graldur] also points out that it has been designed such that it can never fully actuate the cylinder’s release valve no matter how hard one presses, so don’t modify things carelessly. We also notice the design keeps the user’s hand and fingers well away from the business end of things.

This device also reminds of somewhat of a past experiment which used 3D printing to create serviceable (albeit low pressure) 3D printed compressed air tanks in custom shapes.

3D Printed Swirl Rocket Injector Turns Up The Heat

Conceptually speaking, a liquid propellant rocket engine is actually a very simple piece of hardware. All you need to do is spray your fuel and oxidizer into the combustion chamber at the proper ratio, add a spark, and with a carefully designed nozzle you’re off to the races. Or the Moon, as the case may be. It’s just that doing it in the real-world and keeping the whole thing from exploding for long enough to do some useful work is another story entirely.

Taking the process one step at a time, [Luke Walters] has been working on a 3D printed injector that tackles the first half of the problem. After nearly a dozen different prototypes, he’s come up with a printable injector design that atomizes the fuel and combines it with pressurized air at a suitable ratio for combustion. As you can see in the video at the break, it’s certainly capable of generating some impressive fireballs.

A cloud of highly atomized alcohol from the injector.

The internal passages of the injector have been designed in such a way that fuel (91% isopropyl alcohol) and air are spinning in opposite directions when they meet. This promotes more complete mixing, which in turn leads to a more efficient burn. Originally developed in the 1930s, so-called “swirl injectors” of this type were one of the key technological advancements made by Germany’s V-2 rocket program. Some ideas never go out of style.

Since the injector only touches the fuel and air prior to ignition, it doesn’t need to be particularly heat resistant. To be on the safe side [Luke] has printed the part in PETG at 100% infill, but in reality the flame front is far enough away that temperature isn’t much of a concern. That said, he does hope to eventually fit these injectors into some kind of combustion chamber, which is where things will start getting toasty.

To be clear this is not a rocket engine, and it produces no appreciable thrust. Turning a big flame into a useful means of propulsion is where things get tricky, almost as though it’s rocket science or something. But that doesn’t mean it can’t be done by suitably ambitious hackers.

Continue reading “3D Printed Swirl Rocket Injector Turns Up The Heat”

Forming Sheet Metal Parts With 3D Printed Dies

Using 3D printed forms to bend sheet metal isn’t exactly new. We’ve seen several people create custom dies for their brakes, and the results have shown the concept has merit for small-scale production. But that’s usually where the process ends. A bend here or there is one thing, but the ability to form a complex shape with them has always seemed like asking too much. But judging by his recent experiments, [Shane Wighton] is very close to changing that perception.

The process at work here is, relatively speaking, pretty simple. You print out the upper and lower die, put a piece of sheet metal between them, and then smash them together with a hydraulic press. If everything works correctly, and your CAD skills hold true, the metal will take the desired shape.

Of course, that’s vastly oversimplifying things. As [Shane] explains in the video after the break, there are many nuances to forming sheet metal like this that need to be taken into account, and iteration and experimentation are basically unavoidable. So it’s a good thing you can rapidly redesign and reprint the dies.

Which isn’t to say that the dies themselves didn’t come with their own unique set of challenges. The first ones shattered under the pressure, and it took a few design revisions and eventually a switch to a stronger resin before [Shane] got a set of dies that could form the desired piece. Even still, he’s had a lot of trouble getting the printed parts to survive multiple uses. But he’s confident with some more refinements he could get a repeatable process going, and thinks ultimately producing runs of up to 100 parts on a set of printed dies isn’t out of the question.

Logically, it would seem plastic isn’t an ideal choice for punching and shaping metal. Frankly, it’s not. But if you’re doing in-house manufacturing, the ability to produce complex tooling quickly and easily can help make up for any downsides it might have.

Continue reading “Forming Sheet Metal Parts With 3D Printed Dies”

3D Printed Tooling Punches Above Its Weight With Added Hardware

Reddit user [thetelltalehart] has been making brake press tooling with 3D printed PLA, and recently shared an interesting picture of a hybrid brake press punch, shown here on the right, in blue.

Printed in PLA, with 80% infill and 12 walls, the tool (right) failed at 5 tons.

In a press, material such as sheet metal is formed into a shape by forcing the material around the tooling. Some types of tooling can be 3D printed, and it turns out that printed tools are not only fast and economical, but can be surprisingly resilient. You can see such tools in action in our earlier coverage of this approach here and here.

[Thetelltalehart]’s previous work was printed at 80% infill and 12 walls, and failed at 5 tons. The new hybrid tool adds some common hardware that has the effect of reinforcing the tool for very little added expense or complexity. The new tool made it up to 7 tons before failure. It’s a clever idea, and an apparently effective one.

The goal with these 3D printed tools is twofold: doing short-run work, and reducing costly rework when developing “real” tooling. Having to re-cut a tool because it isn’t quite right in some way is expensive and costly, and it’s much easier and cheaper to go through that process with 3D printing instead of metal.

Levitating Starship Model Comes In For A Landing

If everything goes according to plan, Elon Musk says the first generation of SpaceX’s massive Starship will make an orbital flight before the end of 2020. That’s a pretty bold claim, but when you’ve made landing rockets on their tails as in the old science fiction pulp magazines seem routine, we suppose you’ve earned the right to a bit of bravado. We’re excited to see the vehicle evolve over the next several months, but even if the real one stays grounded, we’ll gladly take this “flying” Starship model from [Chris Chimienti] as a consolation prize.

A magnetic levitation module, we’re officially in the future.

Feeling a bit let down by the 3D printable models of the Starship he found online, [Chris] set out to build his own. But it wasn’t enough to just make his bigger, stronger, and more accurate to Starship’s current design; he also wanted to make it a bit more exciting. Some RGB LEDs an Arduino embedded in the “cloud” stand the rocket sits on was a good start, and the landing pad inspired by SpaceX’s real autonomous spaceport drone ship Just Read the Instructions looks great all lit up.

But this is Starship we’re talking about, a vehicle that could literally push humanity towards being a multi-planet species. To do it justice, you’ve really got to knock it out of the park. So [Chris] found a magnetic levitation module online that could support a few hundred grams, and set to work on making his plastic Starship actually hover over the landing pad.

As you might imagine, it was a bit tricky. The first versions of the rocket looked great but came out too heavy, so he switched over to printing the model in so-called “spiral vase mode” which made it entirely hollow. Now far lighter and with a magnetic plate fit into the bottom, it was stable enough to float on its own. For the final touch, [Chris] added some red LEDs and a coin cell battery to the base of the Starship so it looks like the sleek craft is performing a last-second landing burn with its “impossible” full-flow staged combustion engines.

This isn’t the first time we’ve seen a model rocket with an electronic glowing cloud under it, but it’s certainly the first one we’ve seen that could levitate in mid-air. While this little rocket might not make it all the way to Mars, we wouldn’t be surprised to see it touching down on the desks of other hackers and makers in the near future.

Continue reading “Levitating Starship Model Comes In For A Landing”

Cheap Strain Relief By Casting Hot Glue In A 3D Print

[Daniel Roibert] found a way to add cheap strain relief to JST-XH connectors, better known to hobby aircraft folks as the charging and balance connectors on lithium-polymer battery packs. His solution is to cast them in hot glue, with the help of 3D printed molds. His project provides molds fitted for connectors with anywhere from two to eight conductors, so just pick the appropriate one and get printing. [Daniel] says to print the mold pieces in PETG, so that they can hold up to the temperature of melted glue.

The 3D models aren’t particularly intuitive to look at, but an instructional video makes everything clear. First coat the inside surfaces of the mold with a release agent (something like silicone oil should do the trick) and then a small amount of hot glue goes in the bottom. Next the connector is laid down on top of the glue, more glue is applied, and the top of the mold is pressed in. The small hole in the top isn’t for filling with glue, it’s to let excess escape as the mold is closed. After things cool completely, just pop apart the mold (little cutouts for a screwdriver tip make this easy) and trim any excess. That’s all there is to it.

One last thing: among the downloads you may notice one additional model. That one is provided in split parts, so that one can make a mold of an arbitrary width just by stretching the middle parts as needed, then merging them together. After all, sometimes the STL file is just not quite right and if sharing CAD files is not an option for whatever reason, providing STLs that can be more easily tweaked is a welcome courtesy. You can watch a short video showing how the whole thing works, below.

Continue reading “Cheap Strain Relief By Casting Hot Glue In A 3D Print”