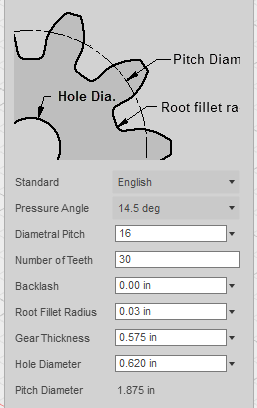
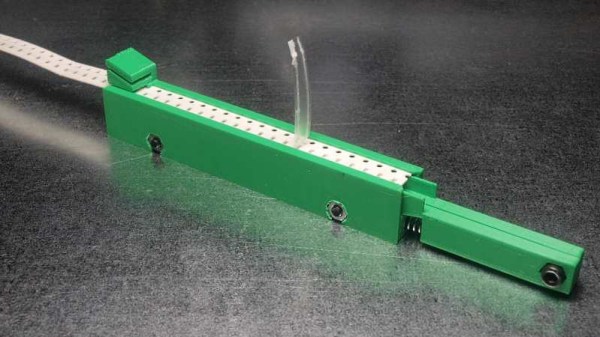
Improving Mister Screamer; An 80 Decibel Filament Alarm

I created a prototype 3D printer filament alarm that worked, but the process also brought some new problems and issues to the surface that I hadn’t foreseen when I first started. Today I’m going to dive further into the prototyping process to gain some insight on designing for a well-specified problem. What I came up with is an easy to build pendant that passively hangs from the filament and alerts you if anything about that changes.

I began with a need to know when my 3D printer was out of filament, so that I could drop whatever I was doing and insert a new spool of filament right up against the end of the previous spool. By doing this within four minutes of the filament running out, printing very large jobs could continue uninterrupted. The device I designed was called Mister Screamer.

Continue reading “Improving Mister Screamer; An 80 Decibel Filament Alarm”

New Useless Machine Does The Twist

Useless machines might not do any work or produce anything of value on their own, but they can be a great learning tool, and are often beautifully crafted as an expression of the builder’s artistic talents. By and large, they consist of a switch to turn the machine on, and an arm that switches the machine back off in response to this. Vladimir had a different take, and built this twisting vase useless machine instead.

The build references the twisting vases we saw recently – [Vladimir] loved the way they so elegantly opened and closed, and decided to base the build around that. The useless part of the machine is the lifting mechanism – a servo turns a pulley, which uses a magnet on a rope to lift the vase. Upon reaching a certain point, the vase drops, and the magnet is once again lowered to lift it back up again.

The first prototype used a simple delay-based timing loop to determine when to drop the magnet again, however over time this would fall out of sync with the vase’s position and the magnet would fail to attach to the vase. For the second version, [Vladimir] improved things by using a limit switch to determine the position of the vase instead of running on timing alone. The machine’s frame was also rebuilt using copper pipe, which allowed the wires and servo to be hidden from sight. The second revision of the project shows the difference polish can make – differences like these make the machine more suitable for display as a curio in a stylish home setting, rather then a messy project that lives on the workbench only.

Be sure to check out the video of the project below the break. For a simpler useless machine, check out this build. 
Continue reading “New Useless Machine Does The Twist”

Hackaday Prize Entry: 3D Printed Mini-Lathe

Lathes can be big, powerful, dangerous machines. But sometimes there’s a call for making very small parts out of soft materials, like plastic and wood. For jobs like this, you could use something like this 3D printed mini-lathe.

The benefits of 3D printing a tool like this are plentiful. The design can be customized and refined by the end user; [castvee8] notes that the machine can be made longer simply by increasing the length of the lead screw and guide rails. The machine does rely on some metal parts and a motor; but the real power here is that if you can’t source the exact components, you can always customize the files to suit what you have on hand.

[castvee8] aimed to make the entire build as easy as possible for the novice – even the motor and speed controller are off-the-shelf modules. It’s a testament to the golden age we live in that an entire lathe can be built out of modules and 3D printed parts. The project makes up another member of the family of 3D printed tools [castvee8] is showing off on Hackaday.io.

Practical Enclosure Design, Optimized For 3D Printing

[3D Hubs] have shared a handy guide on designing practical and 3D printing-friendly enclosures. The guide walks through the design of a two shell, two button remote control enclosure. It allows for a PCB mounted inside, exposes a USB port, and is optimized for 3D printing without painting itself into a corner in the process. [3D Hubs] uses Fusion 360 (free to hobbyists and startups) in their examples, but the design principles are easily implemented with any tool.

One of the tips is to design parts with wall thicknesses that are a multiple of the printer’s nozzle diameter. For example, a 2.4 mm wall thickness may sound a bit arbitrary at first, but it divides easily by the typical FDM nozzle diameter of 0.4 mm which makes slicing results more consistent and reliable. Most of us have at some point encountered a model where the slicer can’t quite decide how to handle a thin feature, delivering either a void between perimeters or an awkward attempt at infill, and this practice helps reduce that. Another tip is to minimize the number of sharp edges in the design, because rounded corners print more efficiently and with smoother motions from the print head.

The road to enclosures has many paths, including enclosures made from FR4 (aka PCB material) all the way down to scrap wood with toner transfer labeling, and certainly desktop 3D printing has been a boon to anyone who’s had to joylessly drill and saw away at a featureless plastic box.

DIY USB Power Bank

USB power banks give your phone some extra juice on the go. You can find them in all shapes and sizes from various retailers, but why not build your own?

[Kim] has a walkthrough on how to do just that. This DIY USB Power Bank packs 18650 battery cells and a power management board into a 3D printed case. The four cells provide 16,000 mAh, which should give you a few charges. The end product looks pretty good, and comes in a bit cheaper than buying a power bank of similar capacity.

The power management hardware being used here appears to be a generic part used in many power bank designs. It performs the necessary voltage conversions and manages charge and discharge to avoid damaging the cells. A small display shows the state of the battery pack.

You might prefer to buy a power bank off the shelf, but this design could be perfect solution for adding batteries to other projects. With a few cells and this management board, you have a stable 5 V output with USB charging. The 2.1 A output should be enough to power most boards, including Raspberry Pis. While we’ve seen other DIY Raspberry Pi power banks in the past, this board gets the job done for $3.


Endstops That Stay Out Of The Way

In the course of building a new delta printer, [thehans] decided he needed his own endstop design that used minimal hardware. Endstops are just switches that get hit when the printer moves at the extreme of an axis, but [thehans] wanted something with a bit of refinement for his BigDelta 3D Printer build.

The result is a small unit that cradles a microswitch and needs only a single zip tie that mounts flush, resulting in a super tidy looking piece. In addition, it mounts on the delta’s v-slot rails such that the mount does not take up any of the machine’s range of motion, because the carriage can travel past it. It is a parametric design made in OpenSCAD, so feel free to modify it to accommodate other types of switches.

Continue reading “Endstops That Stay Out Of The Way”

Walter Is The Slickest Retro-Futuristic Robot Arm

[Jochen Alt] is on a roll. We just covered his ball-balancing robot, Paul, only to find his phenomenal six-DOF robot arm in full retro style. Its name is “Walter” and it’s done up in DDR style (the former East Germany), in painted, 3D-printed plastic. The full design and build documents are an absolutely amazing resource if you’re into robot arm or legs.

In particular, the sections on trajectory planning and kinematics are fantastic. If you’re interested in robot motion planning by Bezier curves, you know where to go. (We’ve always wanted a Bezier-curve 3D printer slicer, but that’s another story.) The construction is also top-notch here, and the attention to detail that went into this arm is phenomenal. It’s all done with stepper motors and geared belts, which allow each of Walter’s joints to be driven by a motor that’s one joint further upstream than would be the case if it were designed with servos. [Jochen] even went so far as to expose the belt in some places to show off the gearing. Walter is worth checking out.

Even if you’ll never build such a fancy robot arm, you should read through the docs just to appreciate all of the thought and work that went into this very refined and simple-from-the-outside design. If you’d like to start out on the simple side of the spectrum, check out these robot arms made of office supplies or a desk lamp. Once you’re ready for your second arm project this short list, some of which [Jochen] mention in his writeup, should get you up and grasping. And do check out his balancing bot, Paul.