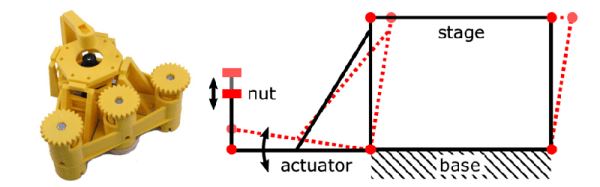
3D Printed Bump Keys

Getting past a locked door is easy if you have the right tools. It’s just a matter of knowing how to adjust the pins inside to an even level while turning the mechanism at the same time when everything is perfectly in place. That’s the beauty of a bump key. You never have to see the actual key or what it looks like. And with a simple hit to the back of the key, and bumping it just enough, the lock can magically be opened.

Lock picking items like this can be ordered online for a couple of dollars, or as [Jos Weyers] and [Christian Holler] showed in a recent Wired article, alternatively you can print your own at home. The video of these 3D printed keys (which can be viewed below) attempts to prove that a person can unlock a door with plastic, which was a little bit surprising to us because it seems like the edges would break off right away. But as it turns out, a thin plastic bump key can be made and does function. Not sure how long these keys can last though, but sometimes all you really need is a one time use when trying to open a specific, tricky lock.

As the article states, “Weyers and Holler aren’t trying to teach thieves and spies a new trick for breaking into high-security facilities; instead, they want to warn lockmakers about the possibility of 3-D printable bump keys so they might defend against it.” Although this information is geared towards lockmakers, we see our Hackaday readers finding this data useful as well. Organizers of hackerspaces who hold regular lock-picking events might want to print their own keys and teach classes centered around security. The uses for this are boundless in regards to educating the public about how locks truly work.

Continue reading “3D Printed Bump Keys”

Teaching The Word Clock Some New Tricks

wordclock2014

[Joakim] has built a clock that spells out the time in words. Wait a second – word clock, what is this, 2009? Word clocks are one of those projects that have become timeless. When we see a build that stands out, we make sure to write it up. [Joakim’s] clock is special for a number of reasons. The time is spelled out in Norwegian, and since the clock is a birthday gift for [Daniel], [Joakim] added the his full name to the clock’s repertoire.

One of the hard parts of word clock design is controlling light spill. [Joakim] used a simple 3D printed frame to box each LED in. This keeps the spill under control and makes everything easier to read. The RGB LED’s [Joakim] used are also a bit different from the norm. Rather than the WS2812 Neopixel, [Joakim] used LPD8806 LED strips. On the controller side [Joakim] may have gone a bit overboard in his choice of an Arduino Yun, but he does put the ATmega328 and Embedded Linux machine to good use.

The real magic happens at boot. [Daniel’s] name lights up in red, with various letters going green as each step completes. A green ‘D’ indicates an IP address was obtained from the router’s DHCP server. ‘N’ switches to green when four NTP servers have been contacted, and the Linux processor is reasonably sure it has the correct time. The last letter to change will be the ‘E’, which reports ambient light.

[Joakim] added a web interface to trigger his new features, such as a rainbow color palette, or the ability to show minutes by changing the color of the letters K,L,O,K. The final result is a slick package, which definitely brings a 2009 era design up to 2014 standards!

Koch Lamp Is 3D Printed With A Twist

Koch Lamp

[repkid] didn’t set out to build a lamp, but that’s what he ended up with, and what a lamp he built. If the above-pictured shapes look familiar, it’s because you can’t visit Thingiverse without tripping over one of several designs, all based on a fractal better known as the Koch snowflake. Typically, however, these models are intended as vases, but [repkid] saw an opportunity to bring a couple of them together as a housing for his lighting fixture.

Tinkering with an old IKEA dioder wasn’t enough of a challenge, so [repkid] fired up his 3D printer and churned out three smaller Koch vases to serve as “bulbs” for the lamp. Inside, he affixed each LED strip to a laser-cut acrylic housing with clear tape. The three bulbs attach around a wooden base, which also holds a larger, central Koch print at its center. The base also contains a PICAXE 14M2 controller to run the dioder while collecting input from an attached wireless receiver. The final component is a custom control box—comprised of both 3D-printed and laser-cut parts—to provide a 3-dial remote. A simple spin communicates the red, green, and blue values through another PICAXE controller to the transmitter. Swing by his site for a detailed build log and an assortment of progress pictures.


Koenigsegg 3D-Printing For Production Vehicles

Koenigsegg with Printed Parts

We’re not surprised to see a car manufacturer using 3D-printing technology, but we think this may be the first time we’ve heard of 3D-prints going into production vehicles. You’ve likely heard of Christian von Koenigsegg’s cars if you’re a fan of BBC’s Top Gear, where the hypercar screams its way into the leading lap times.

Now it seems the Swedish car manufacturer has integrated 3D printing and scanning into the design process. Christian himself explains the benefits of both for iterative design: they roughed out a chair, adjusting it as they went until it was about the right shape and was comfortable. They then used a laser scanner to bring it into a CAD file, which significantly accelerated the production process. He’s also got some examples of brake pedals printed from ABS—they normally machine them out of aluminum—to test the fits and the feeling. They make adjustments as necessary to the prints, sometimes carving them up by hand, then break out the laser scanner again to capture any modifications, bring it back to CAD, and reprint the model.

Interestingly, they’ve been printing some bits and pieces for production cars out of ABS for a few years. Considering the low volume they are working with, it makes sense. Videos and more info after the jump.

Continue reading “Koenigsegg 3D-Printing For Production Vehicles”

A 3D Printed Cryptex

Once you’ve dialed in your 3D printer calibration settings, you enter the phase of printer ownership where you’re eager to show off what you can make, and you’re sure to impress with [pjensen’s] 3d printed cryptex spinning around in your hands.

If you’re a regular reader of our 3D Printering column, then the behind-the-scenes screengrabs should look familiar: [pjensen] used Autodesk Inventor to sculpt the shapes, staring with the cryptex’s individual rings. After embossing the alphabet across each ring, [pjensen] adds slots into the inner loops for pins to slide through. An outer chamber holds the rings in place and prohibits access to the interior chamber, which is held in place on both sides by an end cap.

Lining up the rings to spell the correct word allows the inner chamber to slide free of the whole assembly, revealing whatever goodies may lie inside. You can follow [pjensen’s] step-by-step guide to build your own cryptex, or just download his model and start printing.

Update: Tetris Handheld Get PCB And Case

update-handheld-tetris

Check out this sweet-piece of homemade handheld gaming! [Jianan Li] has been hard at work on the project and published the updates in two parts, one that shows off the PCB he had fabbed for the project, and another which details the 3D printed case. This is, of course, is the culmination of the Tetris project we first saw as an incredbily packed, yet thouroughly tidy breadboarded circuit.

We really enjoy the 8-sided PCB design which hosts all the parts and gives you a place to hold and control the unit, all without seeming to waste much real estate. The case itself is quite impressive. The openings for the square-pixel LED matrices (the original design had round pixels) and the bar graphs all have nice bevel features around them. The control area has a pleasant swooping cutout, with blue buttons which stand out nicely against the red. Check out the slider switch by his left thumb. He printed matching covers for this slider, and the two that stick out the bottom. Also on the bottom are female pin headers so that you don’t need to disassemble the case to interface with the electronics.

All of this and more are shown off in the clip after the break.

Continue reading “Update: Tetris Handheld Get PCB And Case”

3D Printed Netduino Remote Controlled Car

netduinocar

[Matt] lives in South Africa, where homes have smallish crawlspaces (some only 30cm high!) that he can’t quite squeeze himself into. Even if he could, he probably wouldn’t: they’re apparently vacation homes for the local rats. He did, however, want to explore these spaces to get a better idea what’s going on inside, so he built a Windows Phone-controlled car with a Netduino and 3D-printed parts.

Such a specialized application requires unique parts, so [Matt] designed and 3D-printed the wheels and frame from scratch. You’ve probably noticed that the wheels aren’t your typical cylinders. The terrain [Matt] faces is sand, so the spiked shape provides better grip. The body’s design required extra attention because it holds the motors, the Netduino, the motor driver, and the battery.

A Bluetooth module connects to the Netduino and allows [Matt] to drive the car with his Windows Phone, and an inexpensive 5V LED board provides some light for those dark corners. How does it see once inside the crawlspace? It looks like [Matt’s] getting to that part. His plan is to simply mount a second phone running Skype and watch the stream. Stick around after the break to see [Matt] use the car to both confuse and excite his dog.

Continue reading “3D Printed Netduino Remote Controlled Car”