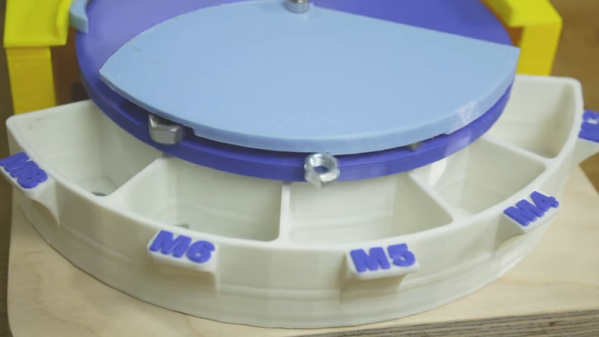
Print Chess Pieces, Then Defeat The Chess-Playing Printer

Chess is undoubtedly a game of the mind. Sadly, some of the nuances are lost when you play on a computer screen. When a game is tactile, it carries a different gravity. Look at a poker player shuffling chips, and you’ll see that when a physical object is on the line, you play for keeps. [Matou], who is no stranger to 3D printing, wanted that tactility, but he didn’t stop at 3D printed pieces. He made parts to transform his Creality Ender 3 Pro into a chess-playing robot.

To convert his printer, [Matou] designed a kit that fits over the print head to turn a hotend into a cool gripper. The extruder motor now pulls a string to close the claw, which is a darn clever way to repurpose the mechanism. A webcam watches the action, while machine vision determines what the player is doing, then queries a chess AI, and sends the next move to OctoPrint on a connected RasPi. If two people had similar setups, it should be no trouble to play tactile chess from opposite ends of the globe.

Physical chess pieces and computers have mixed for a while and probably claimed equal time for design and gameplay. There are a couple of approaches to automating movement from lifting like [Matou], or you can keep them in contact with the board and move them from below.

Continue reading “Print Chess Pieces, Then Defeat The Chess-Playing Printer”

Open Source CAM Software In The Browser

3D printers, desktop CNC mills/routers, and laser cutters have made a massive difference in the level of projects the average hacker can tackle. Of course, these machines would never have seen this level of adoption if you had to manually write G-code, so CAM software had a big part to play. Recently we found out about an open-source browser-based CAM pack created by [Stewert Allen] named Kiri:Moto, which can generate G-code for all your desktop CNC platforms.

To get it out of the way, Kiri:Moto does not run in the cloud. Everything happens client-side, in your browser. There are performance trade-offs with this approach, but it does have the inherent advantages of being cross-platform and not requiring any installation. You can click the link above and start generating tool paths within seconds, which is great for trying it out. In the machine setup section you can choose CNC mill, laser cutter, FDM printer, or SLA printer. The features for CNC should be perfect for 90% of your desktop CNC needs. The interface is intuitive, even if you don’t have any previous CAM experience. See the video after the break for a complete breakdown of the features, complete with timestamp for the different sections.

All the required features for laser cutting are present, and it supports a drag knife. If you want to build an assembly from layers of laser-cut parts, Kiri:Moto can automatically slice the 3D model and nest the 2D parts on the platform. The slicer for 3D printing is functional, but probably won’t be replacing our regular slicer soon. It places heavy emphasis on manually adding supports, and belt printers like the Ender CR30 are already supported.

Kiri:Moto is being actively improved, and it looks as though [Stewart] is very responsive to community inputs. The complete source code is available on GitHub, and you can run an instance on your local machine if you prefer to do so. Continue reading “Open Source CAM Software In The Browser”

Art of 3D printer in the middle of printing a Hackaday Jolly Wrencher logo

3D Printering: To Print Stainless, You Do Half The Work

Everyone wants to print using metal. It is possible, but the machines to do the work are usually quite expensive. So it caught our eye when MakerBot announced a printer — armed with an experimental extruder — that can print stainless steel parts. Then we read a bit more and realized that it can only sort of do the job. It needs a lot of help. And with some reasonable, if not trivial, modifications, your printer can probably print metal as well.

The key part of the system is BASF Ultrafuse 316L Stainless Steel filament, something that’s been around for a few years. This is a polymer with metal incorporated into it. This explains the special extruder, since metal-bearing filament is hell on typical 3D printer nozzles. However, what comes out isn’t really steel — not yet. For that, you have to send the part to a post-processing facility where it is baked at 1380 °C in a pure hydrogen atmosphere using special equipment. This debinding and sintering produces a part that the company claims can be up to 96% pure metal.

Continue reading “3D Printering: To Print Stainless, You Do Half The Work”

Useful Build Tips For Making LED Panel Frames

[NotLikeALeafOnTheWind] has created many LED-based display projects, and shares his method for making attractive LED panel frames and mounts. At first glance it may look as though slapping a rectangle of aluminum extrusion around a display is all it takes, there is also the mounting and management of wiring, power supply, and possibly a Raspberry Pi to deal with. The process of building an attractive frame also has a few hidden gotchas that can be avoided with a bit of careful planning.

Magnetic feet on the LED panels makes mounting much easier and more flexible.

Here is one tip that will resonate with some readers: don’t rely on specified dimensions of parts; measure the actual parts yourself. There can be small differences between what a data sheet says to expect, and the dimensions of the actual part in one’s hands. It may not be much, but it can be the difference between an ideal fit, and something that looks like a bit of a hack job.

[NotLikeALeafOnTheWind] provides some basic frame layouts, and suggests using two- or three-channel extrusions to provide a flat bezel around the display edge if desired. Mounting the LED panel itself is done with magnetic feet and providing a length of steel bar to which the display can attach. This can provide a flush mount while avoiding the whole issue of screw-mounting the display panels themselves, or sliding them into channels. For mounting all the other hardware, a piece of DIN rail and some 3D-printed parts takes care of that.

The result looks slick and sturdy, and some of the tips are sure to be useful even if the whole process isn’t applied. We like the way the basic design scales and is flexible about the thickness and size of the LED panels themselves, making it a promising way to accommodate perfectly functional oddball panels that end up in the trash.

Improving Cheap Ball Screws

Most 3D printers use leadscrews for at least one axis. These are simple devices that are essentially a steel screw thread and a brass nut that travels on it. However, for maximum precision, you’d like to use a ball screw. These are usually very expensive but have many advantages over a leadscrew. [MirageC] found cheaper ball screws but, since they were inexpensive, they had certain limitations. He designed a simple device that improves the performance of these cheap ball screws.

Superficially, a ball screw looks like a leadscrew with an odd-looking thread. However, the nut is very different. Inside the nut are ball bearings that fit in the grooves and allows the nut to spin around with much less friction. A special path collects the ball bearings and recirculates them to the other side of the nut. In general, ball screws are very durable, can handle higher loads and higher speeds, and require less maintenance. Unlike leadscrews, they are more expensive and are usually quite rigid. They are also a bit noisier, though.

Ball screws are rated C0 to C10 precision where C10 is the least accurate and the price goes up — way up — with accuracy. [MirageC] shows how cheaper ball screws can be rolled instead of precision ground. These screws are cheaper and harder, but exhibit more runout than a precision screw.

This runout caused wobble during 3D printing that was immediately obvious on the prints. Using a machinist’s dial gauge, [MirageC] found the screws were not straight at all and that even a relatively poor C7 ball screw would be more precise.

The solution? A clever arrangement of 3D printed parts. ball bearings, and magnets. The device allows the nut to move laterally without transmitting it to the print bed. It is a clever design and seems to work well.

Continue reading “Improving Cheap Ball Screws”

It’s Noodles All The Way Down: Ramen Comes To 3D Printer Support

While ramen support might sound like a help desk for soup, it is actually a technique [GeoDroidJohn] uses to get easy-to-remove support structures on 3D prints. We saw the video below and we have to admit that it did remind us of a brick of uncooked ramen noodles.

We had to dig a little further to find out how he did it. We finally found a Reddit post that gives the recipe for Simplify 3D:

  • Nozzle diameter/2= layer height
  • Support material every other layer, 15% crossing at -45, and 45
  • 5 dense layers at 90% 0 gap layers top or bottom.

We have to admit, we try to avoid support where we can, and where we can’t we just pick one of the stock Cura settings. It wasn’t entirely clear how — or even if — you could replicate this in slicers other than Simplify 3D. The layer height, of course, is a given. We think 15% support density with [-45, 45] in the “line directions” box might get partially there. Maybe someone who is an expert in Simplify and some other slicers can help translate.

In any event, it did make us think about experimenting with different support structures. We’ve played with Cura’s tree supports before this and liked them. So maybe the defaults aren’t always the best.

We’d like to have time to try more of what we read about supports. You can also fit your printer with a marker if you want to try that.

Continue reading “It’s Noodles All The Way Down: Ramen Comes To 3D Printer Support”

3D Print Your Next Antenna

Building antennas is a time-honored ham radio tradition. Shortwave antennas tend to be bulky but at VHF frequencies the antenna sizes are pretty manageable. [Fjkaan’s] 2 meter quadrifilar helicoidal antenna is a good example and the structure for it can be created with 3D printing combined with electrical conduit.

Many people, including [G4ILO] use PVC pipe for the structure, and that design inspired [Fjkaan]. Despite being a bit less substantial, the conduit seems to work well and it is easy to cut. The helical design is common for satellite work owing to its circular polarization and omnidirectional pattern.

Continue reading “3D Print Your Next Antenna”