Dress Up Your 3D Prints With Toner-Transfer Labels

We’ve always found the various methods for adding text and graphics to 3D prints somewhat underwhelming. Embossed or debossed characters are fuzzy, at best, and multi-color printers always seem to bleed one color into the next. Still, the need for labels and logos is common enough that it’s worth exploring other methods, such as this easy toner transfer trick.

Home PCB makers will probably find the method [Squalius] describes in the video below very familiar, and with good reason. We’ve seen toner transfer used to mask PCBs before etching, and the basic process here is very similar. It starts with printing the desired graphics on regular paper using a laser printer; don’t forget to mirror the print. The printed surface is scuffed up a bit, carefully cleaned, and coated with a thick layer of liquid acrylic medium, of the kind used in paint pouring. The mirrored print is carefully laid on the acrylic, toner-side down, and more medium is brushed on the back of the paper. After the print dries, the paper is removed with a little water and some gentle friction, leaving the toner behind. A coat of polyurethane protects the artwork reasonably well.

[Squalius] has tested the method with PLA and PETG and reports good results. The text is clear and sharp, and even fine text and dithered graphics look pretty good. Durability could be better, and [Squalius] is looking for alternative products that might work better for high-wear applications. It looks like it works best on lightly textured surfaces, too, as opposed to surfaces with layer lines. We’d love to see if color laser prints work, too; [Squalius] says that’s in the works, and we’ve seen examples before that are reason for optimism.

Continue reading “Dress Up Your 3D Prints With Toner-Transfer Labels”

FallingWater Clock Puts New Spin On A Common LCD

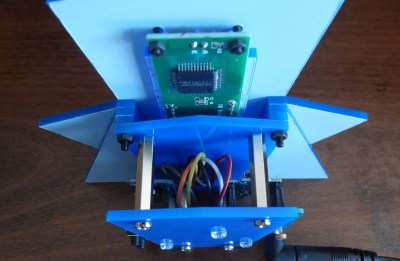
Sometimes, all it takes is looking at an existing piece of tech in a new way to come up with something unique. That’s the whole idea behind FallingWater, a gorgeous Art Deco inspired clock created by [Mark Wilson] — while the vertical LCD might look like some wild custom component, it’s simply a common DM8BA10 display module that’s been rotated 90 degrees.

As demonstrated in the video below, by turning the LCD on its side, [Mark] is able to produce some visually striking animations. At the same time the display is still perfectly capable of showing letters and numbers, albeit in a single column and with noticeably wider characters.

In another application it might look odd, but when combined with the “sunburst” style enclosure, it really comes together. Speaking of the enclosure, [Mark] used OpenSCAD to visualize the five layer stack-up, which was then recreated in Inkscape so it could ultimately be laser-cut from acrylic.

Rounding out the build is a “Leonardo Tiny” ATmega32U4 board, a DS3221 real-time clock (RTC), a couple of pushbuttons, and a light dependent resistor (LDR) used to dim the display when the ambient light level is low. All of the electronics are housed on a small custom PCB, making for a nicely compact package.

This build is as simple as it is stylish, and we wouldn’t be surprised if it inspired more than a few clones. At the time of writing, [Mark] hadn’t published the source code for the ATmega, but he has provided the code to generate the cut files for the enclosure, as well as the Gerber files for the PCB. If you come up with your own version of this retro-futuristic timepiece, let us know.

Continue reading “FallingWater Clock Puts New Spin On A Common LCD”

Laser Painting Explained

If you get an inexpensive diode laser cutter, you might have been disappointed to find it won’t work well with transparent acrylic. The material just passes most of the light at that wavelength, so there’s not much you can do with it. So how did [Rich] make a good-looking sign using a cheap laser? He used a simple paint and mask technique that will work with nearly any clear material, and it produces great-looking results, as you can see in the video below.

[Rich] starts with a piece of Acrylic covered with paper and removes the paper to form a mask. Of course, even a relatively anemic laser can slice through the paper covering with no trouble at all. He also cuts an outline, which requires a laser to cut the acrylic. However, you could easily apply this to a rectangular hand-cut blank. Also, most diode lasers can cut thin acrylic, but it doesn’t always come out as cleanly as you’d like.

Continue reading “Laser Painting Explained”

Hackaday Links Column Banner

Hackaday Links: October 6, 2024

Remember that time a giant cylindrical aquarium in a Berlin hotel bar catastrophically failed and left thousands of fish homeless? We sure do, and further recall that at the time, we were very curious about the engineering details of how this structure failed so spectacularly. At the time, we were sure there’d be plenty of follow-up on that score, but life happened and we forgot all about the story. Luckily, a faithful reader named Craig didn’t, and he helpfully ran down a few follow-up articles that came out last year that are worth looking at.

The first is from prosecutors in Berlin with a report offering three possibilities: that the adhesive holding together the acrylic panels of the aquarium failed; that the base of the tank was dented during recent refurbishment; or that the aquarium was refilled too soon after the repairs, leading to the acrylic panels drying out. We’re a little confused by that last one just from an intuitive standpoint, but each of these possibilities seems hand-wavy enough that the report’s executive summary could have been “Meh, Scheiße happens.”

Continue reading “Hackaday Links: October 6, 2024”

3D Printing On Top Of Laser Cut Acrylic

[Julius Curt] needed to mark acrylic panels with a bit more clarity than the usual way of rastering the surface, so they attempted to 3D print directly to an acrylic sheet, which worked perfectly. The obvious way to do this was to bond the acrylic sheet to the bed with glue temporarily, but another way was tried, and it’s much less messy and precarious.

The bond between a 3D print and acrylic is very strong

The first step was to create a 3D model which combined a constraining ‘fence’ to contain the acrylic panel with the required artwork floating above. It was easy enough to run the print long enough to build the fence, then pause the print mid-way to add the pristine panel and restart after a quick re-prime and wipe.

There were a few simple takeaways from the video below. First, to ensure sufficient tolerance between the fence and the panel, consider the layer width (plus associated tolerance when printed) and the laser kerf of your machines to ensure a not-too-sloppy fit. Secondly, that hot nozzle won’t do the acrylic surface any favours during travel moves, so enabling Z-hopping is essential!

Another use for this simple technique is to fully incorporate an acrylic sheet within a print by pausing at an appropriate height again, dropping the panel in, and continuing the print. A degree of overlap will lock the panel tight, with the plastic bonding very firmly to the acrylic, as [Julius] demonstrates in the video.

It’s always a delight to see how techniques can combine to create the desired effects. Here’s how to use a color laser printer and toner transfer paper to apply designs to a 3D printing front panel. Whilst we’re thinking about the multitude of uses for hacking with acrylic, what about not doing that and using corrugated plastic instead?

Continue reading “3D Printing On Top Of Laser Cut Acrylic”

An adorable mini rack for NUCs, plus a 5-port switch.

A Mini NUC Rack For Your Desktop

We (well, some of us) are complete suckers for things that are both much smaller and much larger than life. And if that thing actually does what its supposed to? Squee! So naturally, we rushed to bring you news of this mini NUC rack designed by [Jeremy Weatherford].

Inspiration comes from a lot of places, often times from stuff that lives on your desk. [Jeremy] had a pile of NUCs and thought they resembled a mini rack already, so why not build them one to live in? It was the perfect excuse to learn CAD, so off [Jeremy] went. Although this is a mini rack, the parts were too big to print. Another opportunity presented itself, and [Jeremy] tried out an online service to get the acrylic cut.

Assembly may have been fiddly with super glue all over the nice black acrylic, but [Jeremy] learned an important tip: excess glue can be removed with vegetable oil. Once it was built, he decided to make it into a control system lab and even found a perfect little five-port switch to top it off. The logo plate, of course, is the icing on this cake.

If you prefer your tower of mini-computers to be extruded, we covered a clever design from [Jay Doscher] back in May.

An Easy Transparent Edge Lit Display

Displays are crucial to modern life; they are literally everywhere. But modern flat-panel LCDs and cheap 7-segment LED displays are, well, a bit boring. When we hackers want to display the progress of time, we want something more interesting, hence the plethora of projects using Nixie tubes and various incantations of edge-lit segmented units. Here is [upir] with their take on the simple edge-lit acrylic 7-segment design, with a great video explanation of all the steps involved.

Engraving the acrylic sheets by hand using 3D printed stencils

The idea behind this concept is not new. Older displays of this type used tiny tungsten filament bulbs and complex light paths to direct light to the front of the display. The modern version, however, uses edge-lit panels with a grid of small LEDs beneath each segment, which are concealed within a casing. This design relies on the principle of total internal reflection, created by the contrast in refractive indices of acrylic and air. Light entering the panel from below at an angle greater than 42 degrees from normal is entirely reflected inside the panel. Fortunately, tiny LEDs have a wide dispersion angle, so if they are positioned close enough to the edge, they can guide sufficient light into the panel. Once this setup is in place, the surface can be etched or engraved using a CNC machine or a laser cutter. A rough surface texture is vital for this process, as it disrupts some of the light paths, scattering and directing some of it sideways to the viewer. Finally, to create your display, design enough parallel-stacked sheets for each segment of the display—seven in this case, but you could add more, such as an eighth for a decimal point.

How you arrange your lighting is up to you, but [upir] uses an off-the-shelf ESP32-S3 addressable LED array. This design has a few shortcomings, but it is a great start—if a little overkill for a single digit! Using some straightforward Arduino code, one display row is set to white to guide light into a single-segment sheet. To form a complete digital, you illuminate the appropriate combination of sheets. To engrave the sheets, [upir] wanted to use a laser cutter but was put off by the cost. A CNC 3018 was considered, but the choice was bewildering, so they just went with a hand-engraving pick, using a couple of 3D printed stencils as a guide. A sheet holder and light masking arrangement were created in Fusion 360, which was extended into a box to enclose the LED array, which could then be 3D printed.

If you fancy an edge-lit clock (you know you do) check out this one. If wearables are more your thing, there’s also this one. Finally, etched acrylic isn’t anywhere near as good as glass, so if you’ve got a vinyl cutter to hand, this simple method is an option.

Continue reading “An Easy Transparent Edge Lit Display”