A Lesson On Zener Regulators

For the longest time, Zener diode regulators have been one of those circuits that have been widely shared and highly misunderstood. First timers have tried to use it to power up their experiments and wondered why things did not go as planned. [James Lewis] has put up a worth tutorial on the subject titled, “Zener Diode makes for a Lousy Regulator”  that clarifies the misconceptions behind using the device.

[James Lewis] does an experiment with a regulator circuit with an ESP8266 after a short introduction to Zener diodes themselves. For the uninitiated, the Zener diode can operate in the reverse bias safely and can do so at a particular voltage. This allows for the voltage across the device to be a fixed value.

This, however, depends on the current flowing through the circuit which in turn relies on the load. The circuit will work as expected for loads the draw a small amount of current. This makes it suitable for generating reference voltages for microcontrollers and such.

To make a Zener into a “proper” voltage regulator, you just need to buffer the output with an amplifier of some kind. A single transistor is the bare minimum, but actually can work pretty well. You might also add a capacitor in parallel with the Zener to smooth out some of its noise.

Zener diodes are wonderful little devices and write-ups like these are indispensable for beginners and should be shared more often like the Zener and Schottky Tutorial and Diodes as a Switch.


ESP To Wireshark

Everyone’s favorite packet sniffing tool, Wireshark, has been around for almost two decades now. It’s one of the most popular network analysis tools available, partially due to it being free and open source. Its popularity guaranteed that it would eventually be paired with the ESP32/8266, the rising star of the wireless hardware world, and [spacehuhn] has finally brought these two tools together to sniff WiFi packets.

The library that [spacehuhn] created uses the ESP chip to save Pcap files (the default Wireshark filetype) onto an SD card or send the data over a serial connection. The program runs once every 30 seconds, creating a new Pcap file each time. There are many example scripts for the various hardware you might be using, and since this is written for the ESP platform it’s also Arduino compatible. [spacehuhn] has written this as a proof-of-concept, so there are some rough edges still, but this looks very promising as a network analysis tool.

[spacehuhn] is no stranger to wireless networks, either. His YouTube channel is full of interesting videos of him exploring various exploits and testing other pieces of hardware. He’s also been featured here before for using an ESP8266 as a WiFi jammer.

Continue reading “ESP To Wireshark”

What Lies Within: SMT Inductor Teardown

Ever wonder what’s inside a surface-mount inductor? Wonder no more as you watch this SMT inductor teardown video.

“Teardown” isn’t really accurate here, at least by the standard of [electronupdate]’s other component teardowns, like his looks inside LED light bulbs and das blinkenlights. “Rubdown” is more like it here, because what starts out as a rather solid looking SMT component needs to be ground down bit by bit to reveal the inner ferrite and copper goodness. [electronupdate] embedded the R30 SMT inductor in epoxy and hand lapped the whole thing until the windings were visible. Of course, just peeking inside is never enough, so he set upon an analysis of the inductor’s innards. Using a little careful macro photography and some simple image analysis, he verified the component’s data sheet claims; as an aside, is anyone else surprised that a tiny SMT component can handle 30 amps?

Looking for more practical applications for decapping components? How about iPhone brain surgery?

Continue reading “What Lies Within: SMT Inductor Teardown”

Show Me The Data: Hackaday.io Year #02

Hackaday.io has just turned two today and we couldn’t be more excited about how far we’ve come. What started out as a simple proof-of-concept, inspired by ye-olde idea of a “virtual hackerspace,” has truly evolved into a global playground for some of the best, brightest, and most creative minds you have ever met. It also became a home and the place to spend sleepless nights for many of us on the team, and we’re excited to share a few ideas on where we are headed going forward.

But before we do that, let’s look at some data.

The Data

We’re thrilled to report that over the last two years, Hackaday.io has grown from zero to a 121,158-member strong community, who have together created a total of 9,736 projects. To put this in context, it is more than a two-fold growth from last year’s milestone of 51,838 users / 4,365 projects. And it doesn’t seem to be showing any signs of slowing down.

regusers_projects5

Projects

Though these “vanity” metrics sure are a nice validation, the number that gets us the most excited is the fact that the 9,731 projects currently on the site have been created by a total 4,966 different users. What’s even better is the fact that 949 projects are a result of collaboration between two or more people. Altogether, a total of 7,170 different users have participated in the creation of the vast body of engineering knowledge currently residing on Hackaday.io.

Continue reading “Show Me The Data: Hackaday.io Year #02”

Excel Password

Breaking Dridex Malware With Excel Macro Password Exploit

[Ronnie] recently posted a new chapter in his adventures in malware deconstruction. This time the culprit was an infected Excel spreadsheet file. The .xls file was attached to a phishing email claiming to be related to a tax rebate. With tax season in full swing, this type of phishing message would be likely to be opened by an inexperienced user.

[Ronnie] saved the file to a virtual machine to prevent his real workstation from getting infected. He then opened it up in Excel and noticed that it immediately attempted to run macros. A macro is essentially visual basic scripting that runs inside of the spreadsheet file. You can use it for simple automation, cell formatting, or do even more complicated tasks like reach out to external websites and pull information. This malware focused on the latter.

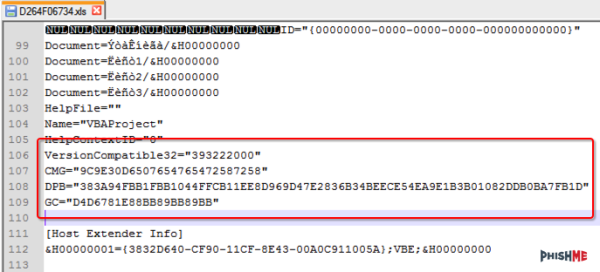
[Ronnie] used the alt + F11 shortcut to view the macros. Unfortunately the attackers had password protected them. [Ronnie] wouldn’t be able to view the macro code without knowing the password. Luckily, he learned of a surprisingly simple trick to completely bypass the macro password. He opened up the .xls file in Notepad++ and located three keys; CMG, DPB, and G. [Ronnie] then created and saved a new blank .xls document and password protected the macros with his own password. He opened up this new file in Notepad++ as well, and located those same three keys. He copied the keys from the new file into the old one, and saved the old file. This effectively changed the password of the malware file to the new one he had set for his new file. This is a nifty trick that apparently only works on the older .xls formats, not the newer .xlsx format.

After loading the macros, [Ronnie] quickly noticed that most of the code was obfuscated to make it difficult to analyze. There were, however, three named modules that reference possible sandbox evasion techniques. The malware first invokes these functions to detect the presence of a virtual machine or other type of sandbox. If it detects nothing, then the rest of the malware program is decoded and executed. [Ronnie] removed these checks and then executed the macro to verify that his change had worked.

The next step was to try to view the decoded instructions. The decoded gibberish was saved to a variable. The simplest way for [Ronnie] to view the contents of the variable was to have the program create a pop-up box that displayed the contents of that variable. After making this change and running the program again, he was able to see exactly what the malware was doing. The code actually invoked Powershell, downloaded a file from the Internet, and then extracted and executed that file. In the full write-up, [Ronnie] goes even further by downloading and analyzing the executable.

Decoding ZeuS Malware Disguised As A .DOC

[Ronnie] recently posted about his adventures in decoding malware. One of his users reported a phishy email, which did indeed turn out to contain a nasty attachment. The process that [Ronnie] followed in order to figure out what this malware was trying to do is quite fascinating and worth the full read.

[Ronnie] started out by downloading the .doc attachment in a virtual machine. This would isolate any potential damage to a junk system that could be restored easily. When he tried to open the .doc file, he was presented with an error stating that he did not have either enough memory or disk space to proceed. With 45GB of free space and 2GB of RAM, this should not have been an issue. Something was definitely wrong.

The next step was to open the .doc file in Notepad++ for analysis. [Ronnie] quickly noticed that the file was actually a .rtf disguised as a .doc. [Ronnie] scanned through large chunks of data in an attempt to guess what the malware was trying to do. He noticed that one data chunk ended with the bytes “FF” and D9″, which are also found as the ending two bytes of .gif files.

[Ronnie] copied this data into a new document and removed all new line and return characters. He then converted the hex to ASCII, revealing some more signs that this was actually image data. He saved this file as a .gif and opened it up for viewing. It was a 79KB image of a 3D rendered house. He also found another chunk of data that was the same picture, but 3MB in size. Strange to say the least.

After finding a few other weird bits of data, [Ronnie] finally started to see more interesting sections. First he noticed some strings with mixed up capital and lowercase letters, a tactic sometimes used to avoid antivirus signatures. A bit lower he found a section of data that was about the size of typical shellcode. He decoded this data and found what he was looking for. The shellcode contained a readable URL. The URL pointed to a malicious .exe file that happened to still be available online.

Of course [Ronnie] downloaded the .exe and monitored it to see how it acted. He found that it set a run key in the registry to ensure that it would persist later on. The malware installed itself to the user’s appdata folder and also reached out repeatedly to an IP address known to be affiliated with ZeuS malware. It was a lot of obfuscation, but it was still no match for an experienced malware detective.

Show Me The Data: Hackaday.io Year #01

Today marks exactly one year since we announced to the world the first product from our software lab – Hackaday.io. In what has been an incredibly exciting year for all of us, we evolved from a simple idea and a prototype to a truly massive community that’s making its mark on the world. Day after day, carefully listening to the invaluable feedback from our users, we have improved and moved forward, one line of code at the time.

We still have a long way to go, but we’ll pause for a second now and reflect on how far we’ve come. Then get right back to fixing bugs and developing new features.

It all started with a simple idea – building a better project hosting website. Though there are project and content websites galore out there, with new ones popping up every day, it all still felt too bland. We thought we could do better. After all, the medium is the message. The place where something lives sooner or later becomes a key part of its identity. So in order to prevent a dystopian future in which we’re all hosting our projects using the (fictional) Microsoft Maker Suite 2020 and simply don’t care, we started to work on providing an alternative.

We quickly realized that we had a much bigger mission on our hands. Sure, a better project hosting website would be nice, but what we felt we really needed was something [Brian Benchoff] has been talking about for quite some time – a “virtual hackerspace.” Not just a place where you can post your builds once you’re done (and hope someone sees it), but a living, breathing community: a place where you can start with an idea and get feedback as it develops, find collaborators, iterate, and ultimately end up building something way more amazing than you would have accomplished on your own.

This has been the aim of Hackaday for many years, but most of the collaboration was constrained to the limited space of post comment threads and biased by the editorial choice of articles and topics. With the introduction of Hackaday.io, we open up a space for anyone to unleash their creativity and expertise, and together, change the way people build things.

The Data

Unfortunately, making bold claims about how we’re out there changing the world is pretty much a commodity these days. As most Web startups can testify, it doesn’t take more than a simple landing page with nice photography and some uplifting message for any arbitrary claims to appear credible.

So instead of trying to convince you with words about how awesome the last year had been, we’ll just stick with the data.

Continue reading “Show Me The Data: Hackaday.io Year #01”