DIY I2C Devices With ATtiny85

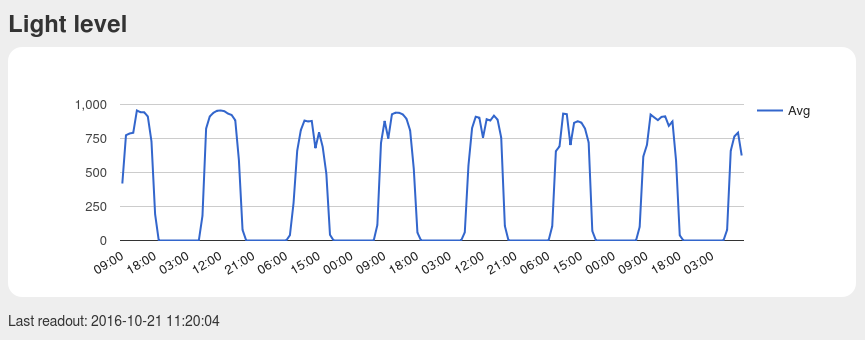
[Pawel] has a weather station, and its nerve-center is a Raspberry Pi. He wanted to include a light sensor but the problem is, the Pi doesn’t have a built-in ADC to read the voltage off the light-dependent resistor that he (presumably) had in his junk box. You can, of course, buy I2C ADC chips and modules, but when you’ve already got a microcontroller that has ADC peripherals on board, why bother?

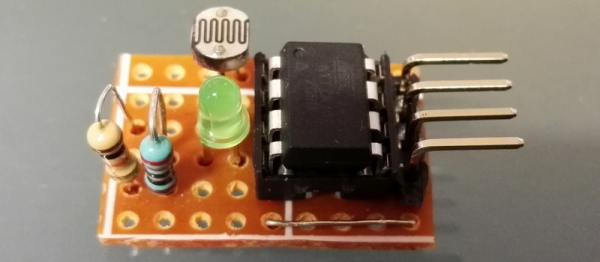
[Pawel] wired up a tremendously simple circuit, downloaded some I2C slave-mode code, and added an LED for good measure. It’s all up on GitHub if you’re interested.

cropped_shot_2016-10-21-112958
Bright by Day, Dark by Night!

We’re covering this because we rarely see people coding for I2C slave devices. Everyone and their mom uses I2C to connect to sensors, for which the Arduino “Wire” library or “i2c-tools” on the Pi do just fine. But what do you do when you want to make the I2C device? [Pawel]’s project makes use of TinyWireS, a slave-mode SPI and I2C library for AVR ATtiny Arduino projects.

Here, [Pawel] just wanted a light sensor. But if you’re building your own devices, the sky is the limit. What’s the most esoteric I2C sensor that you can imagine? (And is it really the case that we haven’t seen an I2C slave device hack since 2010?)

Touchless MIDI: The Secret’s In The Mitten

MIDI is a great tool for virtually any musician. Unless you’re a keyboard player, though, it might be hard to use it live. [Evan] recently came up with a great solution for all of the wistful guitar players out there who have been dreaming of having a MIDI interface as useful as their pianist brethren, though. He created a touchless MIDI controller that interfaces directly with a guitar.

Continue reading “Touchless MIDI: The Secret’s In The Mitten”

Harpsi-Gourd Gets You Into Thanksgiving Spirit

Halloween might be over, but for some of us there’s still another pumpkin-centric holiday right around the corner to give us an excuse to build projects out of various gourds. During a challenge at a local event, [Michael] came up with a virtual cornucopia of uses for all of the squashes he had on hand and built a touch-sensitive piano with all of them.

The musical instrument was dubbed the Harpsi-Gourd and makes extensive use of the Arduino touch-sensitive libraries. Beyond that, the project was constructed to be able to fit into a standard sized upright piano. While only 15 pumpkins are currently employed, the instrument can be scaled up to 48 pumpkins. Presumably they would need to be very small for the lid of the piano to still close.

The Harpsi-Gourd is a whimsical re-imagining of the original Makey Makey which can be used to do all kinds of things, including play Mario Bros. There are all kinds of other food-based musical instruments at your disposal as well, though.

Personal Compass Points To Your Spawn Point

A conventional compass points north (well, to magnetic north, anyway). [Videoschmideo]  wanted to make a compass that pointed somewhere specific. In particular, the compass — a wedding gift — was to point to a park where the newlywed couple got engaged. Like waking up in a fresh new Minecraft world, this is their spawn point and now they can always find their way back from the wilderness.

The device uses an Arduino, a GPS module, a compass, and a servo motor. Being a wedding gift, it also needs to meet certain aesthetic sensibilities. The device is in an attractive wooden box and uses stylish brass gears. The gears allow the servo motor to turn more than 360 degrees (and the software limits the rotation to 360 degrees). You can see a video of the device in operation, below.

Continue reading “Personal Compass Points To Your Spawn Point”

Minimal Arduino Clock

Making a clock with a common microcontroller like an Arduino isn’t very difficult. However, if you’ve tried it, you probably discovered that keeping track of wall time is difficult without some external hardware. [Barzok] has a very minimal clock build. It takes a handful of LED arrays with an integrated driver, an Arduino Nano, a real-time clock module, and a voltage regulator.

Continue reading “Minimal Arduino Clock”

Rotary Cell Phone: Blast From A Past That Never Was

The 1970s called and they want their rotary dial cell phone back.

Looking for all the world like something assembled from the Radio Shack parts department – remember when Radio Shack sold parts? – [Mr_Volt]’s build is a celebration of the look and feel of a hobbyist build from way back when. Looking a little like a homebrew DynaTAC 8000X, the brushed aluminum and 3D-printed ABS case sports an unusual front panel feature – a working rotary dial. Smaller than even the Trimline phone’s rotating finger stop dial and best operated with a stylus, the dial translates rotary action to DTMF tones for the Feather FONA board inside. Far from a one-trick pony, the phone sports memory dialing, SMS messaging, and even an FM receiver. But most impressive and mysterious is the dial mechanism, visible through a window in the wood-grain back. Did [Mr_Volt] fabricate those gears and the governor? We’d love to hear the backstory on that.

This isn’t the first rotary cell phone hybrid we’ve featured, of course. There was this GSM addition to an old rotary phone and this cell phone that lets you slam the receiver down. But for our money a rotary dial cell phone built from the ground up wins the retro cool prize of the bunch.

Continue reading “Rotary Cell Phone: Blast From A Past That Never Was”

What’s New, ESP-32? Testing The Arduino Library

In case you missed it, the big news is that a minimal Arduino core is up and working on the ESP32. There’s still lots left to do, but the core functionality — GPIO, UART, SPI, I2C, and WiFi — are all up and ready to be tested out. Installing the library is as easy as checking out the code from GitHub into your Arduino install, so that’s exactly what I did.

I then spent a couple days playing around with it. It’s a work in progress, but it’s getting to the point of being useful, and the codebase itself contains some hidden gems. Come on along and take a sneak peek.

Continue reading “What’s New, ESP-32? Testing The Arduino Library”