Electronic Bracer Wraps A Lot Of Features Around Your Arm

[Stephanie] just finished up her wearable project which puts a lot of information where a wristwatch would normally be found. She calls it the Integrated Sensors Electronic Bracer. We had to look up what a bracer is; the name originates with archers and it was a leather wrap used to protect the wrist. This does that, but we don’t think you’ll want the bowstring frequently hitting the electronic components hidden within.

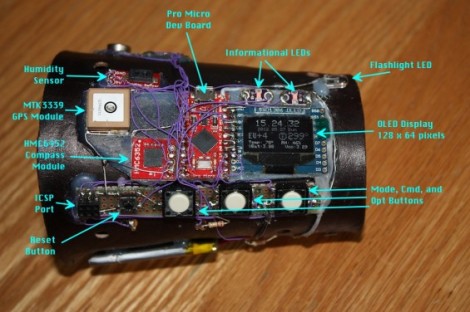
There is a nice finished leather cover which wraps around the unit, leaving just a few holes for key components. Above you can see the parts undressed, with an Arduino compatible board in the middle. It provides a user interface with the OLED display and three input buttons. The array of sensors found on the device include a GPS module to display position data, humidity sensor, magnetometer, luminance sensor, and galvanic skin response.

The opposite side of the bracer has an opening secured by a couple of elastic cords. [Stephanie] mentions that this works, but she’s not happy with the look of it and hopes to make some leather-based improvements.

[via Adafruit]

Triangle-grid LED Display

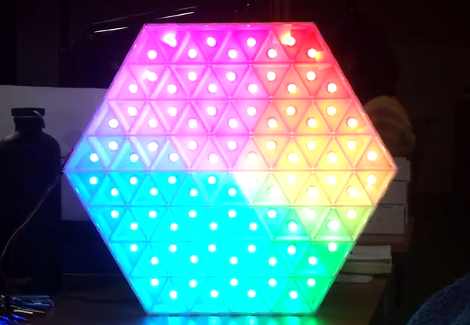
[Dearmash] put together this RGB LED display using triangles for each pixel. It’s an interesting deviation from the traditional grid layout. There are two video demos after the break. The first is a plasma-style pattern generated in Processing. The second is a spinning color wheel which would be perfect if synchronized with your Photoshop color spinner.

So the physical build is done, and now [Dearmash] is looking for a purpose for the device (isn’t that always the way it happens?). He mentions that the triangular layout looks cool, but makes text display almost impossible. Does anyone have any ideas on how to make this work? Right off the bat we could see side-scrolling a font similar to the Metallica logo’s M and A. Bu there must be some way to group these pixels together into readable characters. If you always use an upward and downward pointed triangle on the same row as a pixel it makes a parallelogram which would be used to display italicization characters.

Continue reading “Triangle-grid LED Display”

Remote Shutter Module Uses LCD Screen For Setup

Here’s a full-featured remote shutter project which [Pixel-K] just finished. It seems that he’s interested in taking time-lapse images of the cosmos. Since astrophotography happens outside at night, this presented some special design considerations. He wanted something that he could configure in the dark without zapping his night-vision too much. He also wanted it to be easily configured with a pair of gloves on.

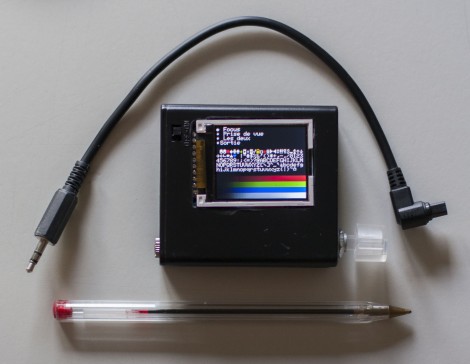
The project enclosure is a 4x AA battery box. He removed the partitions between each cell, leaving plenty of room for the guts. Inside you’ll find a lithium battery and a micro-USB recharger board. It powers the Arduino mini pro which drives the 1.8″ LCD screen and actuates the optoisolator which is responsible for triggering the camera. On the right you can see the clear knob of the clickable rotary encoder. All of the user settings are chosen and selected using just this one knob.

He’s already tried it out on a 6-hour shoot and had no battery life problems or other issues.

Morse Code Beacon Wins The LayerOne Badge Hacking Contest

Ham skills prevail in this year’s LayerOne badge hacking contest. [Jason] was the winner with this Morse Code beacon hack.He got a head start on the competition after seeing our preview feature on the badge hardware development. It got him thinking and let him gather his tools ahead of arrival.

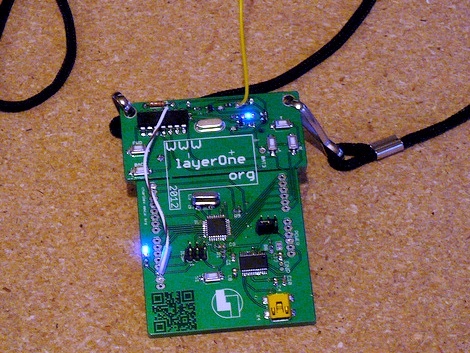
The hardware is segregated into two parts of the board. The lower portion is a take on the Arduino, and the upper portion is a wireless transmitter meant to control some cheap RC cars. [Jason] figured this was perfect for conversion as a CW beacon (continuous wave is what Morse Code is called if you’re a ham). The first issue he encountered was getting the badge to play nicely with the Arduino IDE. It was setup to run Slowduino firmware which uses the internal oscillator. [Jason] soldered on his own crystal and reflashed the firmware. He found that the transmitter couldn’t be directly keyed because of the shifting used in the RC car protocol. He cut the power to the transmitter, and found that it could be more accurately keyed by injecting power to one of the other pins. Check out the video after the break for a better explanation of his technique.

Continue reading “Morse Code Beacon Wins The LayerOne Badge Hacking Contest”

Hipster Chandelier

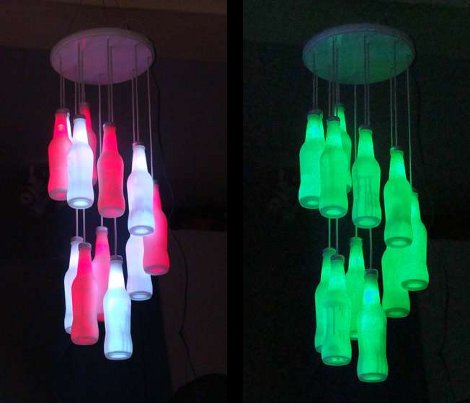
This chandelier is something we’d expect to see on sale in the local gallery store. [Starkec] made it a couple of years back and we just love the look. The materials are pretty common, and you can throw it together in an afternoon.

The diffuser are made from clear glass soda bottles. After removing the labels and giving them a good cleaning, they were each set upside down and sprayed with some glass frosting spray. A four-conductor telephone wire serves both as the support for the bottle and electrical path for the RGB LED inside of each. The original screw cap for the bottles makes it a twist to install them after the soldering is done. There are two common color buses so that alternating colors can be shown at the same time. After seeing the video we think you’ll agree that the wiring scheme makes for some great animated effects.

Continue reading “Hipster Chandelier”

An Arduino Based Quadruped Robot

Arduino-Based-Four-Legged-Robot

Sure, we see hexapods all the time at [HAD], but moving around with four legs can be more tricky kinematics-wise. This Instructable shows you how to make one out of balsa wood.

Although one might not think of balsa to make their robot out of [vexedpheonix] explains that this was chosen because it’s extremely light and easy to work with. Since he was trying to keep costs down, the cheapest servos available were used. These weren’t all that powerful, so the lighter the body the better! According to the included bill of materials, he was able to keep the entire robot build under $100.

According to the article, the hardest part was making four copies of the same leg. We might suggest using a CNC router, but building one would obviously add a huge layer of complication to the project!

Thanks for the tip on this one [SteveT]! Be sure to check out the video of this little robot waving one of it’s legs or trying to walk after the break! Continue reading “An Arduino Based Quadruped Robot”

Moppy Lets You Play Your Floppy Drives

Get ready to join a band. Just follow the guide over at the Moppy project page and you’ll have your very own floppy drive instrument.

The name is a mashup between Musical and Floppy. By using an Arduino UNO as a translator, you can command an array of floppy drives with a musical keyboard (think piano). The head on each floppy drive is controlled by a stepper motor which will put out some sweet sounds if driven at just the right frequency. The lower notes tend to fair a bit better than the high range. One great example of this is the Imperial March theme as heard after the break.

Once you get the base system up and running, it’s time to think of some alternate interfaces. Sure, you can obvious things like toy keyboards. But wouldn’t it be more fun to make it fruit controlled?

Continue reading “Moppy Lets You Play Your Floppy Drives”