Heat pump heating technology is starting to pop up more and more lately, as the technology becomes cheaper and public awareness and acceptance improves. Touted as a greener residential heating system, they are rapidly gaining popularity, at least in part due to various government green policies and tax breaks.
[Gonzho] has been busy the last few years working on his own Arduino Powered Open Source heat pump controller, and the project logs show some nice details of what it takes to start experimenting with heat pumps in general, if that’s your game. Or you could use this to give an old system a new lease of life with an Arduino brain transplant.
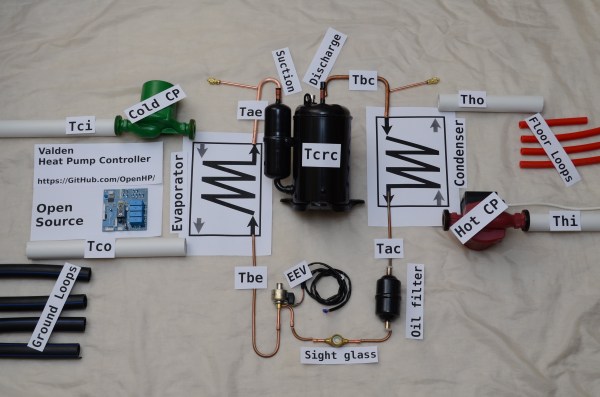
In essence they are very simple devices; some kind of refrigerant is passed through a source of heat, absorbing some of it, it then flows elsewhere, and is compressed, which increases its temperature, before that increased heat is lost where the increase in temperature is desired.
This heat source could be a river, a mass of pipes buried in the ground, or simply the air around you. The source and quality of the heat source as well as the desired system operating temperature dictate the overall efficiency, and with ground-source systems it’s even possible to dump excess heat directly into the ground and store it for when required later. This could be the result of a residential cooling system, or even directly sourced from a solar heated setup.
This heat pumping process is reversible, so it is possible to swap the hot and cold ends, just by flipping some valves, and turn your space heater into a space cooler. This whole process can trace its roots back to the super talented Scottish professor, William Cullen who in 1748 was the first person on record to demonstrate artificial refrigeration.
The power needed to run the compressor pump and control gear is usually electrically derived, at least in non-vehicular applications, but the total power required is significantly less than the effective heating (or cooling) power that results.
We’ve covered a few heat pump hacks before, like this guy who’s been heating his house geothermally for years, but not so many platforms designed for experimentation from the ground up.
The associated GitHub project provides the gerber files as well as the Arduino code, so you’ve got a great starting point for your own heat pumping builds.