3-Phase BLDC Motor Controller Will Run You $20 In Parts

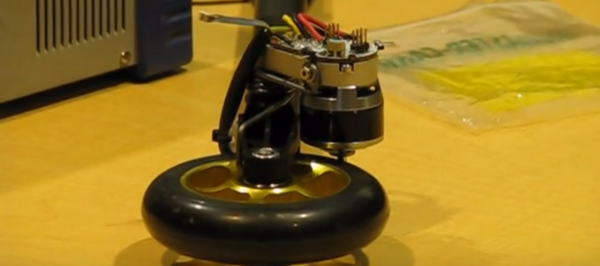
If you’re an active shopper on RC websites, you’ll find tiny motors spec’ed at hundreds of watts while weighing just a few grams, like this one. Sadly, their complementary motor controllers are designed to drive them at a high speed, which means we can only hit that “520-watt” power spec by operating in a max-speed-minimum-torque configuration. Sure, that configuration is just fine for rc plane and multicopter enthusiasts, but for roboticists looking to drive these bldc motors in a low-speed-high-torque configuration, the searches come up blank.

The days in the dust are coming to an end though! [Cameron] has been hard at work at a low cost, closed-loop controller for the robotics community that will take a conventional BLDC airplane motor and transform it into a high end servo motor. Best of all, the entire package will only run you about $20 in parts–including the position sensor!

“Another BLDC motor controller?” you might think. “Surely, I’ve seen this before“. Fear not, faithful readers; [Cameron’s] solution will get even the grumpiest of engineers to crack a smile. For starters, he’s closing the loop with a Melexis MLX90363 hall effect sensor to locate the rotor position. Simply glue a small magnet to the shaft, calibrate the magnetic field with one revolution, and–poof–a wild 14-bit encoder has appeared! Best of all, this solution costs a mere $5 to $10 in parts.

Next off, [Cameron] uncovered a little-known secret of the ATMEGA32u4, better known as the chip inside the Arduino Leonardo. It turns out that this chip’s TIMER4 peripheral contains a feature designed exclusively for 3-phase brushless motor control. Complementary PWM outputs are built into 3 pairs of pins with configurable dead time built into the chip hardware. Finally, [Cameron] is pulsing the FETs at a clean 32-Khz — well beyond the audible range, which means we won’t hear that piercing 8-Khz whine that’s so characteristic of cheap BLDC motor controllers.

Curious? Check out [Cameron’s] firmware and driver design on the Githubs.

Of course, there are caveats. [Cameron’s] magnetic encoder solution has a few milliseconds of lag that needs to be characterized. We also need to glue a magnet to the shaft of our motor, which won’t fly in all of our projects that have major space constraints. Finally, there’s just plain old physics. In the real world, motor torque is directly proportional to current, so stalling an off-the-shelf bldc motor at max torque will burn them out since no propeller is pushing air through them to cool them off. Nevertheless, [Cameron’s] closed loop controller, at long last, can give the homebrew robotics community the chance to explore these limits.

Vintage Apple Keyboard Revived As Standalone Computer

Many of our readers are familiar with the gold standard of classic PC keyboards – the bunker with switches known as the IBM Model M. The Model M’s Apple contemporary is the Apple Extended Keyboard and they are just as highly sought-after by their respective enthusiasts. Though discontinued almost 25 years ago and incompatible with anything made in the last 15, the codenamed “Saratoga” is widely considered the best keyboard Apple ever made.

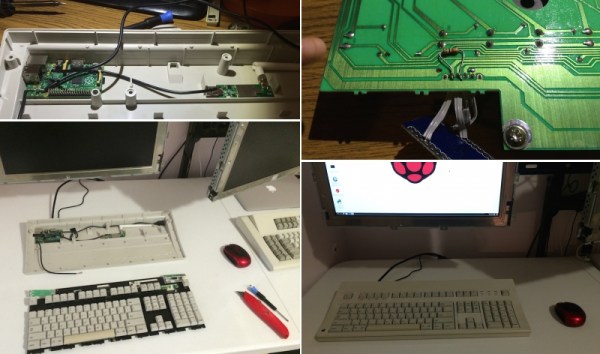
[Ezra] has made a hobby of modernizing these vintage heartthrobs and rescuing them from their premature obsolescence. In a superbly documented tutorial he not only shows how to convert them to USB (a popular and trivial hack), but teaches you how and where to smuggle a Raspberry Pi in as well.

After disassembly, the project requires only a little bit of chisel and Dremel work before the soldering iron comes out. [Ezra] was fairly meticulous in removing or redirecting the Pi’s connectors and hardwiring the internals. Only 3 pins need to be traced from the original keyboard and [Ezra]’s ADB–>USB Rosetta Stone of choice is the Hasu Converter running on a Atmega 32u4 clone. Balancing cost, range, and power draw from the Pi, he settled on the TP-LINK WN722N for his WiFi solution which is also tucked away inside the case. A single pullup resistor to finish it off and [Ezra] was delighted to discover it worked the first time he plugged it in.

Keyboards from this era use actual momentary switches that audibly click twice per keypress. In our world of screens-as-keys celebrating the lack of tactile constraints, using beasts like the Model M or the AEK to force transistors to do your bidding is like racking a shotgun during a game of lasertag – comically obtuse but delightfully mechanical.

If you are looking to expand on [Ezra]’s tinkering, he has already made a wishlist of additions: a toggle switch to lobotomize the Pi back into a plain USB keyboard, an internal USB hub, and a power switch.

Hear the video of an AEK in action after the break (or loop it to sound productive while you nap).

Continue reading “Vintage Apple Keyboard Revived As Standalone Computer”

The Walltech Smartwatch

THP Quarterfinalist: WALLTECH Smartwatch

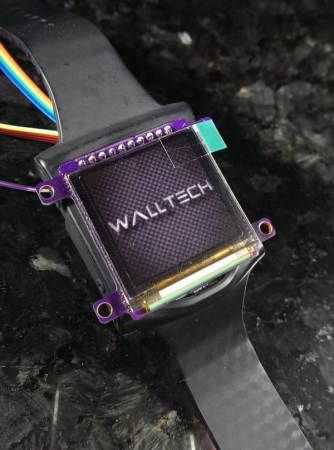
While there is lots of hype about a big company launching a new wearable product, we’re more interested in [Walltech]’s open source OLED Smartwatch. This entry into The Hackaday Prize merges a collection of sensors and an OLED screen into a wearable device that talks to your smartphone over Bluetooth Low Energy.

The device is based on the IMUduino BTLE development board. This tiny Arduino clone packs an inertial measurement unit (IMU), a Nordic nRF8001 Bluetooth radio, and an ATMEGA32u4 microcontroller.

The 1.5″ OLED display comes from [miker] who makes an OLED module based on the SSD1351. A STP200M 3D pedometer provides activity monitoring in a tiny package.

On the hardware side, packaging all these components into something that will fit on your wrist is quite difficult. The prototype hardware is built from mostly off the shelf components, but still manages to be watch sized.

At this point, it looks like the code is the main challenge remaining. There’s a lot of functionality that could be implemented, and [Walltech] even mentions that it’s designed to be very customizable. It even supports Android; the Apple Watch can’t do that.


SpaceWrencherThe project featured in this post is a quarterfinalist in The Hackaday Prize.

Make That C64 Keyboard Work As A USB Keyboard

keyboard-to-usb-mapping

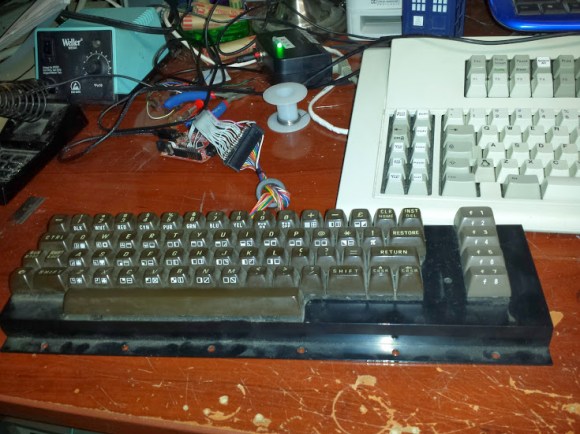
Let’s face it, we all have keyboard peculiarities. Don’t try to deny it, everyone who types a lot has an opinion of the keyboard they stroke so frequently. We know [Brian Benchoff] swears by his model M, and we’re guessing he was the one that bumped into [Evan] and convinced him to write about his conversion of a Commodore 64 keyboard for use as a USB device.

This is not [Evan’s] first rodeo. We recently saw him fixing up the worn off letters of his own model M. But this time around there’s some clever microcontroller work at play. Apparently mapping 122 keys using an Atmel AVR 32u4 chip (built in USB connectivity) is quite a task. Luckily someone’s already worked out all kinds of good things and is sharing the love with the Soarer’s Keyboard Controller Firmware. Of course it handles scanning, but also includes debounce, muxing, and the trick to scan more keys than the uC has pins for. We still don’t fully understand that bit of it. But [Evan] did post the config file he’s using so perhaps after we get elbow-deep in the code we’ll have a better understanding.

If you give this a try, we want to hear about it. Anyone have any modern keyboards they’re in love with? Leave a comment below.

Measuring Magnetic Fields With A Robotic Arm

MagneticArm

Learning how magnets and magnetic fields work is one thing, but actually being able to measure and see a magnetic field is another thing entirely! [Stanley’s] latest project uses a magnetometer attached to a robotic arm with 3 degrees of freedom to measure magnetic fields.

Using servos and aluminium mounting hardware purchased from eBay, [Stanley] build a simple robot arm. He then hooked an HMC5883L magnetometer to the robotic arm. [Stanley] used an Atmega32u4 and the LUFA USB library to interface with this sensor since it has a high data rate. For those of you unfamiliar with LUFA, it is a Lightweight USB Framework for AVRs (formerly known as MyUSB). The results were plotted in MATLAB (Octave is free MATLAB alternative), a very powerful mathematical based scripting language. The plots almost perfectly match the field patterns learned in introductory classes on magnetism. Be sure to watching the robot arm take the measurements in the video after the break, it is very cool!

[Stanley] has graciously provided both the AVR code and the MATLAB script for his project at the end of his write-up. It would be very cool to see what other sensors could be used in this fashion! What other natural phenomena would be interesting to map in three dimensions?

Continue reading “Measuring Magnetic Fields With A Robotic Arm”

Pimp My Keyboard: Automatic Lift Kit And More

Cherry-keyboard-with-lifts

Wondering what the heck a lift kit is? You know those low-riding cars that bounce? That’s the idea with this hack. [Justblair] added automatic height adjustment to his Cherry G80, and hid a few other extras while he was at it. Since there’s a fair amount of room inside the case of this model he was able to hide everything and keep just a single cord to run it all.

Certainly what catches your eye is the keyboard’s ability to rise to a typing height automatically. This is accomplished with a few servo motors and some 3D printed replacement feet. There were some hiccups along the way with under-powered servos, but bulking up to some HXT 900 9G models provide more power than is currently necessary. The automatic feature is thanks to a capacitive sensor built with a wire that loops the perimeter of the keyboard.

Of course to monitor the sensor and drive the servos you need some kind of brain. For that [Justblair] went with an ATmega32U4 breakout board. Since he had to patch into USB for power anyway he added a USB hub and routed one of the ports out the left side of the keyboard as a convenient way to connect other peripherals. There was even room to include an RFID reader which he uses to unlock his sessions (similar to the desk install from earlier this year). There’s still a lot of potential left in that hardware. To make future improvements easier the hack includes an IDC socket as an auxiliary port.

[Justblair] did a great job of sharing his work. His post links to a Github repo for the code and a Thingiverse project for the 3D printed legs. And it wouldn’t be complete without the demo video which is found below.

Continue reading “Pimp My Keyboard: Automatic Lift Kit And More”

LED Costumes And Clothing

3ledCostume

Our tips line recently received an influx of wearable LED projects, both for casual and professional wear. [Elizabeth] and [Luis] have created the Lüme wearable collection, aimed at accessorizing by adding adjustable accent colors to jackets, t-shirts and dresses. The electronics are custom-made, built around an ATMega32u4, and each is Bluetooth enabled to interact with a user’s cell phone. From the phone, you can change colors, sequences, set up events, and even take advantage of an “inkdropper-style” feature that matches the color of the LEDs to any object you point your camera at.

[Michal’s] project is an entire suit for a dance and laser show entitled “Tron Dance”, which uses several RGB LED strips placed on key points of the wearer’s costume. It looks like [Michal] has intentionally avoided the joint areas to prevent any problems with breaks or bends, but still manages to place enough to cover the entire body. We aren’t sure what controls everything, but you can watch it go through various sequences and survive an onstage performance after the break.

Finally, in yet another kind of performance, magician [Kiki Tay] has built a jacket that’s overflowing with RGB LEDs. [Kiki] wanted wearable LED control that could be used in various situations without having to re-invent the wheel each time, so he developed his own board — the LED Magician: an Arduino-compatible solution. The board has 12 outputs channels, drives 50+ LEDs per channel and features 12 on-board LEDs that display a preview of the output. To make interactions user-friendly, [Kiki] has provided 32 built-in sequences and adjustable speeds that the user can program via 4 buttons on the board. If that isn’t enough control, there are some options for external control as well. The jacket itself runs off a hobby LiPo battery and is blindingly bright: stick around after the break for a video.

Continue reading “LED Costumes And Clothing”