The Keypad Contest

Keypad

What can you do with ten buttons and ten lights? A lot.

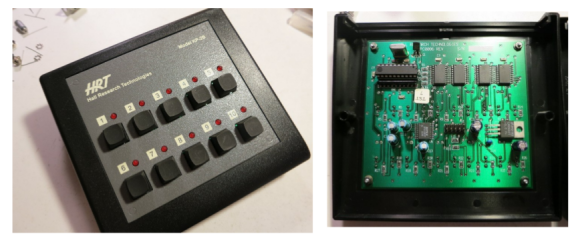
[Andrew] and [Nathan] found a collection of Hale Research keypads being thrown out, and decided to host the Keypad Contest. The goal of the contest was to create something nifty using the ten buttons and ten lights on the keypad, and an ATtiny2313 that replaced the original 8051-compatible microcontroller in the device.

[Andrew] wanted to try making PCBs with his home-built CNC machine, so he milled out USBtinyISP programmers for the ATtiny2313. Then he gave out eleven development kits to a group, and explained how to develop on the hardware.

After a month of hacking, seven people completed projects. The winner was an internet radio controller, which had the keypad sending serial data to a TP-Link WR703N router. The router used a USB sound card and OpenWRT firmware to stream music. The runner up was a timing game called “Capture”.

The contest write up has details on all seven projects. [Andrew] and [Nathan] were successful in getting software engineers to try hardware with this contest, resulting in some neat hacks. After the break, check out a video demo of the internet radio controller.

Continue reading “The Keypad Contest”

Glass Delay Line Slide Used In An RGB Lamp

glass-delay-lines-lamp

The spire used in this lamp is a part from an old television. It’s a glass delay line slide which pipes the light up from the Bluetooth controlled RGB lamp (translated) in the base.

We have looked at delay lines previously when [Dave Jones] tore down a camcorder to get at one. But we must have missed the EEVblog follow-up episode which explains how the glass slides work. The device uses physical distance to form a delay. Waves directed into the edge of the glass slide bounce around at an angle before being sensed at the collection point. [Lukas] liked the visual appearance of the part and decided to use it to add visual interest to his lamp project. The nature of the glass makes it perfect for directing the light up and away from the PCB.

The lamp consists of one RGB LED module controlled by an ATtiny2313 microcontroller. Also on board is a HC-05 Bluetooth module. This along with an app he wrote lets the user change lamp color and behavior wirelessly. You can see the lamp in action in the video after the break, but we think the camera shot probably doesn’t do it the justice it deserves.

Continue reading “Glass Delay Line Slide Used In An RGB Lamp”

WAV Music Player Uses An ATtiny

We’re very accustomed to seeing small media player builds, but [txyz]’s ATtiny-powered audio player is one of the smallest and most feature-packed we’ve seen.

The audio player is powered by the very small and very inexpensive ATtiny2313. The music is stored on an SD card – a maximum of 2GB of WAV files recorded in mono at 32kBps at an 8-bit depth. On boot, the ATtiny loads the first audio file from the card and outputs it through a speaker connection.

To make things interesting, [txyz] made the audio player controllable via a serial connection. Once a small FTDI adapter is connected to the player, [txyz] can connect to it through a terminal and run through his playlist.

Even though the player is controllable through a serial port, there are a few pins left over that [txyz] could attach to buttons, if so desired. With a battery pack, this would turn his music player into the homebrew equivalent of an iPod shuffle. With the low component count, it might actually be cheaper than the shuffle, if [txyz]’s time is free, that is.

Video after the break.

Continue reading “WAV Music Player Uses An ATtiny”

LED Matrix Pendants

If you want to mess around with some microcontrollers but don’t really have a purpose in mind this project is perfect for you. It’s cheap, easy to assemble, and there’s blinking LEDs! [TigerUp] shows us how he  put together some LED matrix pendants using just five components.

He calls the project Tiny Matrix, which is fitting as the pendant outline is barely 0.5″ by 0.7″. On the back an ATtiny2313 chip has been soldered directly to the legs of the LED display. They just happen to line up with I/O pins on the chip which makes for super simple soldering. Power comes from a coin-cell which is connected to the pendant by a red and black wire which make up the necklace for the device. The last two components not yet mentioned are a momentary push switch for changing modes, and a pull-up resistor on the reset pin. The bill of materials rings in at $4 and his firmware offers up nine different modes as you can see in the clip after the break.

[TigerUp] was inspired by this 8×8 matrix project.

Continue reading “LED Matrix Pendants”

Art Controller: Relay Board With Switches For Timing

Meet the Art Controller, a new dev board available over at Evil Mad Scientist Laboratories. It provides a drop-in solution for switching higher voltage loads (but not mains). The thing we like most about it is the ability to alter a switching delay without reprogramming the firmware.

The board uses an ATtiny2313 for control. It’s fed regulated 5V power from the on-board 7805 linear regulator. The relay can handle a 24V DC or 40V AC load, which is targeted at an audience that needs electronic switching for art-related devices but doesn’t want the hassle of designing a circuit every time. This offers a single shot, or repeat action, with that bank of DIP switches selecting a delay from once every second, to every 31 hours. It can get its initial trigger from anything that can pull a pin low, like a button, or a coin acceptor.

Keep this in mind. The open source nature of the project means it could come in handy as a reference design.

Learning The Ins And Outs Of USB With A Simple Dev Board

We can’t count the number of projects we’ve seen on Hackaday with a USB port.  Unfortunately, most of these builds – from RepRap controllers to wireless data loggers – don’t use the full capabilities offered to them with USB. [Ben] came up with a very cool USB breakout board that allows you to explore the USB protocol with just a single inexpensive ATtiny.

Instead of relying on an FTDI chip or otherwise sending serial data down a USB pipe, [Ben]’s project is meant to be the hardware compliment to his book on programming USB devices. His hardware board is exceedingly simple, just an ATtiny 2313, a USB port, and a handful of other components, but allows [Ben] to receive data on eight pins on a breadboard and send them over USB to a computer.

[Ben] had sent in his USB figure eight controller, a board that displays the numbers 0 through 9 according to what data is received via USB, a while ago. It’s a truly useless build aside from learning how USB works, but an excellent tool if you’d like to program your own USB device.

IR Remote As PC Input

As a learning experience [GeriBoss] put together an IR remote control receiver board for his PC. His want of volume control from across the room was reason enough to undertake the project, and he got to work with a 38 kHz receiver module and Manchester encoding in the process.

The decoder portion of the project is built around an ATtiny2313 chip. The external interrupt pin (INT0) is connected to a TSOP31238. When it decodes a valid remote code it pushes a character to the RS232 chip connecting to the computer’s serial port.

We think this is a wonderful accomplishment for [GeriBoss], but we encourage him to refine the design further. You’ll notice in the image there’s a USB port on the board which is only used to provide regulated power. We know it’s possible to use V-USB with the ATtiny2313 to add USB functionality and this would be a great way to learn about it. We’d also like to mention the resistor and capacitor suggested for filtering the IR receiver module signal. We’ve included the recommended application schematic for that part after the break.

Continue reading “IR Remote As PC Input”