Ask Hackaday: Wired Or Wireless Headphones?

They say you should never throw out old clothes because they will come back in style one day. Maybe they are right. We noted in a recent BBC post that, apparently, wired headphones are making a comeback. Like many people, we were dismayed when Apple took the headphone jack out of the iPhone and, as [Thomas Germain] notes, even Google eventually ejected the normal headphone jack. (Although, in fairness, most of the Pixel phones we’ve seen come with a pair of USB-C earbuds.)

On the face of it, though, wireless seems to be a good idea. You can get cheap Bluetooth earbuds now, although maybe still not as cheap as wired buds. Sure, they sound terrible, but so do cheap buds. It is a pain to charge them, of course, but not having to untangle wires is a benefit. On the other hand, you never have to charge your wired headphones.

Continue reading “Ask Hackaday: Wired Or Wireless Headphones?”

Parametric Design Process Produces Unique Speakers

When building one-off projects, it’s common to draw up a plan on a sheet of paper or in CAD, or even wing it and hope for the best outcome without any formal plans. Each of these design philosophies has its ups and downs but both tend to be rigid, offering little flexibility as the project progresses. To solve this, designers often turn to parametric design where changes to any part of the design are automatically reflected throughout the rest, offering far greater flexibility while still maintaining an overall plan. [Cal Bryant] used this parametric method to devise a new set of speakers for an office, with excellent results.

The bulk of the speakers were designed with OpenSCAD, with the parametric design allowing for easy adjustments to accommodate different drivers and enclosure volumes. A number of the panels of the speakers are curved as well, which is more difficult with traditional speaker materials like MDF but much easier with this 3D printed design. There were a few hiccups along the way though; while the plastic used here is much denser than MDF, the amount of infill needed to be experimented with to achieve a good finish. The parametric design paid off here as well as the original didn’t fit exactly within the print bed, so without having to split up the print the speakers’ shape was slightly tweaked instead. In the end he has a finished set of speakers that look and sound like a high-end product.

There are a few other perks to a parametric design like this as well. [Cal] can take his design for smaller desk-based speakers and tweak a few dimensions and get a model designed to stand up on the floor instead. It’s a design process that adds a lot of options and although it takes a bit more up-front effort it can be worth it while prototyping or even for producing different products quickly. If you want to make something much larger than the print bed and slightly changing the design won’t cut it, [Cal] recently showed us how to easily print huge objects like arcade cabinets with fairly standard sized 3D printers.

Repairing The Questionable £25,000 Tom Evans Audiophile Pre-Amp

One of the power supply boards in the Tom Evans Mastergroove SR MkIII preamplifier. (Credit: Mend it Mark, YouTube)

It’s not much of a secret that in the world of ‘audiophile gear’ there is a lot of snake oil and deception, including many products that are at best of questionable value. The Tom Evans Mastergroove SR mkIII preamplifier is one example of this, as [Mark] from the Mend it Mark YouTube channel found in a recent video when he got one to repair which the manufacturer claimed ‘could not be fixed’. This marvel of audio engineering provides amplification for record players, for the low-low price of only twenty-five thousand quid, or about 29.000 US bucks. So what’s inside one of these expensive marvels?

Claiming to be a high-end unit, with only ten units produced per year, you’d expect a gold-plated PCB with excellent noise isolation. The unit does come with an absolutely massive external power supply that dwarfs the preamplifier itself, but the real surprise came after opening up the unit itself to take a peek at the damage, some of which was caused by transport.

As it turns out, the inside of the preamplifier consists out of four stacks of rather cheap, home-made looking boards with what looks like improvised RF shielding in the form of bare PCBs and filed-off markings on many parts. In between the rat’s nest of wiring running everywhere, [Mark] had to trace the broken channel’s wiring, creating a full repair manual in the process. Along the way one of the opamp boards was found to be defective, courtesy of a single shorted tantalum capacitor.

With the tantalum capacitor replaced, [Mark] had repaired the unit, but even though the preamplifier isn’t terribly designed, the illusion of its price tag has been shattered worse than the contents of a parcel kicked across the parking lot by the Royal Mail.

Thanks to [Jim] for the tip.

Continue reading “Repairing The Questionable £25,000 Tom Evans Audiophile Pre-Amp”

Reshoring Vacuum Tube Manufacturing, One Tube At A Time

For most of us, vacuum tubes haven’t appeared in any of our schematics or BOMs in — well, ever. Once mass-manufacturing made reliable transistors cheap enough for hobbyists, vacuum tubes became pretty passe, and it wasn’t long before the once mighty US tube industry was decimated, leaving the few remaining tube enthusiasts to ferret out caches of old stock, or even seek new tubes from overseas manufacturers.

However, all that may change if [Charles Whitener] succeeds in reshoring at least part of the US vacuum tube manufacturing base. He seems to have made a good start, having purchased the Western Electric brand from AT&T and some of its remaining vacuum tube manufacturing equipment back in 1995. Since then, he has been on a talent hunt, locating as many people as possible who have experience in the tube business to help him gear back up. Continue reading “Reshoring Vacuum Tube Manufacturing, One Tube At A Time”

It’s Difficult To Read An Audiophile Guide As An Analogue Engineer

Sitting on a train leaving the Hackaday Berlin conference, and Hacker News pops up Julian Shapiro with a guide to HiFi. What Hackaday scribe wouldn’t give it a click, to while away the endless kilometres of North European Plain!

It’s very easy as an analogue electronic engineer, to become frustrated while reading audiophile tracts, after all they have a tendency to blur superficial engineering talk with pseudoscience. There’s a rich vein of parody to be found in them, but nevertheless it’s interesting to read them because just sometimes the writer gets it and doesn’t descend into the world of make-believe. Continue reading “It’s Difficult To Read An Audiophile Guide As An Analogue Engineer”

A Loving Look Inside Vacuum Fluorescent Displays

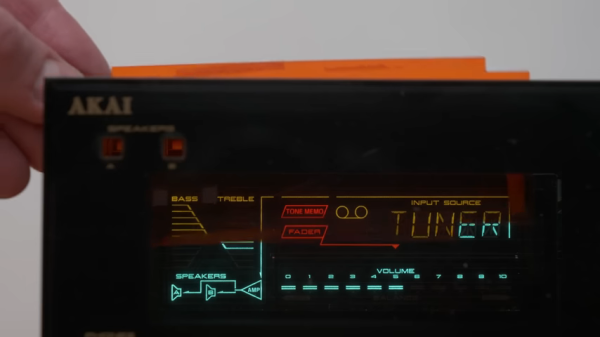
Everyone knows we’re big fans of displays that differ from the plain old flat-panel LCDs that seem to adorn most devices these days. It’s a bit boring when the front panel of your widget is the same thing you stare at hour after hour while using your phone. Give us the chunky, blocky goodness of a vacuum fluorescent display (VFD) any day of the week for visual interest and retro appeal.

From the video below, it seems like [Posy] certainly is in the VFD fandom too, rolling out as he does example after example of unique and complicated displays, mostly from audio equipment that had its heyday in the 1990s. In some ways, the video is just a love letter to the VFD, and that’s just fine with us. But the teardowns do provide some insights into how VFDs work, as well as suggest ways to tweak the overall look of a VFD.

For example, consider the classy white VFDs that graced a lot of home audio gear back in the day. It turns out, the phosphors used in those displays weren’t white, but closer to the blue-green color that VFDs are often associated with. But put a pink filter between the display and the world, and suddenly those turquoise phosphors look white. [Posy] does a lot of fiddling with the stock filters to change the look of his VFDs, some to good effect, others less so.

As for the internals of VFDs, [Posy]’s look at a damaged display reveals a lot about how they work. With a loose scrap of conductor shorting one of the cathodes inside the tube, the damaged VFD isn’t much to look at, and is beyond reasonable repair, but it’s kind of cool to examine the spring mechanisms that take up slack as the cathodes heat up and expand.

Thanks to [Posy] for this heartfelt look into the VFDs of yesterday. If you need more about how VFDs work, we’ve covered that before, too.

Continue reading “A Loving Look Inside Vacuum Fluorescent Displays”

Improve CD Sound By Shaving?

We always enjoy the odd things that people do to try to get better audio reproduction. Exotic cables, special amplifiers, and higher resolution digitization come to mind.  Most of this is dubious, at best, but [Techmoan] brings up something we must have missed back in the day: shaving CDs with a gadget that was marketed as the “CD Sound Improver.” The theory is that bad CD reproduction comes from light scatter of the laser. The solution, according to the maker of this vintage equipment, is to cut a 36-degree bevel to act as a light trap. You can see the gadget in the video below.

The device claims it reduced vibration, improved audio, and even helped DVDs playback better video. As you might imagine, this has little hope of actually working. The box is essentially a motor-driven turntable, a razor blade, and a port for a vacuum cleaner to suck up the mess. You were told to color the edge with a marker, too.

Continue reading “Improve CD Sound By Shaving?”