Bare-Metal STM32: From Power-Up To Hello World

Some may ask why you’d want to program a Cortex-M microcontroller like the STM32 series using nothing but the ARM toolchain and the ST Microelectronics-provided datasheet and reference manual. If your first response to that question wasn’t a panicked dive towards the nearest emergency exit, then it might be that that question has piqued your interest. Why, indeed?

Definitely, one could use any of the existing frameworks to program an STM32 MCU, whether the ST HAL framework, plain CMSIS, or even something more Arduino-flavored. Yet where is the fun in that, when at the end of the day one is still fully dependent on that framework’s documentation and its developers? More succinctly, if the contents of the STM32 reference manuals still look like so much gibberish, does one really understand the platform?

Let’s take a look at how bare-metal STM32 programming works, and make the most basic example run, shall we? Continue reading “Bare-Metal STM32: From Power-Up To Hello World”

The rust language logo being branded onto a microcontroller housing

Pun Intended: Bare Metal Attracts Rust

Programming languages tend to polarize, and Rust is by far no exception. Whether it will stick around and grow as an alternative for the lower levels or not — time will tell. In the meantime, if you’re curious about the language and its low-level abilities yourself, [phil-opp] has written a series of blog posts on building your own little bare metal kernel in Rust.

Starting from the basics, [phil-opp] describes in detail the set-up and build process to create a standalone executable that won’t be linked against the Rust standard library. From here he proceeds to build a simple operating system kernel that prints a good old Hello World via VGA output — QEMU emulation included. And of course, there is a GitHub repository with all of the source code.

[phil-opp] has been working on this for a while already, and he is currently writing the second edition of the series. Some content is therefore still missing, but you may find more of it in his first edition. And in case you know absolutely nothing about Rust in the first place, let’s just take a step back and start with the basics. After all, we might see more of it in the future.

PS/2 Keyboard For Raspberry Pi

A lot of people can bake a cake. Sort of. Most of us can bake a cake if we have a cake mix. Making a cake from scratch is a different proposition. Sure, you know it is possible, but in real life, most of us just get a box of cake mix. The Raspberry Pi isn’t a cake (or even a pie), but you could make the same observation about it. You know the Raspberry Pi is just an ARM computer, you could program it without running an available operating system, but realistically you won’t. This is what makes it fun to watch those that are taking on this challenge.

[Deater] is writing his own Pi operating system and he faced a daunting problem: keyboard input. Usually, you plug a USB keyboard into the Pi (or a hub connected to the Pi). But this only works because of the Linux USB stack and drivers exist. That’s a lot of code to get working just to get simple keyboard input working for testing and debugging. That’s why [Deater] created a PS/2 keyboard interface for the Pi.

Even if you aren’t writing your own OS, you might find it useful to use a PS/2 keyboard to free up a USB port, or maybe you want to connect that beautiful Model-M keyboard without a USB adapter. The PS/2 keyboard uses a relatively simple clock and data protocol that is well-understood. The only real issue is converting the 5V PS/2 signals to 3.3V for the Pi (and vice versa, of course).

Continue reading “PS/2 Keyboard For Raspberry Pi”

Doom on Raspberry Pi

Writing Doom For The Raspberry Pi

We’ve all seen Doom played on the Raspberry Pi before… but this isn’t a port of the game. No, this was a school project at the Imperial College of London — writing the game in bare assembly. They wrote it from scratch.

bare metal doom thumbnail
Complete with a custom home made controller connected directly to the GPIO pins!

Yep. There’s not even an operating system on the Pi. It’s 9800 lines of bare metal ARM assembly. If that doesn’t hurt your brain we dunno what does!

They are using the official textures from the game, and it’s not quite a perfect replica — but it’s pretty darn close.

Part of the project was to build an emulator to make it easier to test the game, but it didn’t work out the greatest — so most of the actual game development was performed on the actual hardware. Yikes!

Stick around after the break to see Doom in all its former glory. Top notch work guys!

Continue reading “Writing Doom For The Raspberry Pi”

Tetris Duel With The Raspberry Pi

Tetris Duel

Building a multiplayer network game with multiple Raspberry Pis can be very difficult. Doing it in assembly is outright insane! This is exactly what a group of first year students at Imperial College London did; they created a network based multiplayer Tetris game for the Raspberry Pi.

[Han], [Piotr], [Michal], and [Utsav] have created this entire game from bare metal assembly, and it only consists of 4000 lines of code! The code is well documented, so be sure to look through their Github repository. This project is a great reference for those looking to learn bare metal assembly and networking. They even chose to use the old NES controllers, a very nice touch. While we have featured what seems like a million different Tetris games in the past, this is the first multiplayer version. See Tetris Duel in action in the video after the break!

This is a shout-out to all of you students out there. Take the time to create quality documentation for your class project, and upload it to the internet. Not only is it a great resume boost, but it could very well end up on Hackaday!

Continue reading “Tetris Duel With The Raspberry Pi”

Programming Pi Games With Bare Metal Assembly

pifox
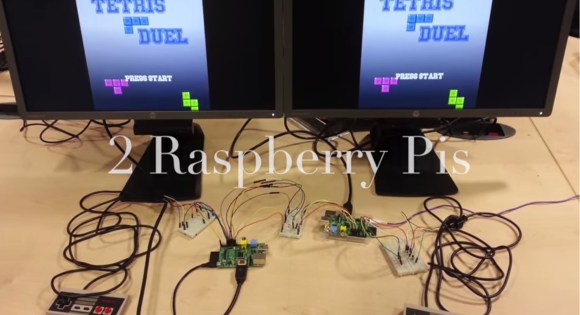
While the most common use for a Raspberry Pi is probably a media center PC or retro game emulator, the Pi was designed as an educational computer meant to be an easy-to-use system in the hands of millions of students. Team 28 at Imperial College London certainly living up to the Raspberry Pi Foundation’s expectations with their bare metal assembly clone of Star Fox, aptly titled PiFox.

This isn’t the first time a college course has taken up the task of developing software for the Pi without an operating system; a few years ago, Cambridge University started that off with a series of bare metal tutorials for the Pi that included drawing graphics on the screen and playing around with USB keyboards. PiFox greatly expands on what those early tutorials could do, reading an NES joystick from the GPIO pins, sound with DMA, and rendering 3D objects.

If you’d like to build PiFox for yourself, or better yet, expand on the existing build, all the code is up on Github. There’s also a Raspberry Pi emulator for Linux, just in case you have an ARM assembly bug you just can’t scratch with a Raspberry Pi.

Continue reading “Programming Pi Games With Bare Metal Assembly”

Bare-metal Programming On The Teensy 3

Teensy

The Teensy 3.x series of boards are amazing pieces of work, with a tiny, breadboard-friendly footprint, an improbable number of IO pins, and a powerful processor, all for under $20. [Karl Lunt] loves nearly all the features of the Teensy 3, except for one: the Arduino IDE. Yes, the most terrible, most popular IDE in existence. To fix this problem, [Karl] set up a bare-metal development environment, and lucky us, he’s chosen to share it with us.

[Karl] is using CodeBench Lite for the compiler, linker, assembler, and all that other GCC fun, but the CodeSourcery suite doesn’t have an IDE. Visual Studio 2008 Express is [Karl]’s environment of choice, but just about every other IDE out there will do the same job. Of course a make utility will be needed, and grabbing the docs for the Freescale K20 microcontroller wouldn’t be a bad idea, either.

The end result is [Karl] being able to develop for the Teensy 3.X with the IDE of his choice. He was able to quickly set up a ‘blink a LED’ program with the new toolchain, although uploading the files to the Teensy does require the Teensy Loader app.