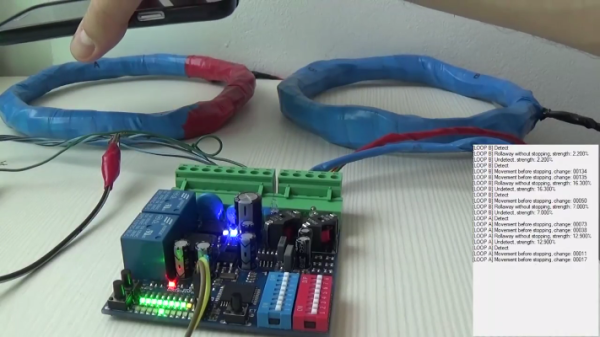
Much like George Lucas and the original Star Wars films, many of us may find that our passion projects are never quite finished, especially when new technology comes around or we just want to make some improvements for their own sake. [Muris] was featured a while back for a vehicle detecting circuit, but is back with some important upgrades to his project. (Which, luckily, do not include any horrible CGI aliens.)
For starters, the entire project has been reworked from the ground up. For anyone unfamiliar with the original project, the circuit detected a vehicle via an inductive loop and was able to perform a task like opening a gate. It now has two independent channels which are polled separately, yet has a reduced parts count which should make construction simpler. The firmware has also been reprogrammed, and in addition to sensing a vehicle’s presence can now also measure the speed of any vehicles passing by.
The complete list of improvements can be found on the project page, and an extensive amount of documentation is available on this if you want to try to roll out your own inductive loop vehicle detector. Of course, this isn’t the only way to detect a vehicle’s presence if inductive loops aren’t really your style.
The humble car alarm has been around almost as long as the car itself, first being developed by an unknown prisoner in Denver, circa 1913. To the security-conscious motorist, they make a lot of sense. The noise of a car alarm draws attention which is the last thing a would-be thief wants, and the in-built immobilizers generally stop the car being moved at all without a time-consuming workaround. Both are a great deterrent to theft.
It may then surprise you to know that I, dear readers, consider the aftermarket car alarm to be one of the most heinous devices ever fitted to the modern automobile. Combining the unholy trifecta of being poorly designed, cheaply made, and fitted by only the most untalented or uncaring people to wield a soldering iron, they are a blight that I myself refuse to accept.
It was my very own Mazda that suffered at the hands of a car alarm system. Two days after purchasing the car, the keyfob died, and thus the car would no longer start. My other car was already out of action due to bent valves, and I needed to get to work, so I figured as a competent hacker, I’d be able to quickly disable it.
While Mars is currently under close scrutiny by NASA and other space agencies, there is still a lot of exploring to do here on Earth. But if you would like to explore a corner of our own planet in the same way NASA that explores Mars, it’s possible to send your own rover to a place and have it send back pictures and data for you, rather than go there yourself. This is what [Norbert Heinz]’s Earth Explorer robots do, and anyone can drive any of the robots to explore whatever locations they happen to be in.
A major goal of the Earth Explorer robot is to be easy to ship. This is a smaller version of the same problem the Mars rovers have: how to get the most into a robot while having as little mass as possible. The weight is kept to under 500g, and the length, width, and height to no more than 90cm combined. This is easy to do with some toy cars modified to carry a Raspberry Pi, a camera, and some radios and sensors. After that, the robots only need an interesting place to go and an Internet connection to communicate with Mission Control.
[Norbert] is currently looking for volunteers to host some of these robots, so if you’re interested head on over to the project page and get started. If you’d just like to drive the robots, though, you can also get your rover fix there as well. It’s an interesting project that will both get people interested in exploring Earth and in robotics all at the same time. And, if you’d like to take the rover concept beyond simple exploration, there are other machines that can take care of the same planet they explore.
Alphabet’s self-driving car offshoot, Waymo, feels that may be the case as they were recently granted a patent for vehicles that soften on impact. Sensors would identify an impending collision and adjust ‘tension members’ on the vehicle’s exterior to cushion the blow. These ‘members’ would be corrugated sections or moving panels that absorb the impact alongside the crumpling effect of the vehicle, making adjustments based on the type of obstacle the vehicle is about to strike.
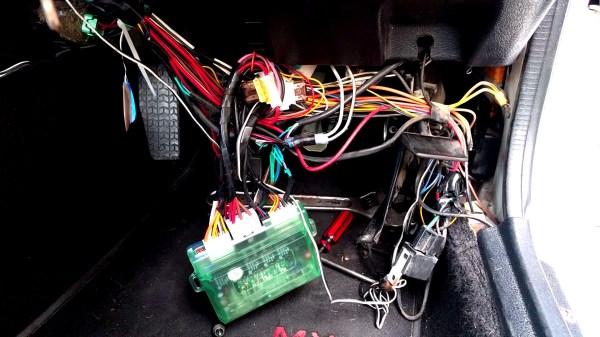
[Big Fish Motorsports] has a vehicle with an adjustable rear spoiler system that broke in the lead up to a big race. The original builder had since gone AWOL so the considerable talents of [Quinn Dunki] were brought to bear in getting it working again.
Cracking open the black control box of mystery revealed an Arduino, a ProtoShield and the first major road block: the Arduino remained stubbornly incommunicado despite several different methods of trying to read the source code. Turns out the Arduino’s ATMega324 was configured to be unreadable or simply fried, but an ATMega128 [Quinn] had proved to be a capable replacement. However, without knowing how the ten relays for this spoiler system were configured — and the race day deadline looming ever larger — [Quinn] opted to scrap the original and hack together something of her own design with what she had on hand.
As ever, I am fighting a marginally winning battle against my 1991 Mazda MX-5, and this is the story of how I came to install a wideband oxygen sensor in my Japanese thoroughbred. It came about as part of my ongoing project to build myself a viable racecar, and to figure out why my 1990s Japanese economy car engine runs more like a late 1970s Malaise-era boat anchor.
I’ve always considered myself unlucky. My taste for early 90s metal has meant I’ve never known the loving embrace of OBD-2 diagnostics, and I’ve had to make to do with whatever hokey system was implemented by manufacturers who were just starting to produce reliable fuel injection systems.
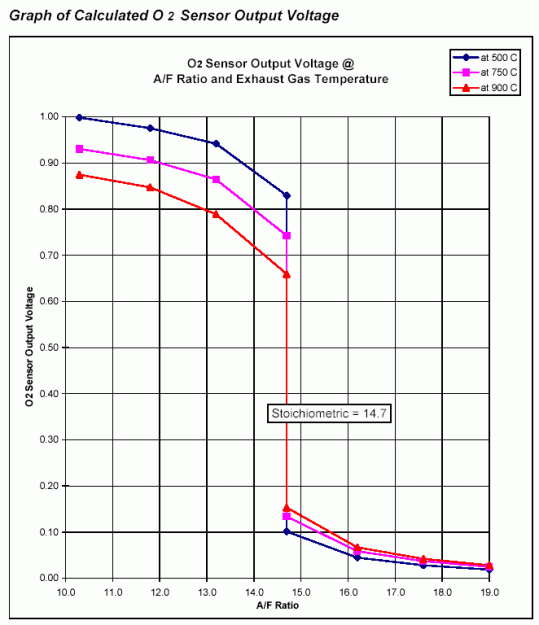
Narrowband oxygen sensor voltage output. The output is heavily dependent on sensor temperature and highly non-linear, making these sensors unsuitable for delivering a true AFR reading.
This generally involves putting in a wire jumper somewhere, attaching an LED, and watching it flash out the trouble codes. My Mazda was no exception, and after putting up with a car that was running rich enough to leave soot all over the rear bumper, I had to run the diagnostic.
It turned up three codes – one for the cam angle sensor, and two for the oxygen sensor. Now, a cam angle sensor (CAS) fault will normally prevent the car running at all, so it’s safe to assume that was an intermittent fault to keep an eye on.
The oxygen sensor, however, was clearly in need of attention. Its job is to allow the engine control unit (ECU) to monitor the fuel mixture in the exhaust, and make sure it’s not too rich or too lean. As my car was very obviously running too rich, and the diagnostic codes indicated an oxygen sensor failure, a repair was in order.
I priced up replacement sensors, and a new oxygen sensor could be had for under $100. However, it wasn’t exactly what I wanted, as not all oxygen sensors are created equal. Cars in the 80s and 90s typically shipped from the OEM fitted with what’s called a narrowband oxygen sensor. These almost always consist of a zirconia dioxide cell that outputs a voltage depending on the difference in oxygen concentration between the exhaust gas and the free air. These sensors generally sit at 0.45 V when the fuel mixture is stoichiometric, but rapidly change to 0.1 V in a lean condition and 0.9 V in a rich condition. The response is highly non-linear, and changes greatly with respect to temperature, and thus is only good for telling the ECU if it’s rich or lean, but not by how much. ECUs with narrowband sensors tend to hunt a lot when running in closed loop O2 control – you’ll see an engine at idle hunt either side of the magical 14.7 stoichiometric air fuel ratio, never able to quite dial in on the correct number.
As I intend to switch to an aftermarket ECU in the future, I’ll need to tune the car. This involves making sure the air/fuel ratios (AFRs) are correct, and for that I need to be able to properly measure them. Just knowing whether you’re rich or lean isn’t enough, as often it’s desirable to run the engine intentionally rich or lean at certain engine loads. To get a true AFR reading requires fitting a wideband oxygen sensor. These are a little more complicated.
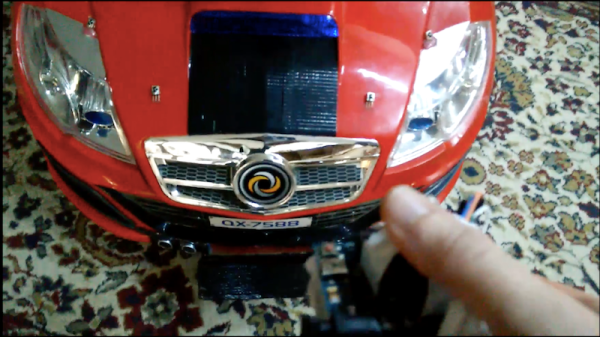
Having a pet can really make a difference to your happiness at the end of the day, but they’re also a lot of work. This project by [Ioannis Stoltidis] does something similar — minus all the responsibility. The Smart Car Follower Project is designed to track people using Bluetooth and IR and follow them around from room to room.
Submitted as part of a Master’s thesis, this project hacks a toy car and uses a key chain transmitter that sends the tracking signals. A Raspberry Pi 3 combines the Bluetooth RSSI and IR signals to make create an estimate of the position of the beacon. Arduinos facilitate the IR signaling as well as the motor control allowing the robot to chase the user around like a puppy. The whole thing also comes with obstacle avoidance using ultrasonic sensors on all sides which are good if you have a lot of furniture in the house.
You can also choose to go manual-mode and drive it around the block using a PC and gamepad. A webcam connected to the onboard computer allows a first person view of the vehicle by sending the video feed over wifi to a PC application. OpenCV is used to create the final GUI which allows you to see and control the project remotely. The source code is available for download for anyone who wants to replicate the project. Check out the video of it in action below.