PC And Console Gaming United Courtesy Of Origin

When folk at Origin PCs realized that their company was about to celebrate its 10th anniversary of making custom (gaming) PCs, they knew that they had to do something special. Since one thing they did when the company launched in 2009 was to integrate an XBox 360 into a gaming PC, they figured that they might as well refresh and one-up that project. Thus 2019’s Project ‘Big O’ was born.

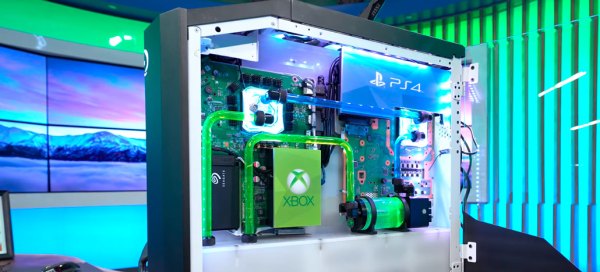
Naturally still featuring a high-end gaming PC at its core, the show piece of the system is that they also added an XBox One X, Playstation 4 Pro and Nintendo Switch console into the same full-tower GENESIS chassis. For this they had to strip the first two consoles out of their enclosures and insert them into the case each along with their own (appropriately colored) watercooling loop. Unfortunately the optical drives got ditched, presumably because this made things look cleaner.

The Switch was not modded or even cracked open. Instead a Switch dock was installed in the front of the case, allowing one to dock the Switch in the front of the case, and still use it in a mobile fashion after undocking it. Meanwhile an Ethernet and HDMI switch simplify the interfaces to this gaming system a lot, requiring one to only plug in a single HDMI and Ethernet cable to plug in all capable platforms. The result is a pretty sleek-looking system, definitely an eye-catcher.

Since Origin will never, ever, sell the Big O to customers as it’s just a promotional item, it does tickle the imagination. Case-modding and combining multiple computers (often an ATX and mini-ITX) system into a single case is nothing new, but aspects such as having a dockable Switch feature, this clean aesthetic and overall functionality makes one wonder what an enterprising hobbyist could accomplish here.

Continue reading “PC And Console Gaming United Courtesy Of Origin”

Comprinter Hides A Laptop Inside A Printer

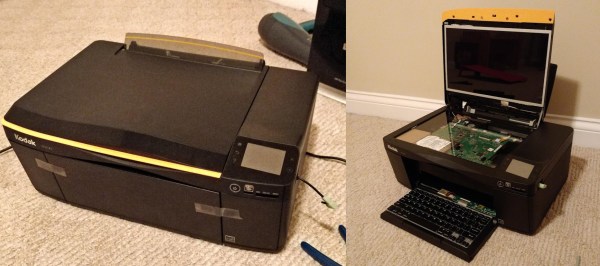
Sometimes we find projects that border on the absurd but are too cool to pass up. The Comprinter is exactly that. [Mason Stooksbury] had a dream. An all-in-one scanner printer that was also a computer. What would turn heads more than walking into a hackerspace with a printer, plugging your headphones in, then opening up the top to reveal a monitor?

[Mason’s] dream became possible when friends gave him some old laptops and a dead Kodak printer. After going through the laptops, he picked a Dell Inspiron 1440 to be the donor machine. The printer and laptop were both carefully stripped down. [Mason’s] goal for the project was to build a “beautiful” printer/computer. No bodges allowed. He spent most of his time planning out how to mount the motherboard and display inside the scanner section of the chassis.

The actual assembly was quite fiddly. Working with only an inch or so of clearance, [Mason] installed standoffs for the motherboard and display. He to do all this without breaking the wires for the display and WiFi antennas.

Once the main parts of the laptop were assembled, [Mason] completed the build with a nine-port USB hub, some internally mounted speakers and a USB keyboard mounted in the paper tray. The twelve-hour operation was a complete success. What looks to be a cheap inkjet actually hides a complete laptop running Xubuntu. The only downside is that the printer doesn’t actually print, but [Mason] is quick to note that if the printer hadn’t been broken in the first place, it would work fine — all the modifications are in the scanner section.

We’ve seen some wild casemods over the years, including a Nintendo in a toaster, a modern PC stuffed into an original Xbox, and Raspberry Pi’s stuffed into just about everything.

The Smallest GameCube Is Actually A Wii

Casemodding, or stuffing video game consoles into shapes they were never meant to be in, is the preserve of a special breed. Our favorites are when old consoles are stuffed into different versions of the same console. Remember that gigantic O.G. Brick Game Boy carrying case? Yes, you can turn that into a jumbo-scale Game Boy, and it’s sweet. Continuining this trend of consoles of a different size, [Madmorda] has stuffed a GameCube into a sugar cube. It’s small. It’s really small, and it’s some of the best casemodding we’ve seen.

First off, the enclosure. This is an officially licensed micro GameCube case that originally housed gummy candies crafted by gummy artisans who work exclusively in the medium of gummy. This case, incidentally, is the perfect scale to match [Madmorda]’s earlier work, a miniaturized GameCube controller. This controller was originally a keychain, but with a bit of fine soldering skills it can indeed become a functional GameCube controller.

With the candy container GameCube gutted, the only task remaining was to put a GameCube inside. This is a lot easier if you tear down a Wii, and after desoldering, resoldering, and generally cutting up the circuit board of a Wii, [Madmorda] had something very small.

The finished console is a complete GameCube, compatible with all games, and no emulation. There are four controller ports, two USB ports for memory card slots, and output is composite through a 3.5mm jack. It’s a great piece of work and looks exactly like a miniaturized GameCube.

An OpenSCAD Mini-ITX Computer Case

We’re no strangers to 3D printed enclosures here at Hackaday. From the plethora of printed Raspberry Pi cases out there to custom enclosures for electronic projects, small plastic boxes turn out to be an excellent application for desktop 3D printing. But as printers get bigger and filament gets cheaper, those little boxes don’t always need to be so little. We aren’t talking about running off boxes for your sneaker collection either, if you’ve got the time and the print volume, you could whip up an enclosure for your PC.

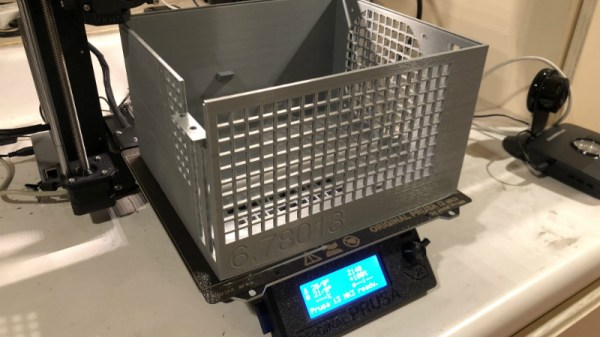
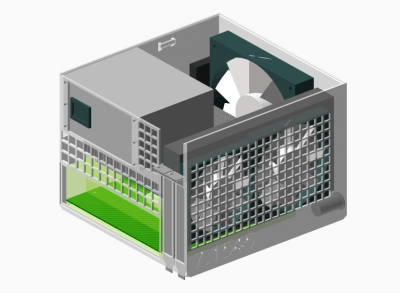
[Nirav Patel] writes in to share his impressive 3D printed Mini-ITX computer case project, which would be a neat enough trick in its own right, but he took the concept one step farther and made it a parametric design in OpenSCAD. This allows the user to input their particular hardware configuration and receive STL files for a bespoke case. The list of supported hardware isn’t that long yet, but with the OpenSCAD code up on GitHub and released under the BSD license, hopefully the community can improve on that as time goes on.

To keep things simple (and strong), [Nirav] implemented what he refers to as a “bucket” design. The majority of the case is a single print, which does take a long time (just shy of 40 hours on his Prusa i3 MK3), but nearly eliminates any post-printing assembly. Only the optional feet and the lid need to be printed separately. Threaded inserts are used throughout the design for mounting hardware, so you don’t run the risk of blowing out the printed holes during hardware changes or upgrades.

A particularly neat feature, and a testament to the power of OpenSCAD, is the fact that the case’s internal volume is calculated and embossed into the side of the design. Does this have any practical purpose? Not exactly, but [Nirav] thought it would be appealing to the Mini-ITX case modding community which apparently measures their accomplishments in liters of volume.

We’ve seen a 3D printed computer case before, but it used acrylic sheets and couldn’t be made without a large format printer. There’s something to be said for a project that can be completed on the hacker community’s favorite printer.

This Xbox 360 Is Powered By Steam

Now that we’re far enough into the next generation of home video game consoles that we can’t really keep calling them that anymore, yard sales are sure to be full of lonely Xbox 360s and PS3s that have been put out to pasture. You’ll probably even find a Wii U or two out there that somebody accidentally purchased. This is great for hackers who like cramming new electronics into outdated consumer gear, and accordingly, we’re starting to see the fruits of that generational shift.

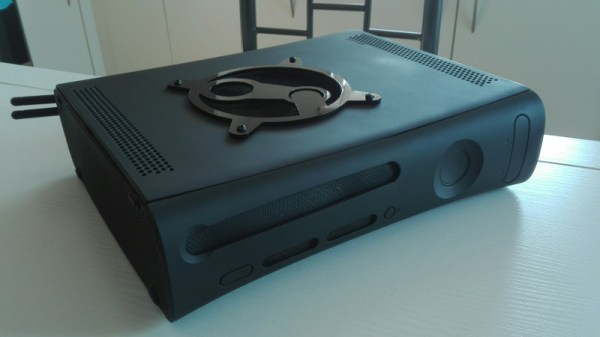
Case in point, this Xbox 360 which has been transformed into a “Steam Box” by [Pedro Mateus]. He figured the Xbox 360 was the proper size to fit a full PC plus PSU, while still looking contemporary enough that it won’t seem out of place in the entertainment center. Running SteamOS on Fedora 28, it even offers a traditional game console experience and user interface, despite the decidedly PC internals.

On the outside, the only thing that really gives away this particular Xbox’s new lease on life (when the purple LEDs are off, anyway) is the laser cut acrylic Steam logo on the top that serves as a grill for the internal CPU cooler. Ironically, [Pedro] did spray the Xbox white instead of just starting with a black one, but otherwise, there wasn’t much external modification necessary. Inside, of course, is a very different story.

It’s packing an AMD Ryzen 5 2400G processor with Radeon RX Vega 11GPU and 8GB of Corsair Vengeance LPX DDR4 3200MHz RAM. Power is provided by a Seasonic SS-300TFX 300W, and a Noctua NH-L9a-AM4 keeps the system cool. Even with all that gear in there, the thing is probably still quieter than the stock Xbox 360.

[Pedro] helpfully provides quite a few benchmarks for those wondering how this hacked-up Xbox fares against a more traditional gaming setup, though peak performance was obviously not the goal here. If you’ve got 45 minutes or so to spare, you should check out the video he’s put together after the break, which goes over the machine’s construction.

We’ve seen it done with the original Xbox, and now the Xbox 360. Who will be the first to send in their build that guts a current-generation Xbox and turns it into a PC for Internet fame?

[Thanks to Mike for the tip.]

Continue reading “This Xbox 360 Is Powered By Steam”

PC In An SNES Case Is A Weirdly Perfect Fit

For better or for worse, a considerable number of the projects we’ve seen here at Hackaday can be accurately summarized as: “Raspberry Pi put into something.” Which is hardly a surprise, the Pi is so tiny that it perfectly lends itself to getting grafted into unsuspecting pieces of consumer tech. But we see far fewer projects that manage to do the same trick with proper x86 PC hardware, but that’s not much of a surprise either given how much larger a motherboard and its components are.

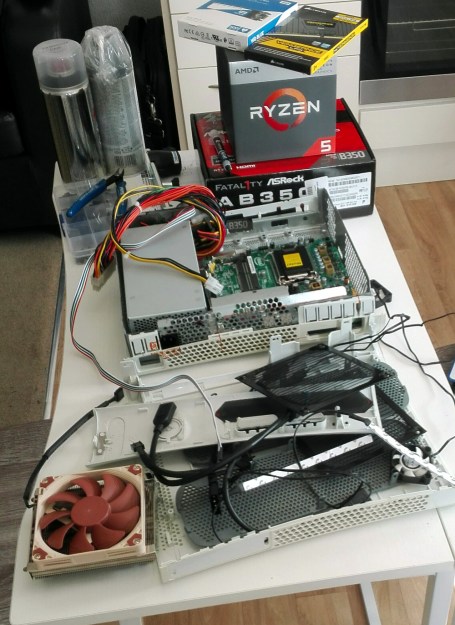
So this PC built into a Super Nintendo case by [NoshBar] is something of a double rarity. Not only does it ditch the plodding Raspberry Pi for a Mini-ITX Intel i5 computer, but it manages to fit it all in so effortlessly that you might think the PAL SNES case was designed by a time traveler for this express purpose. The original power switch and status LED are functional, and you can even pop open the cart slot for some additional airflow.

[NoshBar] started by grinding off all the protruding bits on the inside of the SNES case with a Dremel, and then pushed some bolts through the bottom to serve as mounting posts for the ASUS H110T motherboard. With a low profile Noctua CPU cooler mounted on top, it fits perfectly within the console’s case. There was even enough room inside to add in a modified laptop charger to serve as the power supply.

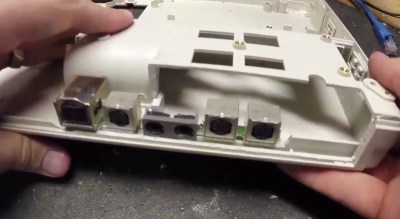
To round out the build, [NoshBar] managed to get the original power slider on the top of the console to turn the PC on and off by gluing a spring-loaded button onto the side of the CPU cooler. In another fantastic stroke of luck, it lined up almost perfectly with where the power switch was on the original SNES board. Finally, the controller ports have been wired up as USB, complete with an adapter dongle.

[NoshBar] tells us the inspiration for sending this one in was the Xbox-turned-PC we recently covered, which readers might recall fought back quite a bit harder during its conversion.

Fail Of The Week: Careful Case Mod Is All For Naught

Today’s entry comes to us from [Robert Tomsons], who was kind enough to document this crushing tale of woe so that we might all learn what true heartbreak is. If you’ve ever toiled away at getting that perfect surface finish with body filler, this one is going to hurt. In fact, you might just want to hit that “Back” button and head to safety now. There’s probably a pleasant story about some 3D printed thing being used with a Raspberry Pi of some sort that you can read instead.

For those of you brave enough to continue on, today we’ll be looking at what [Robert] thought would be a simple enough project. Seeing the board from a USB 3.0 external hard drive kicking around his parts bin, he had a rather unusual idea. Wanting to add an extra drive to his computer, but liking the idea of being able to independently control its power, he decided to integrate the external drive into machine’s front panel. This would not only allow him to power off the secondary drive when not in use, but it meant he could just plug his laptop into the front panel if he wanted to pull files off of it.

All [Robert] needed to do was make it look nice. He carefully squared off the edges of the external drive’s back panel to roughly the size of the computer’s 3.5 inch drive bay opening. He then glued the piece in place, and began the arduous task of using body filler to smooth everything out. It’s a dance that many a Hackaday reader will know all too well: filler, sand, primer, sand, filler, sand, primer, sand, so on and so on. In the end, the final result looked perfect; you’d never have thought the front panel wasn’t stock.

It should have been so easy. Just snap the case back together and be done with it. But when [Robert] finally got the machine buttoned back up and looked at the front, well, it’s safe to say his day couldn’t get much worse. Maybe the glue was not up to the task. Perhaps it was how excited he was to get the case put back together; a momentary loss of muscular coordination. A few extra foot-pounds of energy per second, per second. Who can say?

[Robert] says he’ll return to the project, but for now he needs a break. We agree. Interestingly, he mentions in his post that his body filler work was inspired by [Eric Strebel], a name that is well known around these parts. Considering how good it looked before it exploded, we’ll consider that high praise.