Looking Inside A 3D Printer Nozzle With Computed Tomography

Have you ever wondered what’s actually going on inside the hotend of your 3D printer? It doesn’t seem like much of a mystery — the filament gets melty, it gets squeezed out by the pressure of the incoming unmelty filament, and lather, rinse, repeat. Or is there perhaps more to the story?

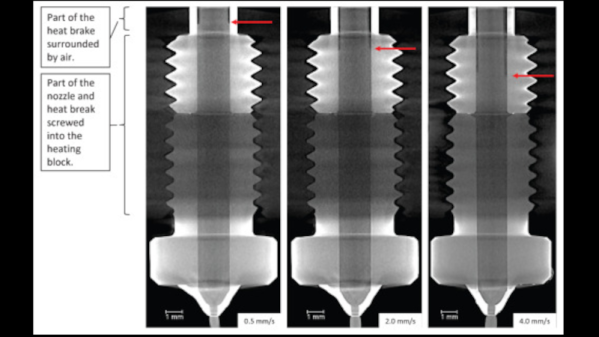
To find out, a team from the University of Stuttgart led by [Marc Kreutzbruck] took the unusual step of putting the business end of a 3D printer into a CT scanner, to get a detailed look at what’s actually going on in there. The test setup consisted of a Bondtech LGX extruder and an E3D V6 hot end mounted to a static frame. There was no need for X-Y-Z motion control during these experiments, but a load cell was added to measure extrusion force. The filament was a bit specialized — high-impact polystyrene (HIPS) mixed with a little bit of tungsten powder added (1% by volume) for better contrast to X-ray. The test system was small enough to be placed inside a micro CT scanner, which generated both 360-degree computed tomography images and 2D radiographs.

The observations made with this experimental setup were pretty eye-opening. The main take-home message is that higher filament speed translates to less contact area between the nozzle wall and the melt, thanks to an air gap between the solid filament and the metal of the nozzle. They also saw an increased tendency for the incoming filament to buckle at high extruder speeds, which matches up with practical experience. Also, filament speed is more determinative of print quality (as measured by extrusion force) than heater temperature is. Although both obviously play a role, they recommend that if higher print speed is needed, the best thing to optimize is hot end geometry, specifically an extended barrel to allow for sufficient melting time.

Earth-shattering stuff? Probably not, but it’s nice to see someone doing a systematic study on this, rather than relying on seat-of-the-pants observations. And the images are pretty cool too.

A Deeper Dive Into Reverse Engineering With A CT Scanner

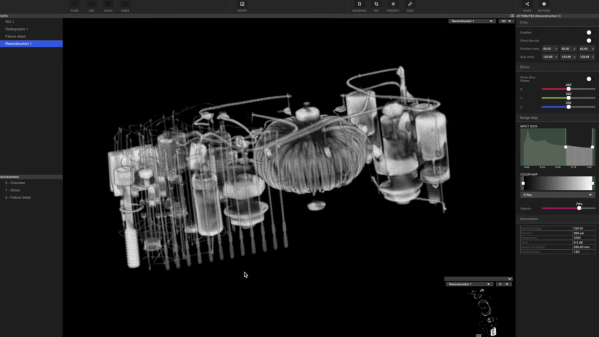
We’ve recently got a look at how [Ken Shirriff] used an industrial CT scanner as a reverse engineering tool. The results were spectacular, with pictures that clearly showed the internal arrangement of parts that haven’t seen the light of day since the module was potted back in the 60s. And now, [Ken]’s cohort [Curious Marc] has dropped a video with more detail on the wonderful machine, plus deep dives into more Apollo-era hardware

If you liked seeing the stills [Ken] used to reverse engineer the obscure flip-flop module, you’re going to love seeing [Marc] using the Lumafield scanner’s 3D software to non-destructively examine several Apollo artifacts. First to enter the sample chamber of the CT scanner was a sealed module called the Central Timing Equipment, which served as the master clock for the Apollo Command Module. The box’s magnesium case proved to be no barrier to the CT scanner’s beam, and the 3D model that was built up from a series of 2D images was astonishingly detailed. The best part about the virtual models is the ability to slice through them in any plane — [Marc] used this feature to hunt down the clock’s quartz crystal. Continue reading “A Deeper Dive Into Reverse Engineering With A CT Scanner”

Homemade CAT Scan Shouldn’t Scan Cats

[Pyrotechnical] thought about buying a CAT scanner and found out they cost millions of dollars. So he decided to build one for about $200 using a salvage X-ray tube and some other miscellaneous parts. A scintillating detector provides the image for pick up with a camera phone. The control? An Arduino, what else? You can watch the video below, but due to plenty of NSFW language, you might want to put your headphones on if you don’t want to shock anyone.

Of course, you need to be careful when working with energetic X-rays. To keep away from the X-ray source, [Pyrotechnical] used a Roku remote and an IR sensor to control the device from afar. The electronics is pretty easy. You just have to rotate a turntable and trigger the camera while lighting up the X-ray tube.

Continue reading “Homemade CAT Scan Shouldn’t Scan Cats”

X-Rays And High Voltage Hack Chat

Join us on Wednesday at noon Pacific time for the X-rays and high-voltage Hack Chat!

Fran Piernas likes to push the envelope a bit with projects that others might shy away from. A quick glance at his Hackaday.io profile reveals a few of the exciting projects he’s been working on recently, including a DIY X-ray machine and the high-voltage driver needed to run it. Not only that, he’s recently taken his home-brew X-ray rig to the next level – a computed tomography (CT) scanner. His YouTube channel also has some exciting stuff using potentially lethal voltages and ionizing radiation.

Please join us for this Hack Chat, in which we’ll cover:

  • How one safely works with high voltage and ionizing radiation;
  • Sourcing uncommon components like X-ray tubes;
  • How Fran decided to start playing at the edge of the danger zone; and
  • What sort of experiments he has in mind for the future.

You are, of course, encouraged to add your own questions to the discussion. You can do that by leaving a comment on the X-rays and high-voltage Hack Chat and we’ll put that in the queue for the Hack Chat discussion.

join-hack-chatOur Hack Chats are live community events on the Hackaday.io Hack Chat group messaging. This week we’ll be sitting down on Wednesday, February 20, at noon, Pacific time. If time zones have got you down, we have a handy time zone converter.

Click that speech bubble to the right, and you’ll be taken directly to the Hack Chat group on Hackaday.io. You don’t have to wait until Wednesday; join whenever you want and you can see what the community is talking about.


Visible Light CT Scanner Does Double Duty

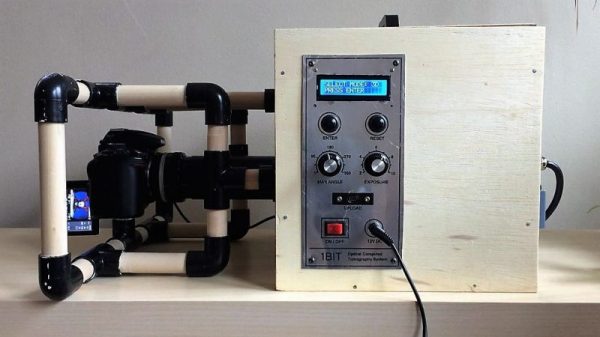
If you’ve ever experienced the heartbreak of finding a seed in your supposedly seedless navel orange, you’ll be glad to hear that with a little work, you can protect yourself with an optical computed tomography scanner to peer inside that slice before popping it into your mouth.

We have to admit to reading this one with a skeptical eye at first. It’s not that we doubt that a DIY CT scanner is possible; after all, we’ve seen examples at least a couple of times before. The prominent DSLR mounted to the scanning chamber betrays the use of visible light rather than X-rays in this scanner — but really, X-ray is just another wavelength of light. If you choose optically translucent test subjects, the principles are all the same. [Jbumstead]’s optical CT scanner is therefore limited to peeking inside things like slices of tomatoes or oranges to look at the internal structure, which it does with impressive resolution.

This scanner also has a decided advantage over X-ray CT scanners in that it can image the outside of an object in the visible spectrum, which makes it a handy 3D-scanner in addition to its use in diagnosing Gummi Bear diseases. In either transmissive or reflective mode, the DSLR is fitted with a telecentric lens and has its shutter synchronized to the stepper-driven specimen stage. Scan images are sent to Matlab for reconstruction of CT scans or to Photoscan for 3D scans.

The results are impressive, although it’s arguably more useful as a scanner. Looking to turn a 3D-scan into a 3D-print? Photogrammetry is where it’s at.

Continue reading “Visible Light CT Scanner Does Double Duty”