Off-World Cement Tested For The First Time

If the current Administration of the United States has their way, humans will return to the surface of the Moon far sooner than many had expected. But even if NASA can’t meet the aggressive timeline they’ve been given by the White House, it seems inevitable that there will be fresh boot prints on the lunar surface within the coming decades. Between commercial operators and international competition, we’re seeing the dawn of a New Space Race, with the ultimate goal being the long-term habitation of our nearest celestial neighbor.

Schmitt's dusty suit while retrieving samples from the Moon
An Apollo astronaut covered in lunar dust

But even with modern technology, it won’t be easy, and it certainly won’t be cheap. While commercial companies such as SpaceX have significantly reduced the cost of delivering payloads to the Moon, we’ll still need every advantage to ensure the economical viability of a lunar outpost. One approach is in situ resource utilization, where instead of transporting everything from Earth, locally sourced materials are used wherever possible. This technique would not only be useful on the Moon, but many believe it will be absolutely necessary if we’re to have any chance of sending a human mission to Mars.

One of the most interesting applications of this concept is the creation of a building material from the lunar regolith. Roughly analogous to soil here on Earth, regolith is a powdery substance made up of grains of rock and micrometeoroid fragments, and contains silicon, calcium, and iron. Mixed with water, or in some proposals sulfur, it’s believed the resulting concrete-like material could be used in much the same way it is here on Earth. Building dwellings in-place with this “lunarcrete” would be faster, cheaper, and easier than building a comparable structure on Earth and transporting it to the lunar surface.

Now, thanks to recent research performed aboard the International Space Station, we have a much better idea of what to expect when those first batches of locally-sourced concrete are mixed up on the Moon or Mars. Of course, like most things related to spaceflight, the reality has proved to be a bit more complex than expected.

Continue reading “Off-World Cement Tested For The First Time”

How To Build A Small Metal Furnace At Home

Casting is a great way to make your own custom metal parts. However, casting requires some manner of furnace capable of generating high enough temperatures to melt the metal in question. Few of us have these just lying around, but never fear. It’s possible to build a basic gas-powered furnace at home, with commonly available materials (Youtube link, embedded below).

This furnace is the work of [Ahmed Ghr], and is as simple a build as they come. The idea is to produce a mold in which to cast concrete to create the furnace. A steel bucket is cut up and used as the outside of the mold, with a pipe inserted in the base to act as a feeder for air and gas. A plastic bucket is then inserted within the steel bucket and held in place with spacers, to create the inner combustion cavity. Concrete is poured in and allowed to set. Once finished, the steel bucket is cut away, and a fire is built over the furnace to melt away the plastic inside. Similar techniques are used to produce the lid, and the furnace is completed.

It’s a build that is executed with the most basic of tools, and should serve as a capable furnace for lower melting point metals at the very least. We’ve seen a lot of cement projects lately, as it turns out. Video after the break.

Continue reading “How To Build A Small Metal Furnace At Home”

Cement Shelves Double As USB Hub

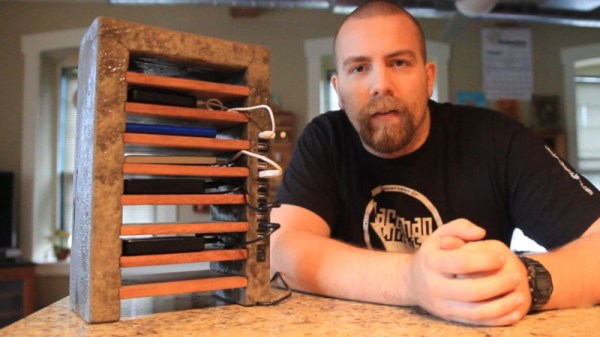
Some of us are able to get by in life with somewhere between 0 and 1 USB ports. We typically refer to these people as “Mac users”. For the rest of us, too much is never enough, and we find ourselves seeking out expansion cards and hubs and all manner of perverse adapters and dongles. [JackmanWorks] was a man who found himself in need of more connectivity, so he built this beautiful shelf with an integrated 12-port hub.

Material choice is key here, with this build looking resplendent in mahogany and cement. As the core of the build, the USB hub is first disassembled and sealed up to prevent damage from the cement. Hot glue is used to protect the PCB, while electrical tape helps cover the individual ports. The cement is then poured into a form which creates the overarching structure for the shelf, with the USB hub being cast in place. With the cement cured, mahogany boards are then cut and waxed, before installation into the structure. These form the individual shelves which hold phones, hard drives and other USB accessories.

The shelf was designed so that the entire structure is supported through the bottom shelf, which then sits on top of the desktop computer case. It’s an attractive piece, and the weight of the cement construction makes it pleasantly stable in use. It’s rare, but we do occasionally see shelf hacks around these parts. Video after the break.

Continue reading “Cement Shelves Double As USB Hub”

Replicating A Victorian Era Console

[Dt99jay] lives in a historic Victorian-era district in the UK.  Most homes in the area have ornate exterior window dressings with stone consoles holding up heavy stone hood molding.

The window hood molding turned out to be wood — most likely the result of damage repaired after the blitzkrieg bombings of WWII. The 1940’s era work is now rotting away, so it was time for a repair. When the hood was pulled away from the window, disaster struck. One console completely crumbled, while the other lost large chunks of material. The They weren’t solid stone after all, but replacements most likely molded with Coade stone.

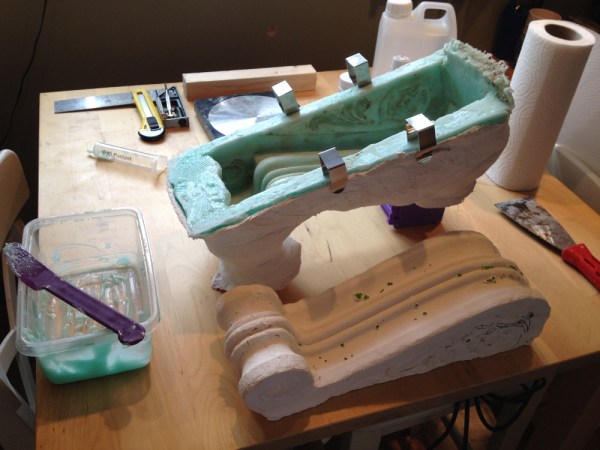
There are no ready replacements for consoles like this. [dt99jay] couldn’t just swap them out for modern looking replacements, so he set about replicating the consoles. The remaining console was much too delicate to remove from the building, so [dt99jay] glued the missing pieces back on. He then filled any missing parts and carefully scraped way all the loose paint. Then came the difficult part — making a mold while the console was still mounted on the house.

Room Temperature Vulcanizing (RTV) silicone rubber was carefully applied to the console. The RTV is thick enough to stay on while it dries. After several thick layers of RTV, the console was covered. [Dt99jay] then covered the mold with plaster of Paris bandages to support it. The finished mold was carefully removed from the house, and [dt99jay] filled all the low spots and air bubbles with RTV.

New castings were made using a mixture of cement and playground sand. Once painted, the results matched perfectly. The historic conservation committee was pleased, and the window was once again structurally sound.

Touch Sensitive Cement With Just A Dash Of Neon

For quite some time now we’ve seen people casting their own countertops and other surfaces out of cement. It’s a combination of mold-making and surface finishing that produces a smooth and durable surface at quite a low cost, if you don’t factor in damage done to your back when lifting the thing for installation.

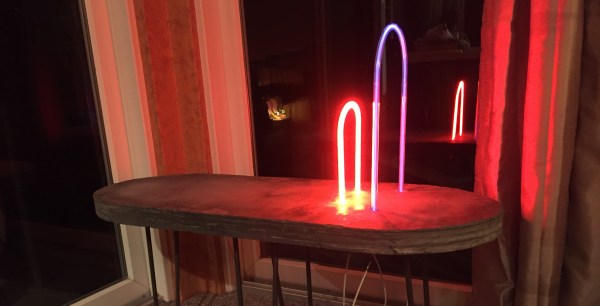
This offering is a little bit different. [Elliott Spelman] built his own touch sensitive cement table top. When you place your grubby hands on the polished surface, a loop of neon lighting is switched on. This is thanks to a 4:1 mix of quick setting cement and iron oxide powder. Bare copper wire was laid around the edges of the surface to be encased by the cement for making connections later.

There were some sad moments when [Elliott] was removing the cast surface from the mold. He ended up cracking it and suggests others be liberal with their use of both wax on the mold before casting, and patience in removing the cement afterward. We might also suggest a strengthening agent like fiber reinforcement. The edges and surface can be sanded to the finish desired and in this case, attaching table legs was easy since the wooden underside of the mold remains on the bottom of the cement.

The neon lighting adds a retro touch to this build. It’s sad to see this technology dying away, so a resurgence of artisanal neon is great in our book. [Elliott] found a Bay Area arts collective called the Crucible which does a lot of art glass education to help him make two hoops of glass tube and fill them with the appropriate gasses. A capacitive touch sensor (once Atmel, now Microchip part) AT42QT2120 (datasheet) monitors the wire coming from the slab and switches the power supply for the tubes using a combination of relay board and Arduino Uno.

We find the prospect of positional sensing in doped cement fascinating. Anyone have ideas for adapting this technique so that a more long and narrow slab could have positional awareness within, say, a few inches? Let us know in the comments.

Continue reading “Touch Sensitive Cement With Just A Dash Of Neon”

Thwomp Drops Brick On Retro Gaming

[Geeksmithing] wanted to respond to a challenge to build a USB hub using cement. Being a fan of Mario Brothers, a fitting homage is to build a retro-gaming console from cement to look just like your favorite Mario-crushing foe. With a Raspberry Pi Zero and a USB hub embedded in it, [Geeksmithing] brought the Mario universe character that’s a large cement block — the Thwomp — to life.

[Geeksmithing] went through five iterations before he arrived at one that worked properly. Initially, he tried using a 3D printed mold; the cement stuck to the plastic ruining the cement on the face. He then switched to using a mold in liquid rubber (after printing out a positive model of the Thwomp to use when creating the mold). But the foam board frame for the mold didn’t hold, so [Geeksmithing] added some wood to stabilize things. Unfortunately, the rubber stuck to both the foam board and the 3D model making it extremely difficult to get the model out.

Like [Han] in carbonite, that's a Rapsberry Pi Zero being encased in cement
Like [Han] in carbonite, that’s a Raspberry Pi Zero being encased in cement
Next up was regular silicone mold material. He didn’t have enough silicone rubber to cover the model, so he added some wood as filler to raise the level of the liquid. He also flipped the model over so that he’d at least get the face detail. He found some other silicone and used it to fill in the rest of the mold. Despite the different silicone, this mold worked. The duct tape he used to waterproof the Raspberry Pi, however, didn’t. He tried again, this time he used hot glue – a lot of hot glue! – to waterproof the Pi. This cast was better, and he was able to fire up the Pi, but after a couple of games his controller stopped working. He cracked open the cement to look at the Pi and realized that a small hole in the hot glue caused a leak that shorted out the USB port on the Pi. One last time, he thought, this time he used liquid electrical tape to waterproof the Pi.

The final casting worked and after painting, [Geeksmithing] had a finished cement Thwomp console that would play retro games. He missed the deadline for the USB Hub Challenge, but it’s still a great looking console, and his video has a lot of detail about what went wrong (and right) during his builds. There’s a great playlist on YouTube of the other entries in the challenge, check them out along with [Geeksmithing]’s video below!

Continue reading “Thwomp Drops Brick On Retro Gaming”

Impressive Custom Built Blacksmith’s Forge

[EssentialCraftsman] is relatively new to YouTube, but he’s already put out some impressive videos. We really enjoyed an episode dedicated to a fixture in his shop, his large custom blacksmith’s forge.

The forge is a custom cast vault of refractory that sits on a platter of fire bricks suspended on a heavy-duty rotating frame. Two forced air natural gas burner provide the heat.  The frame is plasma CNC cut steel welded together.

A lot of technical challenges had to be solved. How does one hold a couple hundred pound piece of refractory in such a way that it can be lifted, especially when any steel parts exposed to the heat of the forge would become plastic and fail? When the forge turns off, how do you keep the hot air in the forge from rising into the blowers and melting them? There were many more.

We were really impressed by the polished final appearance of the forge, and the cleverness of its design. Everything is well thought out, and you can even increase the height of the forge by propping it up on more fire bricks. We hope [EssentialCraftsman] will continue to produce such high quality videos. We also enjoyed his episode on Anvils as well as a weirdly informative tirade on which shape of stake (round or square) to use when laying out concrete jobs. Videos after the break.

Continue reading “Impressive Custom Built Blacksmith’s Forge”