Building A Discrete 14-Bit String DAC

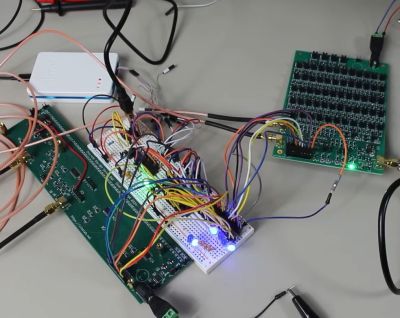
The discrete 14-bit DAC under test. (Credit: Sine Lab, YouTube)

How easy is it to build your own Digital to Analog Converter (DAC)? Although you can readily purchase a wide variety of DACs these days, building your own can be very instructive, as the [Sine Lab] on YouTube explores in a recent video with the construction of a discrete 14-bit DAC. First there are the different architectures you can pick for a DAC, which range from R-2R (resistor ladder) to delta-sigma versions, each having its own level of complexity and providing different response times, accuracy and other characteristics.

The architecture that the [Sine Lab] picked was a String DAC with interpolator. The String type DAC has the advantage of having inherently monotonic output voltage and better switching-induced glitch performance than the R-2R DAC. At its core it still uses resistors and switches (transistors), with the latter summing up the input digital value. This makes adding more bits to the DAC as easy as adding more of these same resistors and switches, the only question is how many. In the case of a String DAC that’d be 2N, which implies that you want to use multiple strings, as in the above graphic.

Scaling this up to 16-bit would thus entail 65,536 resistors/switches in the naive approach, or with 2 8-bit strings 513 switches, 512 resistors and 2 buffers. In the actual design in the video both MOSFETs and 74HCT4051 multiplexers were used, which also necessitated creating two buses per string to help with the input decoding. This is the part where things get serious in the video, but the reasoning for each change and addition is explained clearly as the full 6-bit DAC with interpolator is being designed and built.

One big issue with discrete DACs comes when you have to find matching MOSFETs and similar, which is where LSI DACs are generally significantly more precise. Even so, this discrete design came pretty close to a commercial offering, which is pretty impressive.

Continue reading “Building A Discrete 14-Bit String DAC”

A business card-sized synthesizer with capacitive touch pads.

2024 Business Card Challenge: The Gift Of Music

Has anyone ever told you that you just can’t carry a tune? If you were to be the lucky recipient of one of [Ayu]’s synthesizer business cards, well, then it really couldn’t be helped.

This tiny, go-anywhere instrument has quite a lot going for it. It’s easy for anyone to pick up and play something, but versatile enough that a more experienced musician can add complexity. While we do tend to see twelve keys in a small form-factor like this, the Canta-Cart uses them a bit differently. Only ten are tied to notes, and the other two are for transposition.

[Ayu] was able to keep the BOM cost way down by using the PY32, which is an ARM Cortex-M microcontroller made by Puya that costs as little as 10¢ each. In fact, the whole BOM clocks in around 60¢ total even with the audio DAC and amplifier ICs, which really makes these ideal to actually give away to people. Check it out in action after the break, or try it in the browser!

Continue reading “2024 Business Card Challenge: The Gift Of Music”

Tiny Tapeout 4: A PWM Clone Of Covox Speech Thing

Tiny Tapout is an interesting project, leveraging the power of cloud computing and collaborative purchasing to make the mysterious art of IC design more accessible for hardware hackers. [Yeo Kheng Meng] is one such hacker, and they have produced their very first custom IC for use with their retrocomputing efforts. As they lament, they left it a little late for the shuttle run submission deadline, so they came up with a very simple project with the equivalent behaviour of the Covox Speech Thing, which is just a basic R-2R ladder DAC hanging from a PC parallel port.

The computed gate-level routing of the ASIC layout

The plan was to capture an 8-bit input bus and compare it against a free-running counter. If the input value is larger than the counter, the output goes high; otherwise, it goes low. This produces a PWM waveform representing the input value. Following the digital output with an RC low-pass filter will generate an analogue representation. It’s all very simple stuff. A few details to contend with are specific to Tiny Tapout, such as taking note of the enable and global resets. These are passed down from the chip-level wrapper to indicate when your design has control of the physical IOs and is selected for operation. [Yeo] noticed that the GitHub post-synthesis simulation failed due to not taking note of the reset condition and initialising those pesky flip-flops.

After throwing the design down onto a Mimas A7 Artix 7 FPGA board for a quick test, data sent from a parallel port-connected PC popped out as a PWM waveform as expected, and some test audio could be played. Whilst it may be true that you don’t have to prototype on an FPGA, and some would argue that it’s a lot of extra effort for many cases, without a good quality graphical simulation and robust testbench, you’re practically working blind. And that’s not how working chips get made.

If you want to read into Tiny Tapeout some more, then we’ve a quick guide for that. Or, perhaps hear it direct from the team instead?

Continue reading “Tiny Tapeout 4: A PWM Clone Of Covox Speech Thing”

A Brief Look Inside A Homebrew Digital Sampler From 1979

While we generally prefer to bring our readers as much information about a project as possible, sometimes we just have to go with what we see. That generally happens with new projects and work in progress, but it can also happen with old projects. Sometimes very old indeed, as is the case with this digital sampling unit for analog oscilloscopes, circa 1979.

We’ve got precious little to go on with this one other than the bit of eye candy in the video tour below and its description. Luckily, we’ve had a few private conversations with its maker, [Mitsuru Yamada], over the years, enough to piece together a little of the back story here — with apologies for any wrong assumptions, of course.

Built when he was only 19, this sampler was an attempt to build something that couldn’t be bought, at least not for a reasonable price. With no inexpensive monolithic analog-to-digital converters on the market, he decided to roll his own. A few years back he recreated the core of that with his all-discrete successive approximation ADC.

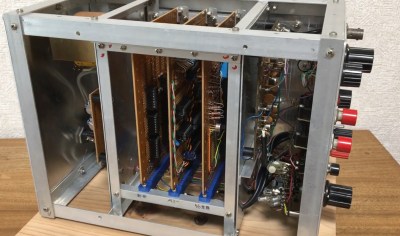
The sampler shown below has an 8-bit SAR ADC using discrete CMOS logic and enough NMOS memory to store 256 samples. You can see the ADC and memory cards in the homebrew card cage made from aluminum angle stock. The front panel has a ton of controls and sports a wide-range attenuator, DC offset, and trigger circuit with both manual and automatic settings.

It’s an impressive build, especially for a 19-year-old with presumably limited resources. We’ve reached out to [Yamada-san] in the hope that he’ll be able to provide more details on what’s under the hood and if this still works after all these years. We’ll pass along whatever we get, but in the meantime, enjoy.

Continue reading “A Brief Look Inside A Homebrew Digital Sampler From 1979”

2024 Business Card Challenge: BAUDI/O For The Audio Hacker

[Simon B] enters our 2024 Business Card Challenge with BAUDI/O, a genuinely useful audio output device. The device is based around the PCM2706 DAC, which handles all the USB interfacing and audio stack for you, needing only a reference crystal and the usual sprinkling of passives. This isn’t just a DAC board, though; it’s more of an audio experimentation tool with two microcontrollers to play with.

The first ATTiny AT1614 is hooked up to a simple LED vu-meter, and the second is connected to the onboard AD5252 digipot, which together allows one to custom program the response to the digital inputs to suit the user. The power supply is taken from the USB connection. A pair of ganged LM2663 charge-pump inverters allow inversion of the 5V rail to provide the necessary -5 V for the output amplifiers.  This is then fed to the LM4562-based CMoy-type headphone amplifier.  This design has a few extra stages, so with a bit of soldering, you can adjust the output filtering to suit. An LM1117 derives 3.3 V from the USB input to provide another power rail,  mostly for the DAC.

There’s not much more to say other than this is a nice, clean audio design, with everything broken out so you can tinker with it and get exactly the audio experience you want.

Wozamp Turns Apple II Into Music Player

Besides obvious technological advancements, early computers built by Apple differed in a major way from their modern analogs. Rather than relying on planned obsolescence as a business model, computers like the Apple II were designed to be upgradable and long-term devices users would own for a substantially longer time than an iPhone or Macbook. With the right hardware they can even be used in the modern era as this project demonstrates by turning one into a music player.

The requirements for this build are fairly short; an Apple II with a serial card and a piece of software called surl-server which is a proxy that allows older computers to communicate over modern networks. In this case it handles transcoding and resampling with the help of a Raspberry Pi 3. With that all set up, the media player can play audio files in an FTP network share or an online web radio station. It can also display album art on the Apple II monitor and includes a VU meter that is active during playback.

Although the 11.52 kHz sampling rate and 5-bit DAC may not meet the stringent requirements of audiophile critics, it’s an impressive build for a machine of this era. In fact, the Apple II has a vibrant community still active in the retrocomputing world, with plenty of projects built for it including others related to its unique audio capabilities. And if you don’t have an original Apple II you can always get by with an FPGA instead.

A render of the Melodio Self Mate music player with it's front plate removed. It's a grey device with a small screen and navigation wheel, similar to a chunky iPod. It has an IR blaster LED in the top and various exposed screw holes letting everyone know that this is a device you can open.

Melodio Self Mate

While the proliferation of the smartphone has caused the personal music player (PMP) market to mostly evaporate, there are still those who prefer a standalone device for their music. The Melodio Self-Mate is one such spiritual successor to the iPod.

Music-only devices really benefit from the wheel interface pioneered by Apple, so we still see it in many of the new Open Source PMPs including this one and the Tangara. The Melodio uses the ubiquitous ESP32 for its brains coupled with a TI PCM5102A DAC and TI TPA6130A2 headphone amp for audio. A slider on the side of the device allows you to switch it between mass storage mode and programming mode for the ESP32.

Since this device packs a little more horsepower and connectivity than the original iPods, things like listening to Spotify are doable once assembled, instead of having to completely rebuild the device. Speaking of building, there are only renders on the GitHub, so we’re not sure if this project has made the jump IRL yet. With more people concerned about the distractions of smartphones, maybe this renaissance of open PMPs will lead to a new golden age of music on the go?

Miss the halcyon days of the iPod? They’re easier to hack now than ever, and if you really want to go old school, how about a podcast on a floppy?