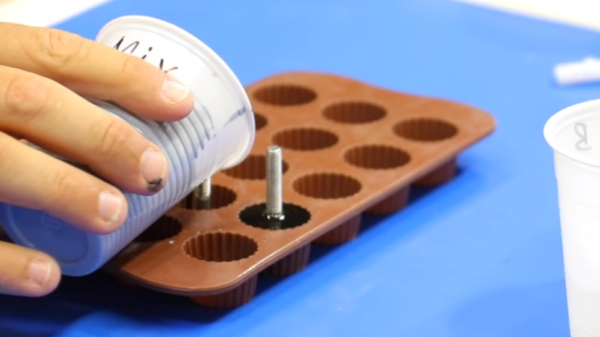
Robot Car Follows Wherever You Go

Having a pet can really make a difference to your happiness at the end of the day, but they’re also a lot of work. This project by [Ioannis Stoltidis] does something similar — minus all the responsibility. The Smart Car Follower Project is designed to track people using Bluetooth and IR and follow them around from room to room.

Submitted as part of a Master’s thesis, this project hacks a toy car and uses a key chain transmitter that sends the tracking signals. A Raspberry Pi 3 combines the Bluetooth RSSI and IR signals to make create an estimate of the position of the beacon. Arduinos facilitate the IR signaling as well as the motor control allowing the robot to chase the user around like a puppy. The whole thing also comes with obstacle avoidance using ultrasonic sensors on all sides which are good if you have a lot of furniture in the house.

You can also choose to go manual-mode and drive it around the block using a PC and gamepad. A webcam connected to the onboard computer allows a first person view of the vehicle by sending the video feed over wifi to a PC application. OpenCV is used to create the final GUI which allows you to see and control the project remotely. The source code is available for download for anyone who wants to replicate the project. Check out the video of it in action below.

Continue reading “Robot Car Follows Wherever You Go”

3D Printed Math Grenade

Calculator hacks are fun and educational and an awesome way to show-off how 1337 your skills are. [Marcus Wu] is a maker who likes 3D printing and his Jumbo Curta Mechanical Calculator is a project from a different era. For those who are unfamiliar with the Curta, it is a mechanical calculator that was the brainchild of Curt Herzstark of Austria from the 1930s. The most interesting things about the design were the compactness and the complexity which baffled its first owners.

The contraption has setting sliders for input digits on the side of the main cylindrical body. A crank at the top of the device allows for operations such as addition and subtraction with multiplication and division requiring a series of additional carriage shift operations. The result appears at the top of the device after each crank rotation that performs the desired mathematical operation. And though all this may seem cumbersome, the original device fit comfortably in one hand which consequently gave it the nick name ‘Math Grenade’.

[Marcus Wu] has shared all the 3D printable parts on Thingiverse for you to make your own and you should really take a look at the video below for a quick demo of the final device. There is also a detailed set of images (82 or so) here that present all the parts to be printed. This project will test your patience but the result is sure to impress your friends. For those looking to dip your toes in big printed machines, check out these Big Slew Bearings for some inspiration.

Make Some Noise With The Typewriter Keyboard

Are you an angry programmer? Do you get the frequent urge to smash the return key or space bar after finishing every single line of code? Well then [Konstantin Schauwecker]’s typewriter keyboard is just the thing for you. In his project, [Konstantin] hacked a German Olympia Monica typewriter into a USB keyboard.

The project uses no less than 50 photo interrupters mounted on a custom PCB that mounts directly under the typewriter itself. The circuit board is so designed that the hammer arms take a position in obstructing the opto-interrupters. Every time a key is pressed, the corresponding device sends a signal to an Arduino.

In order to enable the wiring of 50 signals to an Arduino Leonardo, multiplexers and decoders are employed. CD4515, 4×16 line decoders work to activate the optical signals and the CD4067, 16×4 multiplexers are used to return the scans. This forms the traditional scanning keyboard matrix and the whole thing is managed in the Arduino code (available as a zip file).

This project can be a great starting point for anyone who wants to hack their grandpa’s old typewriter or make one in order to annoy the guy sitting next to them. Check out the video below for a demo and teardown and if you prefer Raspberry Pis then check out this mechanical typewriter hack.

Improved Game Tokens With Laser Cutting And Clever Design

[Martin Raynsford] is a prolific project maker, especially when it comes to using a laser cutter. These laser-cut token counters for the board game Tigris & Euphrates demonstrate some clever design, and show that some simple touches can make a big difference.

In the digital version of the game, the tokens conveniently display a number representing their total power value. [Martin] liked this feature, and set out to design a replacement token for the tabletop version that could display a number while still keeping the aesthetic of the originals. The tokens were designed as a dial with a small cutout window to show a number, but the surface of the token showing color and icon is still mostly unchanged.

Magnets hold the top and bottom together, and because of the small size of the assembly, no detents are needed. Friction is enough to keep things from moving unintentionally. The second noteworthy design feature is the material for the top layer of the token. This layer is made from 0.8 mm birch plywood; a nice and thin top layer means a wider viewing angle because the number is nearer to the surface. If the top layer were thicker, the number would be recessed and harder to see.

[Martin] made the design file available should anyone wish to try it out. No stranger to games, he even once game-ified the laser itself, turning it into a physical version of Space Invaders. Be sure to check it out!


Hackaday Prize Entry: DIY DLP

The 3D printing revolution is upon us and the technologies associated with these machines is evolving every day. Stereolithography or SLA printers are becoming the go-to printer for high-resolution prints that just can’t be fabricated on a filament-based machine. ADAM DLP 3D printer project is [adambrx]’s entry into the Hackaday Prize and the first step in his quest for higher quality prints on a DIY budget.

[adambrx]’s current iteration employs a Raspberry Pi 3 and a UV DLP Projector, all enclosed in a custom frame assembly. The logs show the evolution of the printer from an Acer DLP to the current UV DLP Light Engine. The results are quite impressive for a DIY project, and [adambrx] has put up images of 50-micrometer pillars and some nifty other prints which show the amount of work that has been put into the project.

It is safe to say that [adambrax] has outspent the average entry to the Hackaday Prize with over €5000 spent in around 3 years. Can [adambrx] can keep this one true to its DIY roots is yet to be seen, however, it is clear that this project has potential. We would love to see a high-resolution SLA printer that does not cost and arm and a leg.

Wooden Laptop Enclosure: New Life For Old Thinkpad

Technology is designed to serve us and make our lives better. When a device gets outdated, it is either disposed of or is buried in a pile of junk never to be seen again. However, some individuals tend to develop a certain respect for their mechanical servants and make an effort to preserve them long after they have become redundant.

My relationship with my first laptop is a shining example of how to hold onto beloved hardware way too long. I converted that laptop into a desktop with a number of serious modifications which helped me learn about woodworking along the way. Maybe it’s more pragmatic to just buy new equipment. But you spend so much time each day using your devices. It is incredibly satisfying to have a personal connection that comes from pouring your own craftsmanship into them.

Why the Effort?

IBM Thinkpad R60 via Notebook Review

The laptop in question is an IBM R60 which I lugged around during the first three years after I graduated. It was my companion during some tough times and naturally, I developed a certain attachment to it. With time its peripherals failed including the keyboard which housed the power switch and it was decided that the cost of repair would outweigh its usefulness.

Then came the faithful day when I was inspired to make something with the scrap wood that had accumulated in my workshop. This would be my second woodworking project ever and I did not have the professional heavy machinery advertised in most YouTube videos. Yet I had two targets in mind with this project.

  1. Make the R60 useful again.
  2. Learn about woodworking for creating enclosures for future projects.

Armed with mostly hand tools, a drill and a grinder that was fitted with a saw blade, I started with the IBM R60 to all-in-one PC mod. Following is a log of things I did and those I regret not doing a.k.a. lessons learned. Read on.

Continue reading “Wooden Laptop Enclosure: New Life For Old Thinkpad”

Interfacing A Retro Controller Using The USBASP

An ISP dongle is a very common piece of equipment on a maker’s bench. However, its potential as a hackable device is generally overlooked. The USBASP has an ATmeg8L at its heart and [Robson] decided that this humble USB device could be used as an interface between his PC and a SNES Joypad.

A SNES controller required three pins to communicate with a host: clock, data and latch. In his hack, [Robson]  connects the controller to the ISP interface using a small DIY adaptor and programs the AVR using the V-USB library. V-USB is a software USB library for small microcontrollers and comes in pretty handy in this instance.

[Robson] does a pretty good job of documenting the entire process of creating the interface which includes the USB HID code as well as the SNES joypad serial protocol. His hack works on both Windows and Linux alike and the code is available on GitHub for download.

Simple implementation like this project are a great starting point for anyone looking to dip their toes in the DIY USB device pool. Veterans may find a complete DIY joystick more up their alley and will be inspired by some plastic techniques as well.