Never Miss A Doorbell With This Notifier

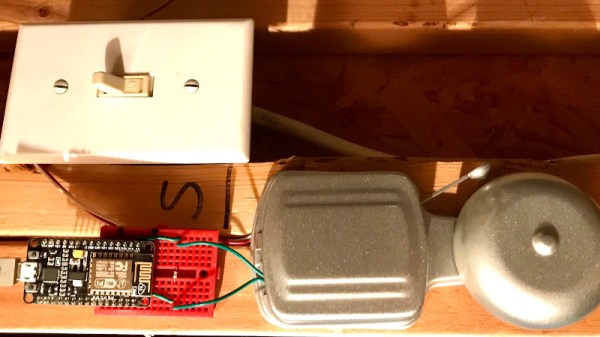
[PatH] tells us that he tragically missed a craft beer delivery to his home, and vowed never to let this happen again. His problem was that he’d missed the doorbell, resulting in one of those annoying notes from the delivery guy. His solution? An ESP8266-driven doorbell detector, that both sends him an SMS and records each doorbell press to a Google Sheet.

The doorbell detection is surprising but simple and non-intrusive, instead of running a GPIO line through some kind of interface to the button itself he’s added a reed switch to his ESP8266 board and used that to detect the magnetic field of the bell solenoids. It’s a convenient method, but one that only works with an old-style bell.

When the bell rings the magnetic field triggers the reed switch, and in turn the sketch running on the ESP calls out to IFTTT which triggers both an SMS and a write to a Google Sheets document that records each doorbell activation.

The ESP8266 seems to be a popular choice with doorbell automatprs probably because of its built-in networking and low price, but it’s not the only option. This optocoupler-sensed effort for example uses a Particle Xenon.

In Soviet Russia, Doorbell Rings You

We can imagine that the origin of the doorbell is truly ancient. if you lived in a cave, you probably had a stick and a rock nearby for people to get your attention without invading your cave. In 1817 a Scot named William Murdoch had a bell in the house that visitors rang via a compressed air system, but the electric doorbell had to wait until 1831. Since then, little has changed with the basic idea. [Erientes] — who lives in the Netherlands, not Russia — wanted a smarter doorbell. In particular, he’s read about older people being victimized by people who ring the doorbell for entry. So [Erientes] used a Raspberry Pi to make a doorbell that supports facial recognition.

The exercise is really more of an operations challenge than a technical one thanks to a high-quality Python library for face recognition powered by DLib. However, we did like the user interface aimed at non-technical users. The metaphor is a traffic light in which a red light means do not allow entry. The lights are buttons, so you can use them to whitelist or blacklist a particular person.

Continue reading “In Soviet Russia, Doorbell Rings You”

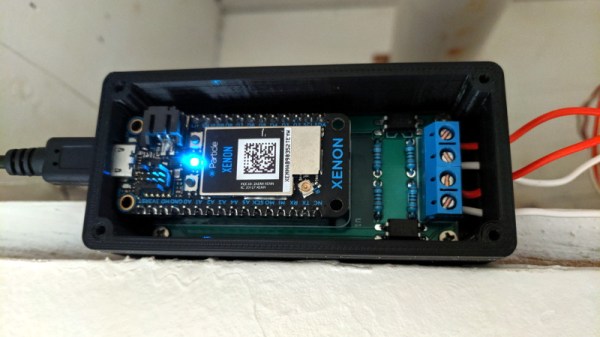
An Optocoupler Doorbell Notifier

Over the years we’ve seen several attempts at adding Internet connectivity to the lowly wired doorbell. Generally, these projects aim to piggyback on the existing wiring, bells, and buttons rather than replace them entirely. Which invariably means at some point the AC wiring is going to need to interface with a DC microcontroller. This is often where things get interesting, as it seems everyone has a different idea on how best to bridge these two systems.

That’s the point where [Ben Brooks] found himself not so long ago. While researching the best way to tap into the 20 VAC pumping through his doorbells, he found a forum post where somebody was experimenting with optocouplers. As is unfortunately so often the case, the forum thread never really had a conclusion, and it wasn’t clear if the original poster ever figured it out.

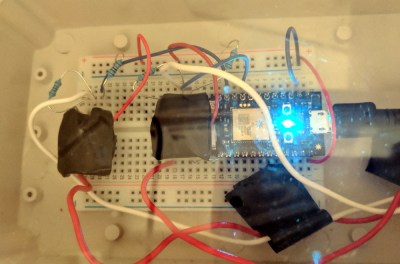
DIY optocouplers wrapped in electrical tape

[Ben] liked the idea though, so he thought he would give it a shot. But before investing in real optocouplers, he created his own DIY versions to use as a proof of concept. He put a standard LED and photoresistor together with a bit of black tape, and connected the LED to the doorbell line with a resistor. Running the LED on 60 Hz AC meant it was flickering rapidly, but for the purposes of detecting if there was voltage on the line, it worked perfectly.

Wanting something slightly more professional for the final product, [Ben] eventually evolved his proof of concept to include a pair of 4N35s, a custom PCB, and a 3D printed enclosure. Powered by a Particle Xenon, the device uses IFTTT to fire off smartphone notifications and blink the lights in the house whenever somebody pushes the bell.

If you’re still wondering why it’s so tricky to connect a microcontroller up to your door bell, a quick look at some of the similar projects we’ve covered should give you a pretty good idea of how annoying these systems can be to modernize.

Sniffed Transformer Puts Wired Doorbell Online

There’s certainly no shortage of “smart” gadgets out there that will provide you with a notification, or even a live audiovisual stream, whenever somebody is at your door. But as we’ve seen countless times before, not everyone is thrilled with the terms that most of these products operate under. Getting a notification on your phone when the pizza guy shows up shouldn’t require an email address, credit card number, or DNA sample.

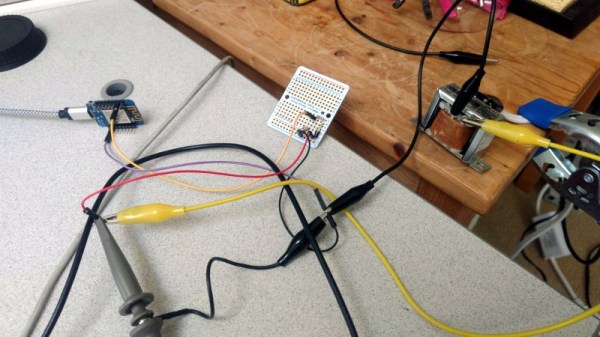
For [Nick Touran], half the work was already done. There was already a traditional wired doorbell in his home, he just had to come up with a minimally invasive way to link it with Home Assistant. He reasoned that he could tap into the low-voltage side of the doorbell transformer and watch for the telltale fluctuations that would indicate the bell was doing its thing. The ESP8266 has an ADC to measure voltage and WiFi to connect to Home Assistant, so it seemed like the perfect bridge between old and new.

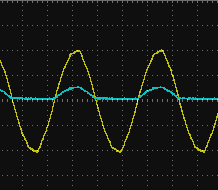
Transformer voltage before and after

Of course, as with any worthwhile project, it ended up being a bit more complicated. Wired doorbells generally operate on 16-24 VAC, and [Nick] knew if he tried to put his Wemos D1 across the line he’d release the critical Magic Smoke. What he needed was a voltage divider circuit that would take low-voltage AC and drop it to an even lower DC voltage that the microcontroller could cope with.

The simple circuit [Nick] comes up with cuts the voltage way down and removes the negative component completely. So what was originally 18.75 VAC turned into a series of 60 Hz blips at 2.4 VDC; perfect for feeding into a microcontroller ADC. With a baseline to work from, he could then write some code that would watch for variations in this signal to determine when the bell was ringing.

Or at least, that was the idea. While the setup worked well enough on the bench, its performance in the real-world left something to be desired. If his house guest had a heavy hand, it worked great. But a quick tap of the doorbell button would tend to go undetected. After investigating the issue, [Nick] found that he needed to use some software trickery to ensure the ESP8266 was able to keep up with the speedy signal. Once he was able to reliably detect short and long button presses, the rest was just a simple matter of sending an MQTT message to his automation system.

Compared to the hoops we’ve seen other hackers have to jump through to smarten up their doorbells, we think [Nick] got off fairly easy. This project is also an excellent example of how learning about circuit design and passive components can still come in handy in the Arduino Era.

Continue reading “Sniffed Transformer Puts Wired Doorbell Online”

Video Doorbell Focuses On Quality, Aesthetic

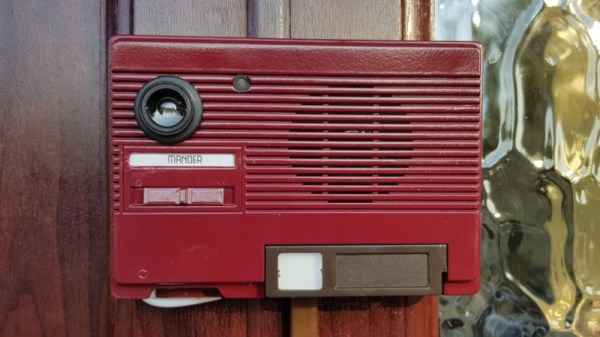
One of the most popular futurist tropes of the 20th century was the video intercom. Once this technology was ready, it would clearly become a mainstay of modern living overnight. Our lived reality is however somewhat different. For [MisterM], that simply wouldn’t do, so he set about producing a retro-themed video doorbell that is sure to be the envy of the neighbourhood.

Not one to settle for second best, [MisterM] wanted to focus on quality in video and sound. A Microsoft LifeCam 3000HD handles video and audio capture, with a Raspberry Pi 3B+ providing plenty of grunt to run the show. The Pimoroni pHAT BEAT add-on provides audio output. It’s all integrated into a 1980s vintage intercom, which is painted a deep shade of maroon for an extra classy look. Further parts are integrated into a classic Sony tape deck, with LEDs shining out from under the cassette door for added visual appeal.

The doorbell works by making calls to Google Duo, which allows the user to answer the door from anywhere in the house, or indeed – anywhere with an Internet connection! [MisterM] reports this has already proved useful for communicating with couriers delivering packages to the house. There’s also a standard wireless doorbell and chime integrated into the unit which alerts those within the house in the usual way.

It’s a project that is both highly functional and looks particularly swish. Integrating new brains into old-school enclosures is a great way to give your project a cool look. These aircraft surplus clocks are a great example. Video after the break.

Continue reading “Video Doorbell Focuses On Quality, Aesthetic”

Building An ESP8266 Doorbell On Hard Mode

It certainly seems as though it should be an easy enough project; all [Miguel De Andrade] wanted was to receive a notification when somebody was pressing his doorbell, and thought it would be a good project to get his feet wet in the wonderful world of ESP8266 hacking. But as fate would have it, not everything went according to plan. In the end he got it sorted out, but it’s an interesting look at how even the “easy” projects can call the gremlins out of hiding.

Arguably, the problems started when [Miguel] picked up an ESP-01 module from a local electronics retailer. While the convenience of buying the hardware in a brick and mortar store can’t be overstated, it did mean he was stuck with a slightly more spartan experience compared to the more common ESP “development boards”. Programming it externally with a Teensy ended up not being much of an obstacle, but it did mean he was stuck with only two GPIO pins.

At any rate, with ESP in hand, the next step was figuring out how the existing bell and intercom system even worked. Unfortunately, after some experimentation [Miguel] found there was a bit more going on there than he’d hoped. According to his multimeter, the one line from the intercom sits at approximately 5 VDC when it’s open, and drops down to 2.5 VDC when pressed. If that wasn’t bad enough, picking up the handset to answer the intercom sent the voltage up to a microcontroller-killing 12 VDC. To complicate maters further, the supply line for the intercom was 23 VAC, so he’d need to rectify that somehow if he wanted to avoid a separate power supply for the ESP.
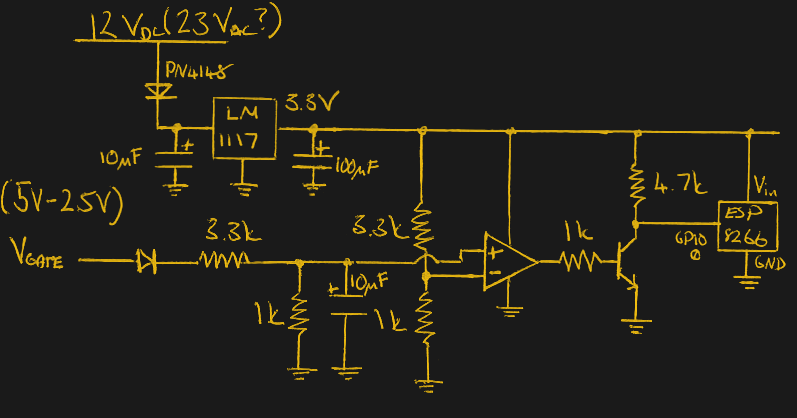
To turn this jumble of voltages into a nice clean 0 – 3.3 V signal for the ESP8266, he came up with a circuit based around the LM358 comparator that utilizes an LM117 regulator to power itself and the ESP at the same time. A couple of diodes are there to block the AC component from causing trouble, and an A2N2222A transistor is used as a buffer amplifier to boost the output of the comparator so it registers as a digital HIGH on the ESP. The circuit took a bit of fiddling to get sorted out, but in the end [Miguel] says it seems to get the job done.

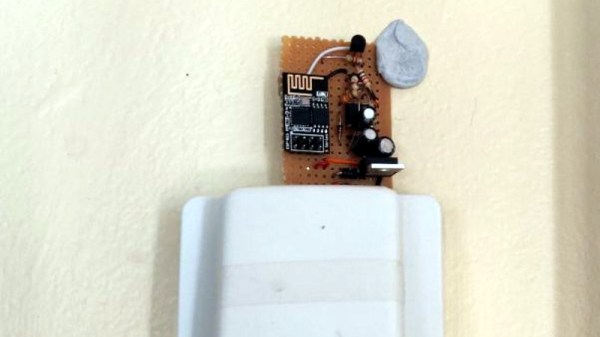
You might think the problems were solved, but this is where it gets really annoying. The system would work fine for awhile, and then inexplicably go silent. In diagnosing the problem he realized that his circuit connected to GPIO_0 was inadvertently putting the ESP8266 into programming mode, since it was holding the pin LOW unless the intercom button was pressed. He assumed he could just move the circuit to the other GPIO pin, but as that one has the board’s LED on it, that caused its own problems. For now, [Miguel] hasn’t come up with a solution to this issue, and has learned to live with the fact that the system won’t come back up cleanly should it lose power for any reason.

If you’re looking for a slightly classier look than a scrap of perfboard stuck on the wall with what appears to be chewing gum, we’ve also seen the ESP8266 used in some more ornate doorbell setups. Of course if you still haven’t gotten your head wrapped around the whole Internet-connected button thing, you can always start with something a little easier.

Wireless Doorbell Hacked Into Hands-on MQTT Tutorial

The project itself is very simple: getting push notifications via MQTT when a wireless doorbell sounds. But as [Robin Reiter] points out, as the “Hello, world!” program is a time-honored tradition for coders new to a language, so too is his project very much the hardware embodiment of the same tradition. And the accompanying video build log below is a whirlwind tour that will get the first-timer off the ground and on the way to MQTT glory.

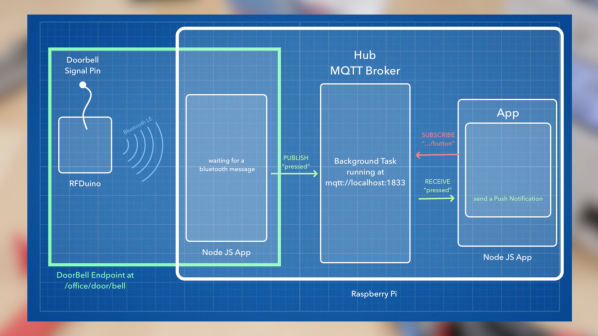
The hardware [Robin] chose for this primer is pretty basic – a wireless doorbell consisting of a battery-powered button and a plug-in receiver that tootles melodiously when you’ve got a visitor. [Robin] engages in a teardown of the receiver with attempted reverse engineering, but he wisely chose the path of least resistance and settled on monitoring the LEDs that flash when the button is pushed. An RFduino was selected from [Robin]’s ridiculously well-organized parts bin and wired up for the job. The ‘duino-fied doorbell talks Bluetooth to an MQTT broker on a Raspberry Pi, which also handles push notifications to his phone.

The meat of the build log, though, is the details of setting up MQTT. We’ve posted a lot about MQTT, including [Elliot Williams]’ great series on the subject. But this tutorial is very nuts and bolts, the kind of thing you can just follow along with, pause the video once in a while, and have a working system up and running quickly. There’s a lot here for the beginner, and even the old hands will pick up a tip or two.

Continue reading “Wireless Doorbell Hacked Into Hands-on MQTT Tutorial”